
- To install WSL on Windows 11, open PowerShell or Command Prompt (admin), run the “wsl –install” command, and restart the computer.
- The command will install WSL alongside the Ubuntu distribution.
- To install WSL with a specific distro, run the “wsl –install -d DISTRO-NAME” command.
- To install WSL from the Microsoft Store, enable the “Virtual Machine Platform” feature and then download the WSL app from the Store.
UPDATED 12/8/2023: On Windows 11, Microsoft simplified the installation process of the Windows Subsystem for Linux 2 (WSL) to only one command to download and install all the required components, which includes the virtual machine platform and Linux GUI apps and in this guide, I’ll teach you how to complete this process.
In addition, the command also installs the latest Ubuntu distro by default. If you prefer another Linux distribution, you can add an option to install any supported distributions in the command. Alongside the new quick and easy process, you will find another way to make it easier to update the kernel with only one command.
In this guide, I will teach you the easy steps to install the WSL platform on your computer. In addition, I will outline the steps to update the Linux kernel on Windows 11.
- Install WSL on Windows 11
- Install WSL with specific distro on Windows 11
- Install WSL from Microsoft Store
Install WSL on Windows 11
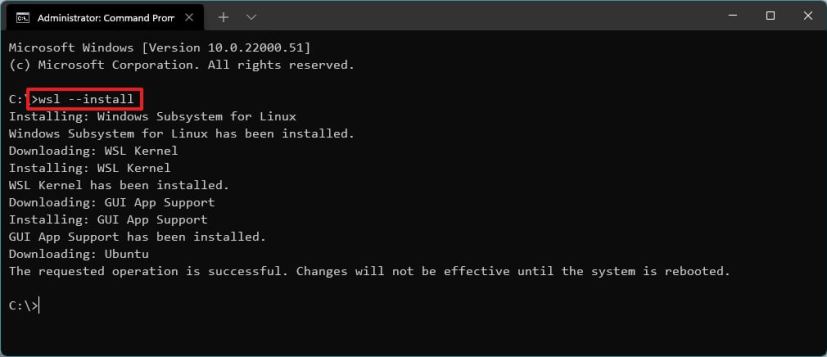
To install WSL (Windows Subsystem for Linux) on Windows 11 from Command Prompt, use these steps:
-
Open Start on Windows 11.
-
Search for Command Prompt (or PowerShell), right-click the top result, and select the Run as administrator option.
-
Type the following command to install the WSL on Windows 11 and press Enter:
wsl --install
-
Restart your computer to finish the WSL installation on Windows 11.
-
Continue with the Linux distro setup as necessary.
Once you complete the steps, the required Linux components will install automatically on Windows 11 and the latest version of the Ubuntu Linux distribution.
Update WSL kernel
To update the WSL kernel from Command Prompt on Windows 11, use these steps:
-
Open Start.
-
Search for Command Prompt, right-click the top result, and select the Run as administrator option.
-
Type the following command to update the WSL kernel on Windows 11 and press Enter:
wsl --update

After you complete the steps, if an update is available, it will download and install on your computer.
Install WSL with specific distro on Windows 11
To install WSL with a specific distro on Windows 11, use these steps:
-
Open Start.
-
Search for Command Prompt, right-click the top result, and select the Run as administrator option.
-
Type the following command to view a list of available WSL distros to install, and press Enter:
wsl --list --online
Quick note: You can install Ubuntu, Debian, Kali Linux, openSUSE, OracleLinux, and SUSE Linux Enterprise Server. -
Type the following command to install the WSL with a specific distro on Windows 11 and press Enter:
wsl --install -d DISTRO-NAME

In the command, remember to replace “DISTRO-NAME” with the name of the distro to install on the device, such as Debian.
-
Restart your computer to finish the WSL installation on Windows 11.
-
Continue with the Linux distro setup as necessary.
Once you complete the steps, the Windows Subsystem for Linux components will install along with the distro of Linux you specified.
Install WSL from Microsoft Store
You can also download all the components wrapped into an app from the Microsoft Store. The benefit of using this approach is that the feature will run isolated from Windows 11, and updates are available through the Microsoft Store without waiting for the next version of the operating system to install the newest version.
To install WSL from the Microsoft Store, use these three steps:
1. Enable Virtual Machine Platform
-
Open Start.
-
Search for Turn Windows Features on or off and click the top result to open the app.
-
Check the “Virtual Machine Platform” option.

-
Click the OK button.
-
Click the Restart button.
After completing the steps, you can proceed with the steps to download the app from the Microsoft Store.
2. Install Windows Subsystem for Linux app
-
Click the Get button.
-
Click the Open button.
-
Click the Get button again.

3. Install Linux distro
-
Open Microsoft Store app.
-
Search for the Linux distro—for example, Debian.
-
Click the Get button.

-
Click the Open button.
Once you complete the steps, WSL will install on Windows 11, including the support for Linux GUI apps and the Linux distribution.
Update December 8, 2023: This guide has been updated to ensure accuracy and reflect changes to the process.
Mauro Huculak is a Windows How-To Expert who started Pureinfotech in 2010 as an independent online publication. He has also been a Windows Central contributor for nearly a decade. Mauro has over 14 years of experience writing comprehensive guides and creating professional videos about Windows and software, including Android and Linux. Before becoming a technology writer, he was an IT administrator for seven years. In total, Mauro has over 20 years of combined experience in technology. Throughout his career, he achieved different professional certifications from Microsoft (MSCA), Cisco (CCNP), VMware (VCP), and CompTIA (A+ and Network+), and he has been recognized as a Microsoft MVP for many years. You can follow him on X (Twitter), YouTube, LinkedIn and About.me. Email him at [email protected].