
- To create a backup using wbAdmin with Command Prompt on Windows 10, use the “wbAdmin start backup -backupTarget:G: -include:C: -allCritical -quiet” command.
- To includes all the drives in the backup, use the “wbAdmin start backup -backupTarget:G: -include:C:,D:,F: -allCritical -quiet” command.
- Also, to save the backup in the network, use the “wbAdmin start backup -backupTarget:\\sharedFolder\folderName -user:username -password:userPassword -include:C: -allCritical -quiet” command.
UPDATED 10/22/2023: On Windows 10, it’s possible to create a full backup of your computer and files with Command Prompt using the wbAdmin tool, and in this tutorial, I’ll walk you through every step. In the event of hardware or system failure, viruses, or any other type of malware, a computer backup is an indispensable component of any recovery plan.
You can use third-party solutions (such as Macrium Reflect) or the system image backup tool. However, Windows 10 also has another tool known as “wbAdmin,” a command tool to backup and restore your entire computer using Command Prompt.
In this tutorial, I will teach you the steps to create a full backup of your computer using wbAdmin with Command Prompt on Windows 10.
Create a full backup using wbAdmin on Windows 10
To create a full backup on Windows 10 with the “wbAdmin” command, connect a USB drive with enough space and then use these steps:
-
Open Start on Windows 10.
-
Search for Command Prompt, right-click the top result, and select the Run as administrator option.
-
Type the following command to create a backup using wbAdmin and press Enter:
wbAdmin start backup -backupTarget:G: -include:C: -allCritical -quiet

In the command, change
Gin the-backupTargetflag with the drive letter for the storage you want to use for the backup. -
(Optional) Type the following command to create a backup that includes all the drives connected to the computer, and press Enter:
wbAdmin start backup -backupTarget:G: -include:C:,D:,F: -allCritical -quiet
In the command, replace the drive letters on the option
-include:C:,D:,F:with the letters that reflect the hard drives on your device. -
(Optional) Type the following command to create a backup to a shared network folder and press Enter:
wbAdmin start backup -backupTarget:\\sharedFolder\folderName -user:username -password:userPassword -include:C: -allCritical -quiet
In the command, replace the network path, username, and password with your information.
Once you complete the steps, the command will create a backup of Windows 10, settings, apps, and files on the external storage. The time to complete the process will vary depending on the data and other variables. The wbAdmin tool will save the image backup inside the “WindowsImageBackup” folder in the target drive.
wbAdmin backup commands explained
The wbAdmin start backup command starts a one-time backup on your computer. The -backupTarget:G: option tells wbAdmin where to save the image backup. In this case, I’m setting the command to save everything on the drive with the letter “D,” which may be different on your computer.
The -include:C: option tells the tool to make an image backup of the primary partition that stores the operating system, settings, apps, and your files.
Then, there’s the -allCritical option that includes all the values inside the hard drive, and the -quiet switch runs the entire backup without prompting the users for extra input.
Restore the computer from backup on Windows 10
To restore a backup created with the wbAdmin command tool, use these steps:
-
Open Settings.
-
Click on Update & Security.
-
Click on Recovery.
-
Under the “Advanced startup” section, click the Restart now button.
 Quick tip: If your device isn’t working correctly, you can use these steps to access Advanced startup settings on Windows 10.
 -
Click on Troubleshoot.

-
Click on Advanced options.

-
Click on System Image Recovery.

-
Select your account from the list after reboot.
-
Type your account password.
-
Click the Continue button.
-
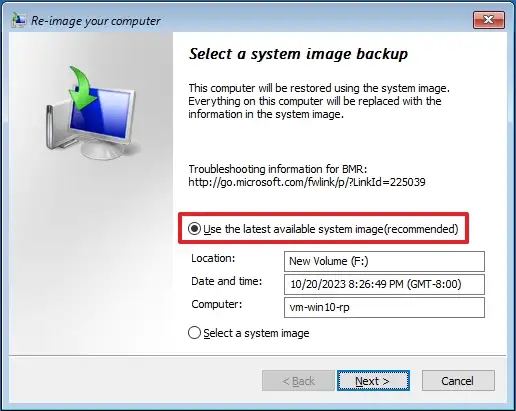
The latest system image backup will be selected automatically for recovery, but you can also use the “Select a system image” option to specify another backup.
-
Click the Next button.
-
Click the Next button again.

-
Click the Finish button.
After you complete the steps, the wizard will apply the full backup on the computer, restoring the Windows 10 installation, settings, apps, and files.
While it’s still possible to create a full backup on Windows 10, Microsoft is moving away from backup tools in favor of other solutions, such as OneDrive to protect your files and the “Reset this PC” feature to reinstall the operating system without losing your files.
One of the main reasons is that using a traditional backup only allows you to recover the system and files since the last backup that was created, making this approach outdated very fast, considering how fast new features and versions of Windows become available and how you are constantly updating your files.
However, a traditional full backup is still relevant as a recovery plan when updating to a new version of the operating system or making system changes to have a way to roll back in case something happens.
Update October 22, 2023: This tutorial has been updated for accuracy and reflects new changes.
Mauro Huculak is a Windows How-To Expert who started Pureinfotech in 2010 as an independent online publication. He has also been a Windows Central contributor for nearly a decade. Mauro has over 14 years of experience writing comprehensive guides and creating professional videos about Windows and software, including Android and Linux. Before becoming a technology writer, he was an IT administrator for seven years. In total, Mauro has over 20 years of combined experience in technology. Throughout his career, he achieved different professional certifications from Microsoft (MSCA), Cisco (CCNP), VMware (VCP), and CompTIA (A+ and Network+), and he has been recognized as a Microsoft MVP for many years. You can follow him on X (Twitter), YouTube, LinkedIn and About.me. Email him at [email protected].