
- You can still bypass the Microsoft Account and internet requirements during the Windows 11 OOBE using Registry tweaks, command prompts, domain-join tricks, or custom USB methods.
- Although Microsoft continues to block workarounds for creating a local account during initial setup, you still have several options to complete this configuration.
Microsoft continues to tighten its grip on the Windows 11 setup experience, blocking more unofficial ways to bypass the Microsoft account and internet requirements during the Out-of-Box Experience (OOBE). Several well-known tricks have already been removed or disabled, including command-based shortcuts that previously allowed users to create a local account.
The company argues these changes ensure devices are properly configured and fully connected from the start. However, for many users, this shift continues to raise concerns about privacy and control, especially for those who prefer to set up Windows 11 with a local account and minimal data sharing.
Despite these restrictions, not everything is locked down yet. After testing the latest builds, several methods still work to bypass the Microsoft account and internet requirements during setup. While the company is expected to close these gaps over time, they remain functional in current releases.
In this guide, I’ll outline the other seven methods that still work to bypass the online account and connection requirements for setting up Windows 11.
Bypass Microsoft Account methods still working on Windows 11
These are the unofficial methods (that I have tested) that are still working on Windows 11 versions 25H2 and 24H2.
- 1. BypassNRO through Registry configuration
- 2. JavaScript function to configure OOBE
- 3. Disable online account screens on OOBE
- 4. Domain join instead option on Windows 11 Pro OOBE
- 5. Create local account using Rufus
- 6. Create an unattended file for Windows 11
- FAQs about bypassing Microsoft account on Windows 11
1. BypassNRO through Registry configuration
Although you can no longer use the OOBE\BYPASSNRO command, you can still configure this workaround through the Registry.
To bypass the internet and Microsoft Account requirements on Windows 11, follow these steps:
-
Open Command Prompt using the “Shift + F10” keyboard shortcut on the region settings page.
-
Type the following command to modify the Registry to bypass the internet and Microsoft Account requirements, and press Enter:
reg add HKLM\SOFTWARE\Microsoft\Windows\CurrentVersion\OOBE /v BypassNRO /t REG_DWORD /d 1 /f

-
Type the following command to restart the computer and continue with the local account experience and press Enter:
shutdown /r /t 0
-
Turn off the Wi-Fi connection, unplug the Ethernet cable from the computer, or power off the router or access point temporarily to disconnect from the internet.
-
Select your region setting after the installation on the first page of the out-of-the-box experience (OOBE).

-
Click the Yes button.
-
Select your keyboard layout setting.

-
Click the Yes button.
-
Click the Skip button if you do not need to configure a second layout.
-
Click the “I don’t have internet” option.

-
Click the “Continue with limited setup” option.

-
Click the Accept button (if applicable).
-
Confirm the name of the local default account on Windows 11.
-
Click the Next button.
-
Create a password for the account.
-
Click the Next button.
-
Confirm the account password.
-
Click the Next button.
-
Select and complete the three security questions to recover the account.
-
Click the Next button.
-
Choose the privacy settings.

-
Click the Next button.
-
Click the Next button again.
-
Click the Accept button.
Once you complete the steps, Windows 11 will complete the setup process with the local account.
2. JavaScript function to configure OOBE
You can also use the command WinJS.Application.restart, which is a JavaScript function used in the Out-of-Box Experience (OOBE) setup process and is primarily built with web technologies.
To set up Windows 11 without a Microsoft account using the JavaScript option, follow these steps:
-
Open Command Prompt using the “Ctrl + Shift + J” keyboard shortcut to open the Developer Console.
-
Type the following command to launch the local account creation screen and press Enter:
WinJS.Application.restart("ms-cxh://LOCALONLY")
-
Press the “Escape” key, but if this action doesn’t close the console, click multiple times anywhere on the screen to dismiss it.
-
Confirm the name of the local default account on Windows 11.
 Quick tip: You can create an account without a password. However, if you choose to create a password, you will have to configure three security questions to recover your account if the password is lost.
 -
Click the Next button.
-
Choose the privacy settings.

-
Click the Next button.
-
Click the Next button again.
-
Click the Accept button.
After completing the steps, you will be taken directly to the Windows 11 desktop using a local account.
3. Disable online account screens on OOBE
You can also use the HideOnlineAccountScreens, which is a specific configuration option used in the operating system installation and deployment process.
To create a local account during the Windows 11 OOBE, follow these steps:
-
Open Command Prompt using the “Shift + F10” keyboard shortcut to open Command Prompt.
-
Type the following command to launch the local account creation screen and press Enter:
reg add HKLM\Software\Microsoft\Windows\CurrentVersion\OOBE /v HideOnlineAccountScreens /t REG_DWORD /d 1 /f
-
Close the Command Prompt console.
-
Restart the computer.
-
Choose your region setting.
-
Click the Yes button.
-
Select your keyboard layout setting.
-
Click the Yes button.
-
Click the Skip button if you do not need to configure a second layout.
-
Click the Next button.
-
Confirm the name of the local default account on Windows 11.
-
Click the Next button.
-
Create a password for the account.
-
Click the Next button.
-
Confirm the account password.
-
Click the Next button.
-
Select and complete the three security questions to recover the account.
-
Click the Next button.
-
Choose the privacy settings.
-
Click the Next button.
-
Click the Next button again.
-
Click the Accept button.
Once you complete the steps, the setup will complete the configuration, and you will be presented with the Windows 11 desktop.
4. Domain join instead option on Windows 11 Pro OOBE
If you’re setting up a Windows 11 Pro installation, you can also use the option to join the computer to a domain, which lets you bypass the Microsoft Account requirement and create a local account.
To install Windows 11 Pro without a Microsoft account but with a local account instead, follow these steps:
-
Press any key to continue.
-
Choose the installation language and format.

-
Click the Next button.
-
Choose the keyboard and input method.

-
Click the Next button.
-
Select the “Install Windows 11” option.

-
Check the “I agree everything” option to confirm that this process will delete everything on the computer.
-
Click the “I don’t have a product key” option.
 Quick note: The computer will activate automatically after reinstallation. If this is a new computer, you must provide a product key. You can always provide the product key to activate later through the Settings app.
 -
Select the edition of “Windows 11” your license key activates (if applicable).

-
Click the Next button.
-
Click the Accept button
-
Select each partition on the hard drive where you want to install Windows 11 and click the Delete button. (Usually, “Drive 0” contains all the installation files.)

-
Select the hard drive (Drive 0 Unallocated Space) to install the operating system.

-
Click the Next button.
-
Click the Install button.

-
Open Command Prompt using the “Shift + F10” keyboard shortcut on the region settings page.
-
Select your region setting after the installation on the first page of the out-of-the-box experience (OOBE).

-
Click the Yes button.
-
Select your keyboard layout setting.

-
Click the Yes button.
-
Click the Skip button if you do not need to configure a second layout.
-
If the computer uses an Ethernet connection, it automatically connects to the network. If you have a wireless connection, you will need to set up the connection manually (a security key may be required).
-
(Optional) Confirm a name for the computer.

-
Click the Next button. (The computer will restart automatically.)
-
(Important) Select the “Set up for work or school” option to continue without a Microsoft account.

-
Click the Next button.
-
Click the “Sign-in options” setting.

-
Click the “Domain join instead” option to bypass the Microsoft account and continue with a local account.

-
Specify a name to create a local account on Windows 11.

-
Create a strong password for the local account.

-
Click the Next button.
-
Confirm the password.
-
Click the Next button.
-
Complete the three security questions in case you forget your password.
-
Click the Next button.

-
Confirm the privacy settings that best suit your situation by turning on or off the toggle switch for each setting.
-
Click the Accept button.

Once you complete the steps, Windows 11 completes the installation with a local account that is not connected to any Microsoft products.
5. Create local account using Rufus
You can also use third-party tools, such as Rufus, to create custom USB bootable media that bypasses the Microsoft account, internet connection, and other hardware requirements.
To set up a new Windows 11 (Home or Pro) installation without a Microsoft account with the Rufus tool, connect a USB flash drive of 8GB and follow these steps:
-
Click the link to download the latest version.
-
Double-click the rufus.4.xx.exe file to launch the tool.
-
Select the flash drive to create the Windows 11 bootable USB media from the “Device” setting.
-
Click the Select button.
 Quick tip: If you don’t have the ISO file, click the arrow button next to “Select,” choose the “Download” option, click the “Download” option, and continue with the on-screen directions to get the latest ISO file for Windows 11.
 -
Select the Windows 11 ISO file.
-
Click the Open button.
-
Select the “Standard Windows Partition” option in the “Image option” setting.
-
Select the GPT option in the “Partition scheme” setting.
-
Select the UEFI (non CSM) option in the “Target system” setting.
-
(Optional) Confirm a descriptive name for the bootable USB flash drive in the “Volume label” setting.
-
Use the default settings for the File system and Cluster size options.
-
Check the Quick format option.
-
Check the “Create extended label and icon files” option.
-
Click the Start button.
-
(Optional) Check the “Remove requirement for 4GB RAM, Secure Boot, and TPM 2.0” option to install Windows 11 on unsupported hardware.
-
(Important) Check the “Remove requirement for an online Microsoft account” option to use a local account and bypass the internet requirements.

-
(Important) Check the “Create a local account with username” option and specify a name for the account.
Quick note: At the time of this writing, this Rufus tool only worked to bypass the Microsoft Account when selecting both the “Remove requirement for an online Microsoft account” and the “Create a local account with username” options. Using only the remove online account requirement failed to skip the screen during the Out-of-box Experience. -
Click the OK button.
-
Start the PC with the Windows 11 USB flash drive created with Rufus.
-
Press any key to continue.
-
Choose the installation language and format.
-
Click the Next button.
-
Choose the keyboard and input method.
-
Click the Next button.
-
Select the “Install Windows 11” option.
-
Check the “I agree everything” option to confirm that the process will delete everything on the computer.
-
Click the “I don’t have a product key” option.
Quick note: The computer will activate automatically after reinstallation. If this is a new computer, you must provide a product key. You can always provide the product key to activate later through the Settings app. -
Select the edition of “Windows 11” your license key activates (if applicable).
-
Click the Next button.
-
Click the Accept button
-
Select each partition on the hard drive where you want to install Windows 11 and click the Delete button. (Usually, “Drive 0” contains all the installation files.)
-
Select the hard drive (Drive 0 Unallocated Space) to install the operating system.
-
Click the Next button.
-
Click the Install button.
-
Open Command Prompt using the “Shift + F10” keyboard shortcut on the region settings page.
-
Select your region setting after the installation on the first page of the out-of-the-box experience (OOBE).
-
Click the Yes button.
-
Select your keyboard layout setting.
-
Click the Yes button.
-
Click the Skip button if you do not need to configure a second layout.
Quick note: Since you have created a custom USB bootable media, after this step, the setup will skip the Microsoft account configuration and create a local account automatically. If you didn’t select the option to create an account, you will have to set up the local account before configuring the privacy settings. -
Choose the privacy settings.
-
Click the Next button.
-
Click the Next button again.
-
Click the Accept button.
After completing the steps, the system will set up the installation using a local account, thereby skipping the Microsoft account requirement.
If you select the option to create a local account, the account will not have a password configured. You can protect your account by going to Settings > Accounts > Sign-in options and clicking the “Add” button from the “Password” setting.
6. Create an unattended file for Windows 11
You can also create an answer file to integrate with the USB bootable media to automate the entire process, including bypassing the Microsoft account and internet connection.
It’s important to note that the author of this tool proactively updates the answer file setup process, meaning that whenever you use these instructions, you may also find new and different options.
To generate an autounattend.xml to install Windows 11 with a local account, follow these steps:
-
Choose the “Install Windows using these language settings” option under the “Region and language settings” setting.
-
Select your language in the “Windows display language” setting.
-
Choose the Intel/AMD 64-bit option under the “Processor architectures” setting.
-
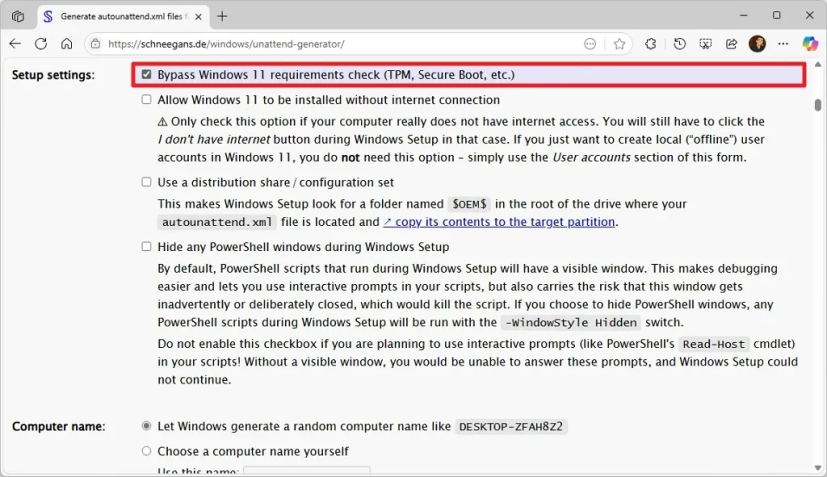
(Optional) Check the “Bypass Windows 11 requirements check (TPM, Secure Boot, etc.)” option under the “Settings” section.
-
(Important) Check the “Hide any PowerShell windows during Windows Setup” option.
-
(Optional) Select the “Choose a computer name yourself” option and specify a custom name for the computer.
Quick note: You should only use this option if you plan to use the answer file to install the operating system on your computer. If you have to set up multiple computers, you should let the operating system choose a random name. -
Select the “Do not use Compact OS” under the “Compact OS” setting.
-
Choose the “Let Windows determine your time zone based on language and region settings” option under the “Time zone” setting.
-
Select the “Let Windows Setup wipe, partition and format your hard drive (more specifically, disk 0) using these settings” option.
-
Choose the GPT option in the “Choose partition layout” setting.
-
Select the “Install on recovery partition” option using the default settings in the “Choose how to install Windows RE” section.
-
Choose the “Do not run a script” option.
-
Select the “Use a generic product key” option in the “Windows edition” section.
-
Select the edition on Windows 11 to install, such as “Pro” or “Home,” in the “Install this edition of Windows” setting.
-
(Important) Choose the “Let Windows Setup create the following local (“offline”) accounts” option under the “User accounts” section.

-
Confirm the name and password for the local account to bypass the Microsoft account requirement.
Quick tip: Clear the “User” account. -
Choose the Administrators option.
-
Select the “Logon to the first administrator account created above” option in the “First logon” setting.
Quick note: This is only for the installation process. After the setup is complete, you will have to sign in to your account normally. -
Choose the “Passwords do not expire” option under the “Password expiration” setting.
-
Choose the “Use default policy” option under the “Account Lockout policy” section.
-
Select the “Use File Explorer default setting” option under the “File Explorer tweaks” section.
-
(Optional) Check the “Always show file extensions” option to show extensions like “.exe,” “.txt,” “.docx,” etc..
-
(Optional) Check the “Use classic context (right-click) menu in Windows 11” option to bring back the legacy context menu to File Explorer.
-
(Optional) Check the “Open File Explorer to This PC instead of Quick access” option to change the default startup page.
-
(Optional) Check the “Show End task command in the taskbar” option to enable the option to terminate unresponsive apps from the Taskbar.
-
(Optional) Select the “Hide” option to remove the search box from the Taskbar under the “Start menu and taskbar” setting.
-
(Important) Choose the “Remove all icons” option to remove the default icons (such as Copilot, File Explorer, Microsoft Store, and others) that the system pins by default on every installation in the Taskbar.
 Quick tip: I’m choosing to enable and disable some options since we’re trying to debloat Windows 11 as much as possible.
 -
(Optional) Check the “Disable widgets” option to remove the widgets from the Taskbar.
-
Check the “Left-align the taskbar in Windows 11” option to roll back to the classic experience for accessing apps and the Start menu.
-
(Optional) Check the “Hide the Task view button from the taskbar” option if you don’t use this feature.
-
(Optional) Check the “Do not show Bing results when searching in the Start menu or the search box” option if you don’t want to see web results when searching from the Taskbar.
-
(Optional) Check the “Remove all pins” option to debloat the Start menu by removing all the default pins from built-in and promoted apps.
-
Confirm the features you want to turn on or off as needed in the “System tweaks” section.
Quick note: Whatever the options you choose in this section, I do not recommend disabling the Microsoft Defender Antivirus or Windows Update. -
Select the “Use default settings chosen by Windows” option under the “Visual effects” section unless you want to use a different configuration.
-
Select the “Show default desktop icons” option under the “Desktop icons” section.
-
Skip the “Virtual machine support” settings unless you install the operating system as a virtual machine in VirtualBox or VMware Workstation.
-
(Optional) Choose the “Configure Wi-Fi using these settings” option and confirm the wireless network settings under the “WLAN / Wi-Fi setup” section.
-
Select the “Disable all” option to improve your privacy by limiting the upload of diagnostic data under the “Express settings” section.
-
Select the “Use default lock key states and behaviors” option under the “Lock key settings” section.
-
Select the “Use default Sticky keys settings” option under the “Sticky keys” section.
-
(Optional) Select the color and desktop wallpaper default settings under the “Personalization settings” section.
Quick note: Although you can always change these settings later, it can come in handy if you don’t plan to activate Windows 11. -
(Optional) Click the “Select all” button to select all the apps you don’t want the system to include in the installation.
 Quick note: This is the main option to debloat Windows 11. If you want to keep one or more applications, select the apps to remove manually.
 -
Skip the “Run custom scripts” settings.
-
Select the “Do not configure WDAC policy” option under the “Windows Defender Application Control” section.
-
Skip the “XML markup for more components” settings.
-
Skip the “Download settings” configuration.
-
Click the “Download.xml file” button and save the file on your computer.
-
Click the Download Now button under the “Create Windows 11 installation media” section.
-
Double-click the mediacreationtool.exe file to launch the tool.
-
Click the Accept button.
-
Click the Next button.
 Quick note: Clear the “Use the recommended options for this PC” option to select the correct language, architecture, and edition if you want to create a Windows 11 24H2 USB for another computer.
 -
Select the “USB flash drive” option.

-
Click the Next button.
-
Select the USB flash drive from the list.

-
Click the Next button.
-
Click the Finish button.
-
Open File Explorer.
-
Open the autounattend.xml file location.
-
Select the file and click the Copy button from the command bar.
-
Open the root of the Windows 11 installation media with File Explorer.
-
Click the Paste button from the command bar.

Once you complete the steps, you can start the device with the USB drive to install the operating system automatically.
In addition to these workarounds, other methods are available, including setting up a computer with a Microsoft account and then switching to a local account by creating a new administrator account or unlinking your Windows 11 profile from the Microsoft account.
Additionally, you can utilize the Tiny11 Builder script to create a custom image that installs the operating system without skipping hardware and specific configuration requirements.
At the time of this writing, the Ventoy tool option to bypass the account and network requirements is not working.
FAQs about bypassing Microsoft account on Windows 11
Here’s a list of frequently asked questions (FAQs) and answers about setting up Windows 11 without a Microsoft account.
Can you bypass the Microsoft account requirement on Windows 11 setup?
Yes, you can still bypass the Microsoft account requirement during Windows 11 setup using methods like Registry tweaks, domain join options, or custom USB tools. While Microsoft has blocked some shortcuts, several workarounds remain functional in current versions, allowing you to create a local account.
How do I skip the internet requirements during Windows 11 OOBE?
You can skip internet requirements by disconnecting from the network and using workarounds like the BypassNRO Registry tweak or custom installation media. These methods force the setup to show the “I don’t have internet” option, enabling you to proceed with a local account configuration.
What is the easiest way to create a local account on Windows 11?
The easiest way is to use a custom USB created with Rufus, which automates bypassing the Microsoft account and network requirements. During setup, the system skips online sign-in and creates a local account automatically, reducing manual steps and avoiding command-line workarounds.
Is bypassing the Microsoft account on Windows 11 safe?
Bypassing the Microsoft account is generally safe but not officially supported by Microsoft. Some setup steps may be skipped, which could affect default configurations. However, most users can still complete setup and adjust privacy and system settings afterward without major issues.
Why does Windows 11 require a Microsoft account during setup?
Windows 11 requires a Microsoft account to ensure devices are connected to cloud services, enable sync features, and improve security and recovery options. Microsoft also uses this requirement to standardize the setup experience and encourage integration with its ecosystem.
What still works to bypass Windows 11 OOBE restrictions?
Methods that still work include Registry edits like BypassNRO, hiding online account screens, domain join options on Pro editions, and automated setups using Rufus or unattended files. These approaches bypass account and internet checks, though Microsoft may disable them in future updates.
Can you switch to a local account after installing Windows 11?
Yes, you can switch to a local account after installation by creating a new local administrator account or unlinking your Microsoft account from Settings. This method avoids setup restrictions entirely but requires completing the initial configuration with an online account first.
Does bypassing the Microsoft account limit Windows 11 features?
Yes, using a local account limits access to certain features tied to a Microsoft account. These include OneDrive sync, Microsoft Store app syncing, device backup, BitLocker recovery key storage, and cross-device settings. However, you can still sign in to individual apps later without converting the entire system to a Microsoft account.
Mauro Huculak is a Windows How-To Expert and founder of Pureinfotech in 2010. With over 22 years as a technology writer and IT Specialist, Mauro specializes in Windows, software, and cross-platform systems such as Linux, Android, and macOS.
Certifications: Microsoft Certified Solutions Associate (MCSA), Cisco Certified Network Professional (CCNP), VMware Certified Professional (VCP), and CompTIA A+ and Network+.
Mauro is a recognized Microsoft MVP and has also been a long-time contributor to Windows Central.
You can follow him on YouTube, Threads, BlueSky, X (Twitter), LinkedIn and About.me. Email him at [email protected].