
UPDATED 3/24/2025: On Windows 11, you can change partition size to either increase the drive size or use the unallocated space to create one or more partitions, and in this guide, I’ll show you how.
Regardless of the reason, you can resize a partition on Windows 11 without re-formatting or losing your files using the Settings app with the “Disks & volumes” settings, Disk Management, Command Prompt, and PowerShell. When using these tools, you can change the size of any partition, including the “C,” or the partition on any drive, including those from an external location.
In this guide, I’ll teach you the steps to shrink and extend the size of a partition on Windows 11.
- Change partition size with Settings on Windows 11
- Change partition size with Disk Management on Windows 11
- Change partition size with Command Prompt on Windows 11
- Change partition size with PowerShell on Windows 11
Change partition size with Settings on Windows 11
To change the size of a partition on Windows 11, use these steps:
-
Open Settings on Windows 11.
-
Click on System.
-
Click the Storage tab.
-
Click on Advanced storage settings under the “Storage management” section.
-
Click the “Disks & volumes” setting.

-
Select the drive with the partition (volume) to resize.
-
Select the partition and click the Properties button.

-
Click the Change size button under the “Size” section.

-
(Option 1) Confirm a lower number than the “Current” size to shrink the partition.
-
(Option 2) Confirm a higher number than the “Current” size but not larger than the “Max” number to extend the partition.

-
Click the OK button.
Once you complete the steps, the system will change the partition size without losing data to reflect the specified setting.
If you must extend the installation (C:) drive, you may have to delete and recreate the Recovery Partition before you can change the size of the main system partition.
Change partition size with Disk Management on Windows 11
Using the legacy Disk Management tool is the easiest way to shrink or expand the partition size on Windows 11.
Shrink partition
To shrink a partition on Windows 11 with Disk Management, use these steps:
-
Open Start.
-
Search for Create and format hard disk partitions and click the top result to open the Disk Management console.
-
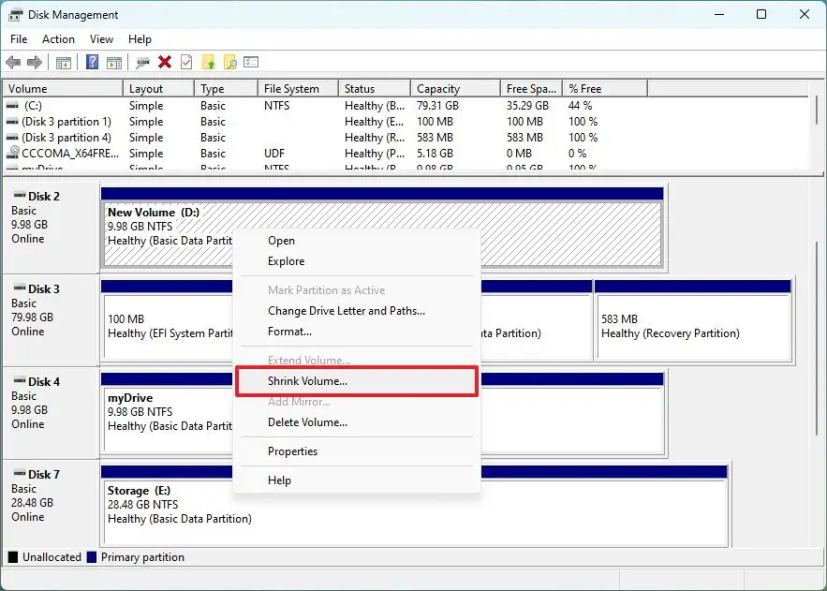
Right-click the drive you want to change its partition size and select the Shrink Volume option.
-
Confirm the amount of space to shrink the partition (in megabytes).
 Quick note: As you change the size value, you can confirm the total size of the unallocated space after shrinking the original partition.
 -
Click the Shrink button.
Once you complete the steps, the partition will reduce to the specified size.
Extend partition
To increase (or extend) the drive partition size using Disk Management, use these steps:
-
Open Start.
-
Search for Create and format hard disk partitions and click the top result to open the Disk Management console.
-
Right-click the drive to change its partition size and select the Extend Volume option.

-
Click the Next button.
-
Choose the disk with available space under the “Selected” section (if applicable).
Quick note: In some cases, you may need to select the disk from the “Available” section and click the Add button to make it available. -
Confirm the space to increase the drive partition (if necessary).

-
Click the Next button.
-
Click the Finish button.
After completing the steps, the drive partition will extend to the specified size.
If the “Extend volume” option is greyed out, the physical drive doesn’t have any space to increase the volume.
Change partition size with Command Prompt on Windows 11
It’s also possible to change the partition size without losing data on Windows 11 using the DiskPart tool with Command Prompt.
Shrink partition
To shrink a partition with Command Prompt on Windows 11, use these steps:
-
Open Start.
-
Search for Command Prompt, right-click the top result, and select the Run as administrator option.
-
Type the following command to start diskpart and press Enter:
diskpart
-
Type the following command to list the volumes and press Enter:
list volume
-
Type the following command to select the volume you want to shrink the partition and press Enter:
select volume 2
In the command, change “2” to the number representing the partition you want to modify.
-
Type the following command to determine the space you can decrease the partition and press Enter:
shrink querymax
-
Type the following command to shrink the drive partition by a specific amount (in megabytes) and press Enter:
shrink desired=7099

In the command, change “7099” for the amount (in megabytes) you want to shrink the partition.
-
(Optional) Type the following command to shrink the partition by its maximum space reclaimable and press Enter:
shrink
Once you complete the steps, DiskPart will reduce the size of the partition to the new smaller size.
Extend partition
To increase the drive partition size with DiskPart, use these steps:
-
Open Start.
-
Search for Command Prompt, right-click the top result, and select the Run as administrator option.
-
Type the following command to start diskpart and press Enter:
diskpart
-
Type the following command to list the available disks and their capacity, and press Enter:
list disk
Quick note: Identify the drive’s total size with the partition you want to increase. -
Type the following command to list the volumes and press Enter:
list volume
-
Type the following command to select the volume to shrink the partition and press Enter:
select volume 2
In the command, change “2” for the number that represents the partition to modify.
-
Type the following command to increase the size of the partition and press Enter:
extend size=20480
In the command, change “20480” for the amount (in megabytes) you want to increase the partition.
-
(Optional) Type the following command to increase the size of the partition using all contiguous space on the drive and press Enter:
extend

After you complete the steps, the partition will extend to the new size without losing your data.
Change partition size with PowerShell on Windows 11
Alternatively, you can change partition sizes using PowerShell commands.
Shrink partition
To resize a partition with PowerShell, use these steps:
-
Open Start.
-
Search for PowerShell, right-click the top result, and select the Run as administrator option.
-
Type the following command to list all the drives and their total size, and press Enter:
Get-Disk
-
Type the following command to list the available partitions on the drive and Enter:
Get-Partition -DiskNumber 2
In the command, change “2” for the number of the drive with the partition to shrink.
-
(Optional) Type the following command to understand the minimum and maximum space you can resize the partition and press Enter:
Get-PartitionSupportedSize -DiskNumber 2 -PartitionNumber 2
In the command, change the disk and partition number corresponding to your situation. Also, the “SizeMin” and “SizeMax” are specified in bytes, which means that you may need to use an online converter to understand the information in gigabytes or any other size.
-
Type the following command to resize the partition to 5GB and press Enter:
Resize-Partition -DiskNumber 2 -PartitionNumber 2 -Size (5GB)

In the command, replace the partition number and size for the information corresponding to your drive and the size to shrink the drive. Also, I”m using GB, but you can also specify the space in bytes, KB, MB, and TB
Once you complete the steps, PowerShell will shrink the partition, leaving additional unallocated space to create additional volumes.
Extend partition
To extend the partition size with PowerShell, use these steps:
-
Open Start.
-
Search for PowerShell, right-click the top result, and select the Run as administrator option.
-
Type the following command to list all the drives and their total size, and press Enter:
Get-Disk
-
Type the following command to list the available partitions in the drive and press Enter:
Get-Partition -DiskNumber 2
In the command, change “2” for the drive number with the partition you want to extend.
-
(Optional) Type the following command to understand the minimum and maximum space you can resize the partition on Windows 11 and press Enter:
Get-PartitionSupportedSize -DiskNumber 2 -PartitionNumber 2
In the command, change the disk and partition number corresponding to your situation.
-
Type the following command to increase the partition to 9GB and press Enter:
Resize-Partition -DiskNumber 2 -PartitionNumber 2 -Size (9GB)
In the command, replace the partition number and size for the information corresponding to your drive and the size to increase the partition.

-
(Optional) Type the following command to extend the partition to its maximum size on Windows 11 and press Enter:
Resize-Partition -DiskNumber 1 -PartitionNumber 2 -Size 10720624128
In the command, replace the disk and partition number for the information that corresponds to your situation. Also, to specify the new size of the partition, use the “SizeMax” number available in step 4.
After completing the steps, the partition will cover the available space or the specified amount.
It’s important to note that sometimes partition and volume are used interchangeably, but they are different. For example, a “partition” is a logical division of a physical drive. You can divide a single drive into multiple partitions, allowing you to organize the storage, run multiple operating systems on the same drive, or separate different types of data.
On the other hand, a “volume” is a formatted storage area with a file system. It’s the logical unit that the operating system recognizes for storing and accessing files. A volume can reside on a single partition, but in some cases, it can span multiple partitions. In other words, a volume is a partition that has been formatted with a file system (like NTFS, FAT32, or ext4).
In summary, a “drive” is a physical piece of hardware, a “partition” is a logical division of the physical drive, and the “volume” is a formatted storage area with a file system, which may reside on a partition.
Update March 24, 2025: This guide has been updated to ensure accuracy and reflect changes to the process.
Mauro Huculak is a Windows How-To Expert and founder of Pureinfotech in 2010. With over 23 years as a technology writer and IT Specialist, Mauro specializes in Windows, software, and cross-platform systems such as Linux, Android, and macOS.
Certifications: Microsoft Certified Solutions Associate (MCSA), Cisco Certified Network Professional (CCNP), VMware Certified Professional (VCP), and CompTIA A+ and Network+.
Mauro is a recognized Microsoft MVP and has also been a long-time contributor to Windows Central.
You can follow him on YouTube, Threads, BlueSky, X (Twitter), LinkedIn and About.me. Email him at [email protected].