
- Option 1: To change the Taskbar size on Windows 11, open “Windhawk,” install “Taskbar height and icon size,” and choose the size for icons and interface height.
- Option 2: To resize the Taskbar, open “ExplorerPatcher,” click “Taskbar,” and change the “Taskbar icon side” to “Small” to make the interface smaller.
- Option 3: To change the size of the Taskbar, open “Start11,” open the “Taskbar” settings, and use the “Taskbar size” option to make the Taskbar smaller or larger.
- Option 4: To specify a scale setting to resize the Taskbar, open Settings > System > Display and customize the “Scale” setting with one of the available options.
- The Registry method no longer works to make the Taskbar smaller or larger in the latest release of Windows 11.
UPDATED 7/26/2024: Although the Taskbar on Windows 11 has a similar design to the one available on Windows 10, the new version lacks some essential features, including the ability to change the Taskbar size. However, it’s possible to change the size of the Taskbar to make it smaller or larger, and in this guide, I’ll show you the available methods.
In early releases of the operating system, you could use Registry to adjust the settings to change the Taskbar size, but it’s no longer the case. If you must show smaller or larger icons while minimizing the height of the interface, you will have to resource third-party tools, such as Windhawk, ExplorerPatcher, and Start11.
Windhawk is an open-source project that makes it easier to modify the behavior of applications and the operating system. This solution requires installing the application and then downloading and installing the extension to perform a change, in this case, changing the size of the Taskbar.
ExplorerPatcher is also an open-source application that restores the classic Taskbar experience. Using this app, you can move the bar to any location, make the Taskbar smaller or larger, and more.
Start11 is a paid software that offers a bunch of customization options for the Taskbar, including the ability to move the bar to the top of the screen and change its size. It also allows you to fully customize the Start menu with different designs as well as the Start button and more.
Alternatively, you can also change the scale settings on Windows 11 to make the Taskbar smaller or larger without having to install thrid-party apps.
In this guide, you will learn the steps to change the size of the Taskbar on Windows 11.
- Change Taskbar size on Windows 11 from Windhawk
- Change Taskbar size on Windows 11 from ExplorerPatcher
- Change Taskbar size on Windows 11 from Start11
- Change Taskbar size on Windows 11 from Scale settings
- Change Taskbar size on Windows 11 from Registry (deprecated)
Change Taskbar size on Windows 11 from Windhawk
Once you install the Windhawk application, you can use it to download the extension that allows you to change the Taskbar interface.
1. Install Windhawk
To install Windhawk on Windows 11, use these steps:
-
Open Start.
-
Search for Command Prompt, right-click the top result, and select the Run as administrator option.
-
Type the following command to install Windhawk and press Enter:
winget install --id RamenSoftware.Windhawk

Once you complete the steps, the app will install on Windows 11.
2. Change Taskbar from Windhawk
To change the size of the Taskbar with the Windhawk app, use these steps:
-
Open Windhawk.
-
Click the Explore button from the top-right corner.
-
Search for “Taskbar height and icon size” and click the Details button.

-
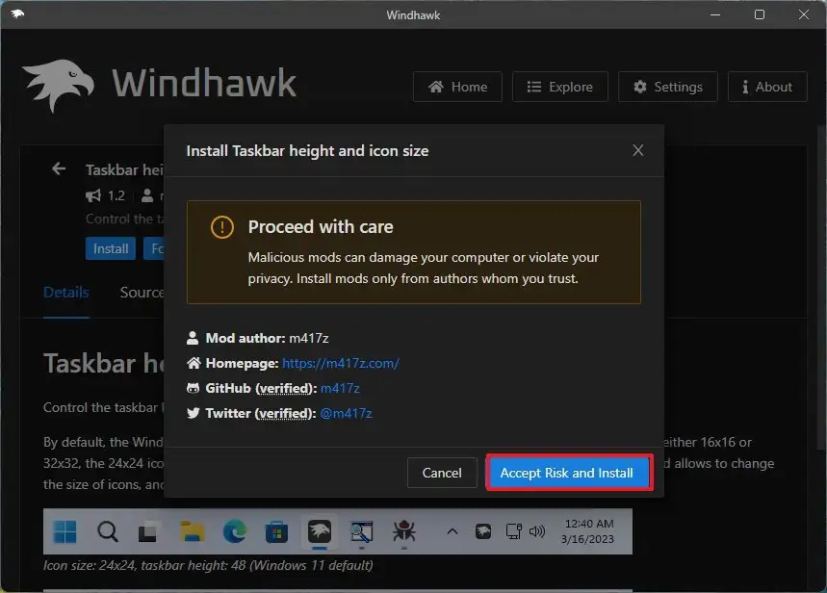
Click the Install button.

-
Click the “Accept Risk and Install” button.
-
Click the Settings tab.
-
Set the “Icon size” to 16.

-
Set the “Taskbar height” to 34 to make the Taskbar smaller.
-
Click the Save settings button.
After you complete the steps, the settings will apply, making the Taskbar smaller on the Windows 11 desktop.
If you change your mind, you can revert the changes with the same instructions, but in steps 7 and 8, set the icon side to 24 and the Taskbar height to 48. You can also click the “Remove” button to delete the extension from the Windhawk application, which will also restore the default settings.
Change Taskbar size on Windows 11 from ExplorerPatcher
After you install the ExplorerPatcher application, you can change the size of the Taskbar.
1. Install ExplorerPatcher
To install ExplorerPatcher on Windows 11, use these steps:
-
Open Start.
-
Search for Command Prompt, right-click the top result, and select the Run as administrator option.
-
Type the following command to install ExplorerPatcher and press Enter:
winget install --id valinet.ExplorerPatcher

After you complete the steps, the app will install on Windows 11 and, by default, will put the Taskbar at the top of the screen.
2. Change ExplorerPatcher from ExplorerPatcher
To change the size of the Taskbar with the ExplorerPatcher app, use these steps:
-
Open Start.
-
Search for ExplorerPatcher and click the top result to open the Properties (ExplorerPatcher) interface.
-
Click on Taskbar.
-
Change the “Taskbar icon side” to “Small” to make the interface smaller.

-
(Optional) Change the “Primary taskbar location on screen” to “Bottom,” “Top,” or the position to place the Taskbar.
-
Click the Restart File Explorer option in the bottom-left corner to apply the changes.
Once you complete the steps, the ExplorerPatcher will make the Taskbar smaller or larger, depending on your configuration.
If you want to revert the changes from the “Properties (ExplorerPatcher)” interface, choose the “Large” option for the “Taskbar icon side” setting.
Change Taskbar size on Windows 11 from Start11
Start11 is a tweaker application similar to ExplorerPatcher, but it’s a more reliable solution since it’s a paid product. At the time of this update, the app costs $9.99, but you can use your email to get a 30-day trial before purchasing.
To change the size of the Taskbar and icons with the Star11 app on Windows 11, use these steps:
-
Click the Try Free button to download the app on your computer.
 Quick note: The browser may complain the software is untrusted, but this is only because the app makes system changes. Although the app works as advertised, use it at your own risk.
 -
Double-click the setup file to launch the installer.
-
Check the option to agree to terms.
-
Click the Next button.
-
Click the Next button again.
-
Open Start11 from the Start menu.
-
Click the “Start 30 Day Trial” button.

-
Confirm your email address.
-
Click the Continue button.
-
Confirm the email to start the trial.
-
Click the Finish button.
-
Click on Taskbar.
-
Turn on the “Let Start11 enhance the taskbar” toggle switch.

-
Click the Yes button.
-
Click the “Configure enhanced taskbar” button.
-
Choose the “Always combine taskbar” button option.

-
Click on Taskbar.
-
Choose the size (small, medium, large, or extra large) to use in the Taskbar with the “Taskbar size” setting.

-
Click the Yes button to apply the changes.
Once you complete the steps, the Start11 will change the size of the Taskbar on your Windows 11 installation.
Change Taskbar size on Windows 11 from Scale settings
If you want to change the Taskbar size, but you mean that you want the items on the desktop, including the Taskbar, to be smaller or larger, you can change the scale settings on Windows 11. Also, if you don’t want to install third-party apps, this is perhaps the best option to make the Taskbar smaller or larger.
To resize the Taskbar by changing the scale settings on Windows 11, use these steps:
-
Open Settings.
-
Click on System.
-
Click the Display page on the right side.
-
Choose the scaling size (100%, 125%, 150, or 175%) with the “Scale” setting under the “Scale & layout” section.

After you complete the steps, the Taskbar will reflect the new size along with text, apps, and other items on the desktop. You can also choose a custom scaling setting to set the Taskbar to a specific size.
Change Taskbar size on Windows 11 from Registry (deprecated)
This method used to work, but after recent changes in the operating system, the option to change the Taskbar size is no longer available. I’ll be leaving these steps as a reference.
To change the Taskbar size on Windows 11, use these steps:
-
Open Start.
-
Search for regedit and click the top result to open the Registry Editor.
-
Browse the following path:
HKEY_CURRENT_USER\Software\Microsoft\Windows\CurrentVersion\Explorer\Advanced
-
Right-click the Advanced key, select New, and click on DWORD (32-bit) Value.

-
Name the key TaskbarSi and press Enter.
-
Double-click the newly created DWORD and change its value from 0 to 2 to change the Taskbar icon size to large. The value 0 is for the small size and 1 is for the default icon size.

-
Click the OK button.
-
Restart the computer.
Once you complete the steps, the Taskbar will reflect the size you specified on Windows 11.
If you want to revert the changes, you can always follow the same instructions, but in step 4, right-click the TaskbarSi DWORD and select the Delete button.
Update July 26, 2024: This guide has been updated to ensure accuracy and reflect changes to the process.
Mauro Huculak is a Windows How-To Expert and founder of Pureinfotech in 2010. With over 22 years as a technology writer and IT Specialist, Mauro specializes in Windows, software, and cross-platform systems such as Linux, Android, and macOS.
Certifications: Microsoft Certified Solutions Associate (MCSA), Cisco Certified Network Professional (CCNP), VMware Certified Professional (VCP), and CompTIA A+ and Network+.
Mauro is a recognized Microsoft MVP and has also been a long-time contributor to Windows Central.
You can follow him on YouTube, Threads, BlueSky, X (Twitter), LinkedIn and About.me. Email him at [email protected].