
- VirtualBox lets you share host‑system folders with a virtual machine on Windows 11 or 10 by configuring a “Shared Folder” and optionally mapping it as a network drive.
- After the configuration, the folder appears on the File Explorer’s Network page and as a mapped drive on the This PC page.
UPDATED 7/31/2025: On Windows 11 (or 10), after creating a virtual machine on VirtualBox, you may sometimes need to share files between the host and guest operating systems to install apps or work with documents.
Although you can configure the virtualization solution to drag and drop files, you can also set up a folder on the host device to share files with the virtual machine. In addition, you can also use this approach when, for example, the feature to mount an ISO file or storage peripherals doesn’t work with the virtual machine.
Whatever the reason, VirtualBox offers two ways to share files with Windows 10 on Windows 11, including using a shared folder or mapping a folder as a network drive in the guest operating system.
In this guide, I’ll outline the instructions to share a folder with a virtual machine using VirtualBox on Windows 11 and 10.
- Create a shared folder on VirtualBox
- Create a mapped drive on VirtualBox
- Access VirtualBox shared folder or mapped drive
- Delete shared folder or mapped drive on VirtualBox
Create a shared folder on VirtualBox
To set up VirtualBox to share a folder with a virtual machine, follow these steps:
-
Open VirtualBox.
-
Right-click the virtual machine and select the Settings option.

-
Click on Shared Folders.
-
Right-click on Machine Folders and select the “Add new shared folder” option.
-
In the “Folder path” field, confirm the path for the local folder to share with the device. Alternatively, you can click the down-arrow button and select the “Other” option to browse and select the folder.

-
In the “Folder Name” field, confirm a name to identify the shared folder.
-
(Optional) Check the Read-only option to prevent saving files into the folder from the virtual machine.
-
Click the OK button.
Once you complete the steps, the folder will appear in the network section of the guest machine.
Create a mapped drive on VirtualBox
To map a shared folder to a virtual machine, follow these steps:
-
Open VirtualBox.
-
Right-click the virtual machine and select the Settings option.
-
Click on Shared Folders.
-
Right-click on Machine Folders and select the “Add new shared folder” option.
-
In the “Folder path” field, confirm the path for the local folder to share with the device. Alternatively, you can click the down-arrow button and select the “Other” option to browse and select the folder.
-
In the “Folder Name” field, confirm a name to identify the shared folder.
-
(Optional) Check the Read-only option to prevent saving files into the folder from the virtual machine.
-
In the “Mount point” field, specify the drive letter to map the folder as a drive on the virtual machine. For example, “G:”

-
Check the Auto-mount option to mount the shared folder with the drive letter from the previous step.
-
Check the Make Permanent option to keep the shared folder mounted even after restarting the virtual machine.
-
Click the OK button.
After you complete the steps, the folder will mount as a drive on the virtual machine. In the case of Windows 10, you can access it under the “Network locations” section on File Explorer’s “This PC” page.
Access VirtualBox shared folder or mapped drive
You can access the folder from the “Network” or “This PC” pages, depending on how you configure the feature.
From Network page
If you created a shared point to access the files, follow these steps:
-
Open File Explorer.
-
Click on Network.
-
Double-click the VBOXSVR device.
-
Double-click the shared folder to access the files.

Once you complete the steps, you can interact with the files and folders.
From the This PC page
If you mounted the folder as a drive to access the files, follow these steps:
-
Open File Explorer.
-
Click on This PC.
-
Under the “Network locations” section, double-click the drive letter assigned to the mount point to access the files.
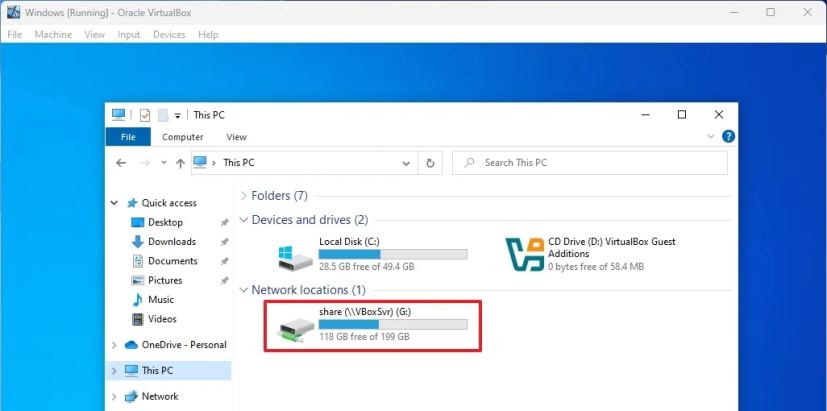
After you complete the steps, the files and folders will be accessible.
Delete shared folder or mapped drive on VirtualBox
To delete a shared folder or mapped drive from VirtualBox, follow these steps:
-
Open VirtualBox.
-
Right-click the virtual machine and select the Settings option.
-
Click on Shared Folders.
-
Select the shared folder or mapped drive and click the “Remove selected shared folder” button in the top-right corner.

Once you complete the steps, the folder will no longer be accessible from the virtual machine.
Update July 31, 2025: This guide has been updated to ensure accuracy and reflect changes to the process.
Mauro Huculak is a Windows How-To Expert and founder of Pureinfotech in 2010. With over 22 years as a technology writer and IT Specialist, Mauro specializes in Windows, software, and cross-platform systems such as Linux, Android, and macOS.
Certifications: Microsoft Certified Solutions Associate (MCSA), Cisco Certified Network Professional (CCNP), VMware Certified Professional (VCP), and CompTIA A+ and Network+.
Mauro is a recognized Microsoft MVP and has also been a long-time contributor to Windows Central.
You can follow him on YouTube, Threads, BlueSky, X (Twitter), LinkedIn and About.me. Email him at [email protected].