Google Chrome, by default, can offer to save various types of personal information, such as mailing addresses, phone numbers, emails, payment methods, and passwords for online services, so that the next time the data can fill automatically.
However, sometimes, you may need to delete this information because you initially typed it wrong, it’s no longer valid, or you don’t want the browser to remember a specific piece of information.
Whatever the case, Google Chrome includes settings to add, edit, and remove autofill data. You can even turn off the feature to prevent the browser from offering to save specific information.
This guide will teach you the steps to delete entries from the autofill database stored on Google Chrome. You will also learn the instructions to add autofill entries in the browser.
Delete autofill entries on Chrome
On Google Chrome, you can delete the three types of data that the browse fills automatically, including addresses, passwords, and payment methods.
Remove autofill passwords entries
To delete autofill passwords on Chrome, use these steps:
-
Open Google Chrome.
-
Click the “Customize and control Google Chrome” button in the top-left corner and click on Settings.
-
Click on Autofill.
-
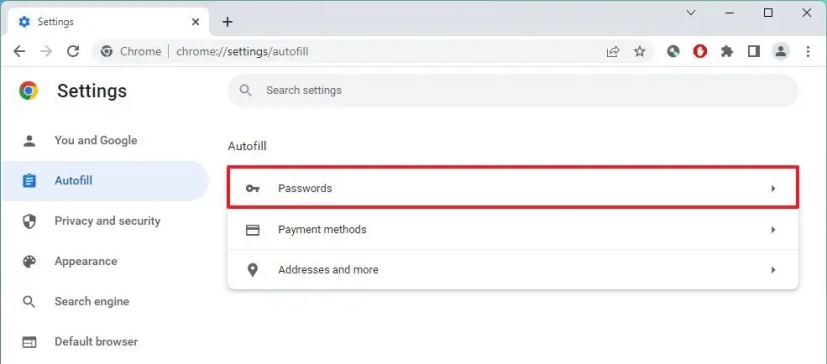
Click the “Passwords” setting.

-
Click the menu button next to the autofill entry and select the Remove option.

-
Click the Remove button.
-
Repeat steps 5 and 6 to continue removing other passwords.
-
(Optional) Turn off the “Offer to save passwords” toggle switch to prevent Chrome from saving passwords on the web.
Once you complete the steps, the saved password for autofill will be deleted from the browser.
Remove autofill addresses entries
To delete mailing addresses, phone numbers, and emails from the autofill database of Chrome, use these steps:
-
Open Google Chrome.
-
Click the “Customize and control Google Chrome” button in the top-left corner and click on Settings.
-
Click on Autofill.
-
Click the “Addresses and more” setting.

-
Click the menu button next to the autofill entry and select the Remove option.

-
Click the Remove button.
-
Repeat steps 5 and 6 to continue removing other entries.
-
(Optional) Turn off the “Save and fill addresses” toggle switch to prevent Chrome from saving and filling in this information on the web.
Once you complete the steps, the browser will no longer offer to fill out the deleted information in web forms.
Remove autofill payment entries
To delete autofill payment methods from Chrome, use these steps:
-
Open Google Chrome.
-
Click the “Customize and control Google Chrome” button in the top-left corner and click on Settings.
-
Click on Autofill.
-
Click the “Payment methods” setting.

-
Click the menu button next to the autofill entry and select the Remove option.

-
Click the Remove button.
-
Repeat steps 5 and 6 to continue removing other entries.
-
(Optional) Turn off the “Save and fill payment methods” toggle switch to prevent Chrome from saving and filling in this information on the web.
After you complete the steps, the payment information will no longer be available for autofill on Chrome.
Add autofill entries on Chrome
The browser also lets you automatically define the information you want to fill out on web forms.
Create autofill passwords entries
To add passwords for online services on Chrome, use these steps:
-
Open Google Chrome.
-
Click the “Customize and control Google Chrome” button in the top-left corner and click on Settings.
-
Click on Autofill.
-
Click the “Passwords” setting.

-
Click the Add button.
-
Add the credential information.

-
Click the Save button.
After you complete the steps, Google Chrome will offer the credential information to sign in to the online service.
Create autofill addresses entries
To add mailing addresses, phone numbers, and emails from the autofill database on Chrome, use these steps:
-
Open Google Chrome.
-
Click the “Customize and control Google Chrome” button in the top-left corner and click on Settings.
-
Click on Autofill.
-
Click the “Addresses and more” setting.

-
Click the Add button.
-
Fill out the desired information.

-
Click the Save button.
After you complete the steps, Chrome will offer to autofill the added information in web forms.
Create autofill payment entries
To add payment methods to fill out the information on Chrome quickly, use these steps:
-
Open Google Chrome.
-
Click the “Customize and control Google Chrome” button in the top-left corner and click on Settings.
-
Click on Autofill.
-
Click the “Payment methods” setting.

-
Click the Add button.
-
Confirm the debit or credit card information.

-
Click the Save button.
Once you complete the steps when making an online purchase, you can autofill the payment information quickly.