

- Windows 11 provides at least six different ways to remove user accounts.
- Only Settings and Control Panel can delete both the account and its files in one process.
- Netplwiz, Computer Management, Command Prompt, and PowerShell remove only the account, leaving profile data behind.
- If you use command-line or management tools, you’ll need to manually remove the user’s folder and Registry profile.
One of the easiest ways to keep Windows 11 organized is to remove user accounts that are no longer in use. Whether someone has stopped using a shared computer, a temporary account is no longer needed, or you’re cleaning up after testing different configurations, deleting unused accounts helps reduce clutter and can reclaim valuable storage space.
Over the years, I’ve found that old user profiles are often forgotten until they start causing confusion. It’s common to see multiple accounts left behind after upgrading a computer, troubleshooting an issue, or handing down a device to another family member. Besides taking up storage space, those abandoned profiles can leave behind outdated settings and make managing the system more complicated than it needs to be.

Windows 11 includes several ways to remove a user account, but they don’t all work the same way. This is an important distinction that many guides overlook. The Settings app and the legacy Control Panel can delete both the account and its personal files in a single process, making them the safest and most convenient options for most people. In contrast, PowerShell, Command Prompt, and Computer Management only remove the account itself, leaving the user’s profile folder and other remnants behind unless you clean them up manually.
In this guide, I’ll walk you through each available method to delete a user account on Windows 11.
- Which method should you use?
- Delete user accounts from Settings
- Delete user accounts from Control Panel
- Delete user accounts from NetPlWiz
- Delete user accounts from Computer Management
- Delete user accounts from Command Prompt
- Delete user accounts from PowerShell
- Delete account files and settings on Windows 11
- Pureinfotech’s Take
Which method should you use?
Windows 11 offers several ways to delete user accounts, but the best option depends on what you’re trying to accomplish.
| Method | Best for | Deletes account | Deletes user files | Admin required | Works with MSA | Manual cleanup required | Difficulty |
|---|---|---|---|---|---|---|---|
| Settings | Most users | ✅ | ✅ | ✅ | ✅ | ❌ | Easy |
| Control Panel | Choosing whether to keep or delete files | ✅ | ✅ (or keep files) | ✅ | ✅ | ❌ | Easy |
| Netplwiz | Quickly removing a local account | ✅ | ❌ | ✅ | Local accounts only | ✅ | Easy |
| Computer Management | Managing local accounts (Windows Pro, Enterprise, Education) | ✅ | ❌ | ✅ | Local accounts only | ✅ | Medium |
| Command Prompt | Automation and scripting | ✅ | ❌ | ✅ | ✅ | ✅ | Advanced |
| PowerShell | Administration and automation | ✅ | ❌ | ✅ | ✅ | ✅ | Advanced |
Quick recommendations
- Use Settings if you simply want to remove an account and permanently delete its files. This is the easiest and safest option for most people.
- Use Control Panel if you want the option to delete the user’s files or keep them before removing the account.
- Use Netplwiz if you need a quick way to remove a local account but don’t mind cleaning up leftover files afterward.
- Use Computer Management if you’re managing multiple local accounts on Windows 11 Pro, Enterprise, or Education.
- Use Command Prompt if you’re scripting or managing computers remotely.
- Use PowerShell if you need the most flexibility for automation or administrative tasks.
Delete user accounts from Settings
To delete a user account with the Settings app, follow these steps:
-
Open Settings on Windows 11.
-
Click on Accounts.
-
Click the Other Users page.
-
Select the account and click the Remove button.

-
Click the “Delete account and data” button.

Once you complete the steps, the account and files will be removed from the current setup.
You cannot delete the account while it’s signed in. You can only delete an account from another account with administrator privileges.
If the user is still signed in, you can open Task Manager (Ctrl + Shift + Esc), and from the “Users” tab, right-click the user and choose the “Disconnect” option.
If you are part of a family group on your Microsoft account, the users will be listed under Settings > Accounts > Family, but you won’t be able to delete the accounts from this page. In this case, you will have to change the settings from the “Your family” page on your Microsoft account.
Delete user accounts from Control Panel
To delete an account using the Control Panel, follow these steps:
-
Open Start.
-
Search for Control Panel and click the top result to open the app.
-
Click on User Accounts.
-
Click the “Remove user accounts” option.

-
Select the account to remove from Windows 11.
-
Click the “Delete the account” button.

-
(Option 1) Click the Delete Files button to delete the account and data.

-
(Option 2) Click the Keep files button to delete the account and keep the data.
-
Click the Delete Account button.
After you complete the steps, the account and data will be completely removed from the operating system.
Delete user accounts from NetPlWiz
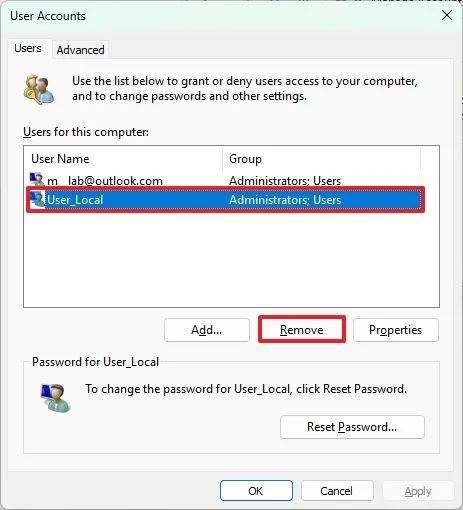
To remove an account with a legacy user account (netplwiz) dialog, follow these steps:
-
Open Start.
-
Search for netplwiz and click the top result to open the account manager.
-
Click the Remove button.
-
Click the Yes button.
Once you complete these steps, the user accounts will be removed from the system, but the user files and leftover settings will remain.
Delete user accounts from Computer Management
To remove an account using Computer Management, follow these steps:
-
Open Start.
-
Search for Computer Management and click the top result to open the console.
-
Open the following path:
System Tools > Local Users and Groups > Users
-
Right-click the desired account and choose the Delete option.

After you complete the steps, the account will no longer be available on Windows 11, but the settings and files will remain on the computer.
One thing to note is that while Computer Management is available on Windows 11 Pro as well as on Home, the “Local Users and Groups” settings are only available for Windows 11 Pro, Enterprise, and Education.
Delete user accounts from Command Prompt
To delete an account with Command Prompt on Windows 11, follow these steps:
-
Open Start.
-
Search for Command Prompt, right-click the top result, and select the Run as administrator option.
-
Type this command to view all users and press Enter:
net user
-
Type this command to delete the user and press Enter:
net user "Username" /delete
In the command, replace “Username” with the account name.

After you complete the steps, the Windows 11 account will no longer be available on the computer, but the files and account settings will remain in the setup.
Delete user accounts from PowerShell
To delete a Windows 11 account using PowerShell, follow these steps:
-
Open Start.
-
Search for PowerShell (or Terminal), right-click the top result, and select the Run as administrator option.
-
Type this command to view all users and press Enter:
Get-LocalUser
-
Type this command to delete the user and press Enter:
Remove-LocalUser -Name "Username"
In the command, replace “Username” with the account name.

Once you complete the steps, the PowerShell command will remove the account, but the account files and other settings won’t be deleted from the system.
Delete account files and settings on Windows 11
If you’re removing an account using the user accounts dialog, Computer Management, PowerShell, or Command Prompt, follow these steps to delete the account files and Registry settings.
To manually delete the user’s data, follow these steps:
-
Open File Explorer.
-
Click on This PC on the left pane.
-
Open the
C:\Usersfolder location. -
Right-click the user folder and choose the Delete option.

Quick note: Ensure that any important data is backed up before deletion, as this action is irreversible.
To get rid of the residual profile settings from the Registry, follow these steps:
-
Open Start.
-
Search the Registry and click the top result to open the Registry Editor.
-
Open the following location:
HKEY_LOCAL_MACHINE\SOFTWARE\Microsoft\Windows NT\CurrentVersion\ProfileList
-
Select each subkey and confirm the
ProfileImagePathentry on the right side to identify the name of the deleted account. -
Right-click the account key in the right pane and choose Delete.

After you complete the steps, the files and settings from the deleted account will no longer be available on the computer.
Pureinfotech’s Take
I’ve noticed that many users assume deleting an account is the same regardless of the method they choose, but that’s not how it works. In my experience, this is one of those small details that can make a big difference later. I’ve seen plenty of devices with old user profiles still taking up storage simply because the account was removed with a command or management tool that didn’t clean up the associated files.
For most people, I recommend using the Settings app. It’s the simplest option and does exactly what most users expect. PowerShell, Command Prompt, and Computer Management certainly have their place, especially if you’re managing multiple computers or automating tasks, but they’re better suited for administrators who understand the extra cleanup that’s required afterward.
This is also a good example of Windows maintaining multiple ways to perform the same task for different audiences. While I appreciate having those choices, I wish Microsoft made the differences between these methods more obvious so users don’t accidentally leave unnecessary data behind.
Which method do you use to remove user accounts on Windows 11? Let me know in the comments.

Mauro Huculak is a Windows How-To Expert and founder of Pureinfotech in 2010. With over 23 years as a technology writer and IT Specialist, Mauro specializes in Windows, software, and cross-platform systems such as Linux, Android, and macOS.
Certifications: Microsoft Certified Solutions Associate (MCSA), Cisco Certified Network Professional (CCNP), VMware Certified Professional (VCP), and CompTIA A+ and Network+.
Mauro is a recognized Microsoft MVP and has also been a long-time contributor to Windows Central.
You can follow him on YouTube, Threads, BlueSky, X (Twitter), LinkedIn and About.me. Email him at [email protected].