
- To fix Windows 11 Network Discovery, open Settings > Network & internet > Ethernet (or Wi-Fi), choose “Private network,” then open Advanced network settings > Advanced sharing settings, click “Private networks,” and turn on “Network discovery.”
- You can also try checking the background services, enabling SMB protocol, configuring the firewall, and resetting the network adapter.
On Windows 11, Network Discovery is the feature that allows you to view and access other computers in the local network, and in this guide, you will learn the steps to fix it. When you turn on the feature, the “Network” tab on File Explorer will populate the devices (computers, printers, etc.) available in the local area network, giving you access to the resources, including network shares and printers.
Since the Network Discovery does not always work as intended, on Windows 11, you can troubleshoot the problem by ensuring that the feature is turned on, the required services and protocols are running, the firewall isn’t blocking the features, and you can even reset the networking stack to fix the issue.


This guide will teach you the steps to troubleshoot and fix Network Discovery on Windows 11.
- Fix Network Discovery enabling feature on Windows 11
- Fix Network Discovery starting required services on Windows 11
- Fix Network Discovery enabling SMB protocol on Windows 11
- Fix Network Discovery configuring firewall on Windows 11
- Fix network discover resetting adapter on Windows 11
Fix Network Discovery enabling feature on Windows 11
To enable Network Discovery on Windows 11, use these steps:
-
Open Settings on Windows 11.
-
Click on Network & internet.
-
Click the Ethernet tab.
 Quick note: If you have a wireless connection, click on Wi-Fi and the connection properties options to access the adapter settings.
 -
Under the “Network profile type” section, select the Private profile type.

-
Click the “Advanced network settings” tab.
-
Under the “More settings” section, click on “Advanced sharing settings.”

-
Click the Private networks setting.
-
Turn on the Network discovery toggle switch.

-
Check the “Set up network connected devices automatically” option.
-
(Optional) Turn on the “File and printer sharing” toggle switch.
Once you complete the steps, File Explorer will show devices through the “Network” page.
The “Advanced sharing settings” page also includes the option to enable Network Discovery for public networks and even all networks. However, usually, you only need to allow discovery in a private network.
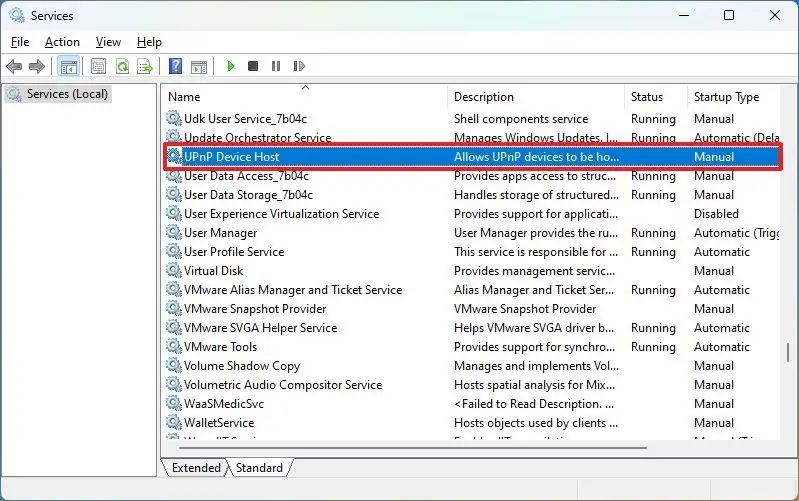
Fix Network Discovery starting required services
To determine and fix if the required services for Network Discovery are running on Windows 11, use these steps:
-
Open Start.
-
Search for Services and click the top result to open the app.
-
Confirm the “DNS Client,” “Function Discovery Provider Host,” “Function Discovery Resource Publication,” “SSDP Discovery,” and “UPnP Device Host” services are running.
-
Double-click the service that isn’t running (if applicable).
-
In the “Startup type” option, use the drop-down menu and select the Automatic option.

-
Under the “Service status” section, click the Start button.
-
Repeat steps 4 through 6 to enable the remaining services.
-
Click the Apply button.
-
Click the OK button.
After you complete the steps, open the “Network” tab in File Explorer and confirm that Network Discovery is working.
Fix Network Discovery enabling SMB protocol on Windows 11
If Network Discovery is working, but you’re missing some devices, such as an old computer, hard drive connected to the network, or Network-Attached Storage (NAS), then it’s possible that those devices are still relying on the old version of the Server Message Block (SMB) protocol.
It’s not recommended to use SMBv1 for security reasons, but if you must access devices using Network Discovery, you may need to enable the feature.
To enable SMB version 1 on Windows 11, use these steps:
-
Open Settings.
-
Click on Apps.
-
Click the Optional features tab.
-
Under the “Related settings” section, click the “More Windows features” setting.

-
Expand the SMB 1.0/CIFS File Sharing Support branch.
-
Select the SMB 1.0/CIFS Client option.

-
Click the OK button.
-
Click the Restart now button.
Once you complete the steps, open File Explorer, and in the Network tab, you should now see the missing devices.
Fix Network Discovery configuring firewall on Windows 11
In the case that the firewall is blocking the Network Discovery, you won’t be able to see network devices on File Explorer.
To allow Network Discovery through the firewall, use these steps:
-
Open Start.
-
Search for Windows Security and click the top result to open the app.
-
Click on Firewall & network protection.
-
Click the “Allow an app through firewall” option.

-
Click the Change settings button.
-
Check the Network Discovery feature.
-
Check the Private and Public options.

-
Click the OK button.
After you complete the steps, the firewall will allow the device to discover other computers in the network.
Fix Network Discovery resetting adapter on Windows 11
If you are still not able to view the devices in the network on File Explorer, you could try to reset the network adapter to resolve the issue. This process will reset all the networking components and restores the default settings, which can help to fix Network Discovery problems. If you have a wireless adapter, you will have to reconnect manually to the network after the reset.
To reset the network adapter settings to fix Network Discovery problems on Windows 11, use these steps:
-
Open Settings.
-
Click on Network & Internet.
-
Click the Advanced network settings option.

-
Under the “More settings” section, click the Network reset option.

-
Click the Reset now button.

-
Click Yes to confirm.
-
Click the Close button.
-
Restart your computer.
Once you complete the steps, the adapters will reset, and you may need to reinstall other networking software as necessary, and you will have to reconnect to the wireless network.
After the troubleshooting steps, open the File Explorer “Network” page, and enable Network Discovery by clicking the “Turn on Network Discovery and file sharing” option and choose the “No, make the network that I am connected to a private network” option.
Mauro Huculak is a Windows How-To Expert and founder of Pureinfotech in 2010. With over 23 years as a technology writer and IT Specialist, Mauro specializes in Windows, software, and cross-platform systems such as Linux, Android, and macOS.
Certifications: Microsoft Certified Solutions Associate (MCSA), Cisco Certified Network Professional (CCNP), VMware Certified Professional (VCP), and CompTIA A+ and Network+.
Mauro is a recognized Microsoft MVP and has also been a long-time contributor to Windows Central.
You can follow him on YouTube, Threads, BlueSky, X (Twitter), LinkedIn and About.me. Email him at [email protected].