
- To remove the background of a picture with the Paint app, open an image and click the “Remove background” button from the “Image” section.
- To remove an image background with the Photos app, open an image, click “Edit image,” click “Background,” click “Remove,” and click “Apply.”
- You can also use these apps to remove a part or replace the background of a picture.
On Windows 11, the Microsoft Paint and Photos apps now include a tool that makes it super simple to remove the background of a picture, and in this guide, you will learn how to use it.
The Paint app includes an option that detects objects on an image and removes the background with a single click, eliminating the need for complicated steps using third-party image editing applications or online services. You can also use the selection tool to remove only part of the background.
The Photos app can also remove the background from an image, but there’s another option that allows you to replace it with a solid color, and you get brush tools to alter the background manually. In addition, the app also includes a feature to blur the background of an image.
In this guide, I’ll teach you the steps to remove the background from any image with a single click on Windows 11. (You can also erase distractions from images like on Android with the latest update of Photos.)
Remove image background using Paint app
The Microsoft Paint app can remove the background of an image entirely or partially by selecting the area.
Remove background with Paint
To remove the background from an image with the Paint app, use these steps:
-
Open Paint on Windows 11.
-
Click on File and select the Open option.
-
Choose the image with the background to remove.
-
Click the Open button.
-
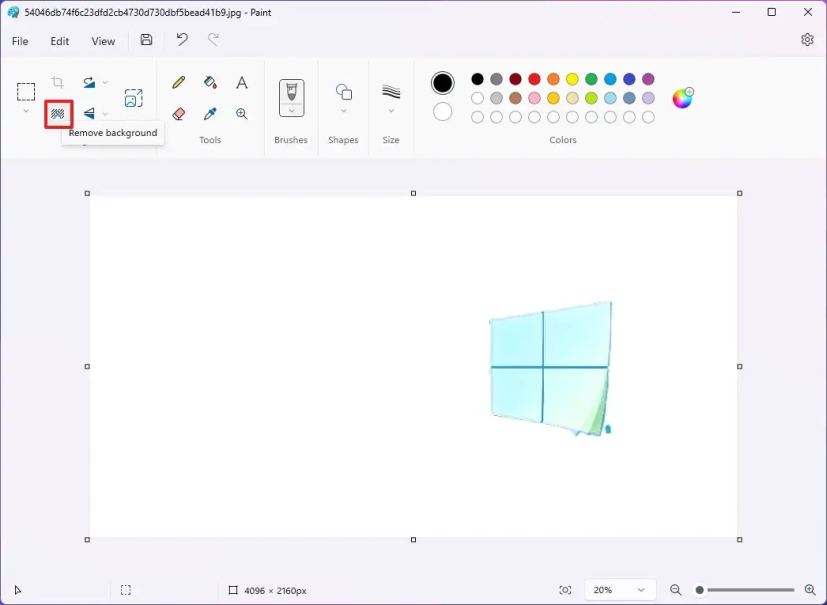
Click the “Remove background” button from the “Image” section in the ribbon.
-
(Optional) Use the “Zoom” tool to enlarge the image and use the “Eraser” option to finish cleaning residues of pixels around the object.
-
Click the Save button.
Once you complete the steps, Microsoft Paint will analyze the image, detect the objects, determine the background areas, and remove them from the image.
Remove specific area of background with Paint
To manually choose a portion of the background to remove from an image with Paint, use these steps:
-
Open Paint.
-
Click on File and select the Open option.
-
Choose the image with the background to remove.
-
Click the Open button.
-
Click the Select button from the “Image” section in the ribbon.
-
Select the area with a background to remove.

-
Click the “Remove background” button from the “Image” section in the ribbon.

-
(Optional) Use the “Zoom” tool to enlarge the image and use the “Eraser” option to finish cleaning residues of pixels around the object.
-
Click the Save button.
After you complete the steps, Microsoft Paint will remove the background only from the portion you selected on the image.
It’s not perfect since cleaning the pixels around the objects leaves some residues behind. Sometimes, you could zoom in and use the eraser to clean up the cropping.
Remove image background using Photos app
The Photos includes an option to remove the background, similar to the Paint app, but it also includes a feature to replace the background.
Remove background with Photos
To remove the background of a picture with the Photos app, use the steps:
-
Open Photos.
-
Open the picture to edit with the background to remove.
-
Click the Edit image (Ctrl + E) option.

-
Click the Background button in the command bar.

-
Click the Remove button.

-
(Optional) Turn on the “Background brush tool” toggle switch.

-
Click the Subtract button.
Quick tip: The “Subtract” option allows you to select the part of the background you want to preserve. The “Add” option allows you to choose the area of the background you want to remove manually. -
Adjust the brush size and softness settings.
-
Using the brush tool, select the area of the background to remove.
-
Click the Apply button.
-
Click the Save options button.
-
Choose the “Save as copy” option.
-
Save the image on your computer.
Once you complete the steps, the Photos app will remove the background, and to conserve transparency, the app will save the image as a “.png” file.
Replace background with Photos
To replace the background of a picture with the Photos app on Windows 11, use these steps:
-
Open Photos.
-
Open the pictures to edit with the background to replace.
-
Click the Edit image (Ctrl + E) option.
-
Click the Background button in the command bar.
-
Click the Replace button.

-
Select the color to replace in the background.
-
(Optional) Turn on the “Background brush tool” toggle switch.

-
Click the Subtract button.
Quick tip: The “Subtract” option allows you to select the background part you don’t want to change. The “Add” option allows you to choose the area of the background you want to change its color manually. -
Adjust the brush size and softness settings.
-
Using the brush tool, select the area of the background to replace.
-
Click the Apply button.
-
Click the Save options button.
-
Choose the “Save as copy” option.
-
Save the image on your computer.
After you complete the steps, the background will be replaced with a solid color.
Using this feature, it’s not possible to replace the background with another image. However, you can remove the background of the image and then add this image to another image that includes the background you want.
Update January 8, 2024: This guide has been updated to ensure accuracy and includes the steps to remove the background using both the Paint and Photos apps.
Mauro Huculak is a Windows How-To Expert and founder of Pureinfotech in 2010. With over 23 years as a technology writer and IT Specialist, Mauro specializes in Windows, software, and cross-platform systems such as Linux, Android, and macOS.
Certifications: Microsoft Certified Solutions Associate (MCSA), Cisco Certified Network Professional (CCNP), VMware Certified Professional (VCP), and CompTIA A+ and Network+.
Mauro is a recognized Microsoft MVP and has also been a long-time contributor to Windows Central.
You can follow him on YouTube, Threads, BlueSky, X (Twitter), LinkedIn and About.me. Email him at [email protected].