
- To create an email signature in Outlook for Windows 11, open Settings > Accounts > Signatures, create a custom signature, and click “Save.”
- It’s also possible to create multiple email signatures depending on the recipient from the “Signatures” page.
- These instructions apply to Windows 11, 10, and the web version of Outlook.
When you use the new Outlook app (and web), you can set up signatures for each new message, reply, and forward, and this guide will teach you how to complete this configuration.
Whenever you compose a message, you typically end up with a signature that can include various details, including your name, contact information, company name, title, and other information, as well as the closing message you may want to share with recipients. Instead of writing or copying and pasting the same block of text on every email, the new Outlook app for Windows 11 includes a setting that allows you to create one or multiple custom signatures that the client can apply automatically to your messages.
In this guide, I’ll teach you the steps to enable and configure signatures in Outlook for Windows 11, 10, and on the web version of the email service from Microsoft.
Create email signature in Outlook for Windows 11
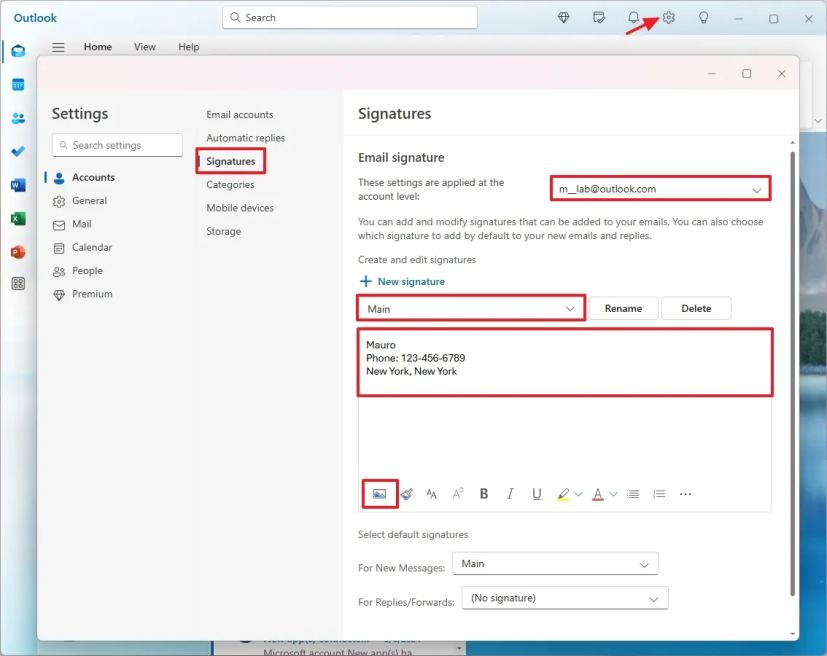
To add an email signature on the Outlook app for Windows 11, use these steps:
-
Open the Outlook app on Windows 11.
-
Click on Settings (gear button from top-right).
-
Click on Accounts.
-
Click the Signatures tab.
-
Choose the account to apply the signature under the “Email signature” section (if applicable).
-
Confirm a name for the signature.
-
Create a signature with the information you want to appear at the bottom of the email in the provided text box.
-
(Optional) Click the “Insert pictures inline” option from the bottom toolbar to insert an image of a business card or another type of image.
-
Customize the text with bold, italic, underlined, color, or another option using the toolbar at the bottom of the page.
-
(Optional) Select the signature for new emails if you have multiple signatures.
-
(Optional) Choose the signature for replies and forwards.
-
Click the Save button.

-
(Optional) Click the New Signature option to create additional signatures with different information.

-
Confirm a name for the signature.
-
Create a signature with the different information in the provided text box.
-
Click the Save button.
-
(Optional) Select the signature from the list and click the Delete button to erase it.
-
Click the Save button.
Once you complete the steps, the signature will appear automatically at the bottom of the email the next time you create a new message.
Since this is only a piece of text, you can always select and delete the block. Also, if you want to change or insert a different signature, you can open the “Insert” tab and use the “Signature” setting to apply a different signature for the email.
Update December 6, 2024: This guide has been updated to ensure accuracy and reflect changes to the process.
Mauro Huculak is a Windows How-To Expert and founder of Pureinfotech in 2010. With over 23 years as a technology writer and IT Specialist, Mauro specializes in Windows, software, and cross-platform systems such as Linux, Android, and macOS.
Certifications: Microsoft Certified Solutions Associate (MCSA), Cisco Certified Network Professional (CCNP), VMware Certified Professional (VCP), and CompTIA A+ and Network+.
Mauro is a recognized Microsoft MVP and has also been a long-time contributor to Windows Central.
You can follow him on YouTube, Threads, BlueSky, X (Twitter), LinkedIn and About.me. Email him at [email protected].