
Windows 11 comes with default settings that work well for most users, but the configuration isn’t perfect. Fortunately, you can adjust most settings to make the experience more functional, minimize distractions, and take full advantage of the old and new features that might otherwise go unnoticed.
For instance, to reduce clutter, you can align the Taskbar icons to the original left side and remove the Widgets icon. You can also rename your computer to make it easier to organize and locate on a network. Additionally, enabling the Night Light feature can help reduce eye strain when working at night.
Although the default Windows Update settings are optimal, you can customize them to include updates for other products and set active hours to prevent unexpected reboots after updates. Another feature I like is Hibernate, which can save your current session while allowing the system to power down completely. However, for some odd reason, it’s not enabled by default.
In File Explorer, you can display file extensions to simplify renaming and understanding file formats. To further streamline your workflow, you can disable intrusive ads and notifications, manage startup apps, and free up disk space to enhance performance.
In this guide, I will show you the features and configurations you should consider changing on Windows 11 in 2026.
Windows 11 settings to change in 2026
These are the Windows 11 settings everyone should change on their computers in 2026 (and beyond) to get the most out of the operating system. (This list is not organized in any particular order.)
1. Change the Taskbar alignment to the left side
Windows 11 features a redesigned Taskbar that centers the icons. However, you can easily adjust the alignment to the left, mirroring the familiar layout of previous Windows versions for convenient access to the Start menu and your apps.
To align the Taskbar to the left side, follow these steps:
-
Open Settings on Windows 11.
-
Click on Personalization.
-
Click on Taskbar.
-
Click the Taskbar behaviors option.

-
Use the “Taskbar alignment” setting and select the Left option to align icons to the left side.
Once you complete the steps, the Start button and other icons will align to the left side of the Taskbar, like on Windows 10.
2. Remove the Widgets icon from Taskbar
The Taskbar now includes a Widgets icon that displays dynamic content such as weather, sports, finance, and breaking news. While some users may find this feature distracting, it can be easily disabled from the “Taskbar” settings page.
To remove the Widgets weather icon from the Taskbar on Windows 11, use these steps:
-
Open Settings.
-
Click on Personalization.
-
Click the Taskbar page on the right side.
-
Turn off the Widgets toggle switch to disable the feature under the “Taskbar items” section.
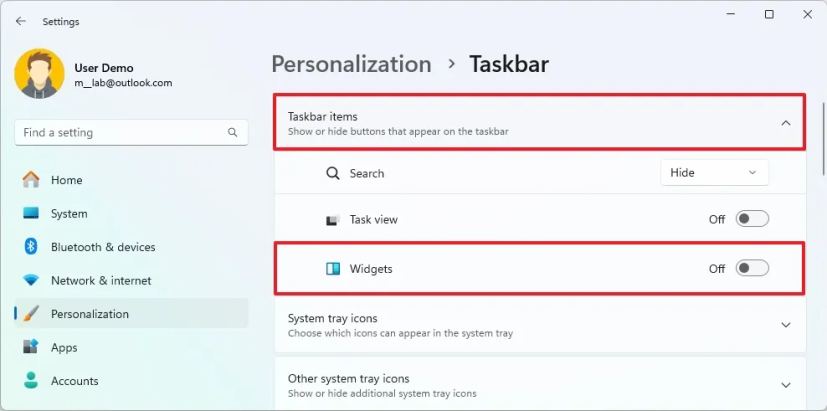
Once you complete the steps, the Widgets icon with the weather, sports, finance, and news information on the left side will be removed from the Taskbar. However, you can still access the Widgets dashboard using the “Windows key + W” keyboard shortcut.
3. Add folder icons to Start menu
In addition to the quick access to your applications, the Start menu allows you to include shortcuts next to the Power button for quick access to the different known folders, including Documents, Downloads, Pictures, and apps like Settings and File Explorer.
To add or remove folders next to the Power button in the Start menu, use these steps:
-
Open Settings.
-
Click on Personalization.
-
Click the Start page on the right side.

-
Click on Folders.
-
Turn on the toggle switch for the folders you want to appear next to the Power button on Windows 11, including:
- Settings.
- File Explorer.
- Documents.
- Downloads.
- Music.
- Pictures.
- Videos.
- Network.
- Personal folder.

Once you complete the steps, open the Start menu, and the buttons to the locations you selected will appear next to the Power button.
4. Change computer name on Windows 11
The ability to choose a custom name for your computer comes in handy when you have multiple devices to keep them organized. Otherwise, finding them in the network (and in your Microsoft account) and configuring certain features will be more challenging.
To change the computer name on Windows 11, use these steps:
-
Open Settings.
-
Click on System.
Quick tip: Windows 11 also includes a quick “Rename” button on the “System” page’s top-left side. -
Click on About on the right side.
-
Click the “Rename this PC” button under the “Device specifications” section.

-
Enter a new name for the computer.
 Quick tip: Avoid any special characters, keep it short (less than 15 characters is always recommended), and don’t leave a space when using multiple words.
 -
Click the Next button.
-
Click the Restart now button.
Once you complete the steps, the computer will restart to apply the new name on Windows 11.
5. Change audio devices name
If you have multiple output devices (such as speakers, headphones, headsets, etc.), you can change their names to make them easier to identify.
Rename speakers
To rename sound devices (such as speakers and headphones) on Windows 11, use these steps:
-
Open Settings.
-
Click on System.
-
Click the Sound tab.
-
Select the speakers (or headphones) to rename under the “Output” section.

-
Click the Rename button.
-
Confirm a short and descriptive name for the audio device.

-
Click the Rename button.
Once you complete the steps, the new name will apply, and it’ll be easier to identify when switching outputs from the Taskbar.
Rename microphone
To rename a microphone on Windows 11, use these steps:
-
Open Settings.
-
Click on System.
-
Click the Sound tab.
-
Select the microphone to rename under the “Input” section.

-
Click the Rename button.
-
Confirm a short and descriptive name for the microphone.

-
Click the Rename button.
After you complete the steps, the new name will be reflected on the microphone.
6. Enable Night light to reduce eye strain
On Windows 11, you should consider using the “Night Light” feature. This setting reduces the blue light emitted by the display, shifting towards warmer colors. This can facilitate easier sleep and minimize eye strain during nighttime computer use.
To enable “Night Light” on Windows 11, use these steps:
-
Open Settings.
-
Click on System.
-
Click the Display page on the right side.
-
Turn on the Night light toggle switch to enable the feature under the “Brightness & color” section.

Alternatively, click the Network and Volume button in the bottom-right corner of the taskbar to open the Quick Settings flyout (Windows key + A) and click the Night light button.
7. Change Windows Update advanced settings
Although the default settings for Windows Update are optimal for most people, you can turn on some additional features to customize the experience.
To change the Windows Update advanced settings, use these steps:
-
Open Settings.
-
Click on Windows Update.
-
Click the Advanced options tab.

-
Turn on the “Receive updates for other Microsoft products” toggle switch to enable automatic updates of Office apps and other Microsoft products.

-
Turn on the “Notify me when a restart is required to finish updating” toggle switch to receive a notification when a restart is pending to complete the update.
After you complete the steps, the device will receive updates for Microsoft products you may have installed on the system, and Windows 11 will notify you every time a restart is needed to complete an update.
8. Configure Windows Update active hours
Windows 11 includes an “active hours” feature that controls when the computer restarts to complete updates, preventing unexpected reboots during active use. While this feature operates automatically, you can also customize its settings manually.
To configure active hours on Windows 11, use these steps:
-
Open Settings.
-
Click on Windows Update.
-
Click the Advanced options tab.
-
Click the “Active hours” setting.
-
Select the Manually option in the “Adjust active hours” setting.

-
Specify the time range when you’re expected to be working on the computer.
Once you complete the steps, the system won’t try to restart the device between the hours specified in the “Active hours” setting.
9. Enable Hibernate on Windows 11
On Windows 11, to enable the hibernation feature, you first need to enable the feature through Command Prompt. Then you add the Hibernate option to the Start menu or change the behavior of the power button or laptop’s lid in the Control Panel.
Turn on Hibernate
To enable Hibernate on Windows 11, use these steps:
-
Open Start.
-
Search for Command Prompt or PowerShell, right-click the top result, and select the Run as administrator option.
-
Type the following command to check the hibernation status and press Enter:
powercfg /availablesleepstates
-
Type the following command to enable Hibernate on Windows 11 and press Enter:
powercfg /hibernate on

-
(Optional) Type the following command to turn off hibernation and press Enter:
powercfg /hibernate off
Once you complete the steps, the feature will enable, and you can now add the option to the “Power” menu with the instructions below.
Add Hibernate to Start menu
To add the Hibernate option to the Start’s Power menu, use these steps:
-
Open Control Panel.
-
Click on Hardware and Sound.
-
Click on Power Options.
-
Click the “Choose what the power button does” option.

-
Click the “Change settings that are currently unavailable” option.
-
Under the “Shutdown settings” section, check the Hibernate option.

-
Click the Save button.
After you complete the steps, the Hibernate option will be available in the Power menu in the Start menu.
10. Change power mode for performance or battery life
Windows 11 uses a default power mode that automatically balances performance with power consumption. However, depending on your computer hardware or situation, you can change the power mode to save battery life or increase performance at the cost of more energy consumption.
To select a different power mode on Windows 11 through the Settings app, use these steps:
-
Open Settings.
-
Click on System.
-
Click the Power (or Power & battery) tab.
-
In the “Power mode” setting, select the mode to use on Windows 11, including:
- Best power efficiency – saves energy by reducing the device performance when possible.
- Balanced – automatically balances performance with energy consumption on capable hardware.
- Best performance – offers the most performance, but it uses more energy.

Once you complete the steps, Windows 11 will control the power consumption based on the selected mode, offering more performance, better battery life, or a balance between performance and energy.
11. Show file extensions in File Explorer
By default, File Explorer hides the extensions of known file types. While file extensions are often unnecessary, they provide a visual cue for quickly identifying file formats. Additionally, displaying extensions simplifies the process of changing compatible extensions when creating scripts or batch files.
To show extensions in File Explorer on Windows 11, use these steps:
-
Open File Explorer.
-
Click the View button in the command bar.
-
Select the Show submenu and choose the “File name extensions” option.

After you complete the steps, File Explorer will show extensions for known file formats on Windows 11.
12. Change default startup page on File Explorer
By default, File Explorer opens the Home page during startup, but you can change this behavior to, for example, the “This PC” page for faster access to your drives and other network locations.
To change the default start page to This PC in File Explorer, use these steps:
-
Open File Explorer.
-
Click the See more (three-dotted) drop-down menu and select Options.

-
Click the General tab.
-
Select the This PC option from the “Open File Explorer to” menu.

-
Click the Apply button.
-
Click the OK button.
Once you complete the steps, File Explorer will now open on “This PC” instead of the Home page by default. It’s important to note you can also choose the third option, which opens up the OneDrive folder by default.
13. Disable annoying ads on Windows 11
Windows 11 can sometimes show you ads that might look like regular parts of the system. You might see suggestions to use certain Microsoft apps, get pop-up messages recommending things, or see ads for products like OneDrive while browsing files. If you don’t like these ads, you can usually find settings to turn them off.
To disable advertisements on Windows 11, use these steps:
-
Open Settings.
-
Click on Privacy & security.
-
Click the General setting under the “Windows permissions” section.

-
Turn off the “Let apps show me personalized ads by using my advertising ID” toggle switch.

-
Turn off the “Show me suggested content in the Settings app” toggle switch.
-
Click on System.
-
Click the Notifications tab.
-
Clear the “Suggest ways to get the most out of Windows and finish setting up this device” option.

-
Clear the “Get tips and suggestions when using Windows” option.
-
Click on Apps.
-
Click the Installed apps tab.
-
Click the three-dotted button from the left side and choose the Uninstall button for the promotional app to remove.
-
Click the Uninstall button again.

-
Click on Personalization.
-
Click the Device usage tab.
-
Turn off all the options to prevent personalized tips, ads, and recommendations.

After you complete the steps, you should no longer see as many advertisements across the experience.
Turn off File Explorer ads
To disable ads on File Explorer, use these steps:
-
Open File Explorer.
-
Click the See more (three-dotted) button and click on Options.

-
Click the View tab.
-
Clear the “Show sync provider notifications” option.

-
Click the Apply button.
-
Click the OK button.
Once you complete the steps, File Explorer will no longer show promotional notifications for OneDrive or other products.
14. Disable annoying notifications
Windows 11 and the apps you use often show you notifications. These messages let you know about things like new messages or problems that need fixing. However, they can sometimes be distracting. If you don’t want to see these pop-up notifications, you can turn them off completely or just for certain apps. This helps you stay focused on your work without constant interruptions.
To disable all system and app notifications on Windows 11, use these steps:
-
Open Settings on Windows 11.
-
Click on System.
-
Click the Notifications tab.
-
Turn off the Notifications toggle switch.

Once you complete the steps, apps and the system will stop showing notifications on the desktop.
Although this option disables notifications for the entire system, some applications have their own notifications system. You will have to change the app’s settings if this is the case.
Disable notifications per app
To turn off notifications for a specific app, use these steps:
-
Open Settings.
-
Click on System.
-
Click the Notifications tab.
-
Turn off the app notification toggle switch under the “Notifications from apps and other senders” section.

After you complete the steps, the app will stop showing notifications, but notifications will remain available for system alerts and other apps.
Alternatively, you can disable notifications for a specific app using the “Windows key + N” keyboard shortcut, click the menu (three-dotted) button on the top-right, and select the “Turn off all notifications for” option.
Enable Do Not Disturb
If you like to see your notifications in the Notification Center but find those pop-up messages in the corner distracting, you can use a feature called “Do Not Disturb.” This setting lets you still see your notifications, but it hides those annoying pop-ups.
To enable Do Not Disturb through the Settings app on Windows 11, use these steps:
-
Open Settings.
-
Click on System.
-
Click the Notifications tab.
-
Turn on the “Do not disturb” toggle switch to stop distractions on Windows 11.

Once you complete the steps, the system will silence all notification banners. However, all the alerts will continue to appear in the Notification Center.
Schedule Do Not Disturb
To turn on or off Do Not Disturb automatically, use these steps:
-
Open Settings.
-
Click on System.
-
Click the Notifications tab.
-
Turn on the “Do not disturb” toggle switch.
-
Click the “Turn on do not disturb automatically” setting.
-
Check the During these times option.
-
Set the on and off time to silence notifications.

-
Choose the repeat setting.
After you complete the steps, the Do Not Disturb feature will enable and disable automatically, depending on your configuration.
In addition to setting up a schedule, you can also decide whether to stop notifications banners at certain times, such as when duplicating the display, playing games or apps in full-screen mode, and for the first hours after a feature update installation.
15. Disable startup apps to improve boot time
If you have many apps set to start automatically when you turn on your computer, you might notice a few things. Your computer will take longer to start, it might feel slow, and your battery will last less. To make your computer start faster and save battery, it’s usually a good idea to limit the number of apps that start automatically.
To disable apps from launching automatically at startup on Windows 11, use these steps:
-
Open Settings.
-
Click on Apps.
-
Click the Startup tab.
-
Turn off the toggle switch to disable apps on the startup.

Once you complete the steps, the apps will no longer start automatically every time you turn on your computer.
Turn on restartable apps
Windows 11 also can restart certain apps when you sign back into the account after a restart. However, usually, this is not the preferred behavior.
To disable restartable apps on Windows 11, use these steps:
-
Open Settings.
-
Click on Accounts.
-
Click the Sign-in options page.
-
Turn off the “Automatically save my restartable apps and restart them when I sign back in” toggle switch under the “Additional settings” section.
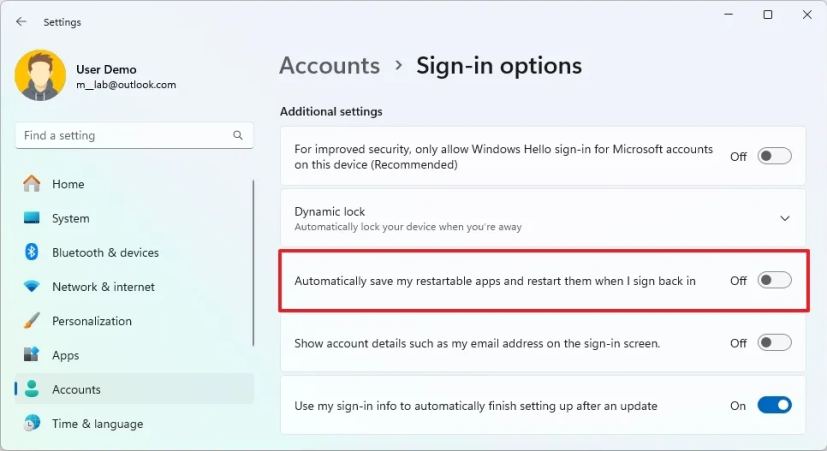
After you complete the steps, Windows 11 won’t remember the running in the last session to restart them when you sign back into the account.
16. Configure Storage Sense to free up space
Another setting that every user must configure is Storage Sense. When a device runs low on space, it’s critical to free up space to make storage available for other files and improve system performance. Usually, you should never use more than 70 percent of the total capacity to prevent performance issues.
On Windows 11, you have multiple ways to free up hard drive space, but Storage Sence is perhaps the best feature since it helps to manage storage space automatically.
To free up space with Storage Sense on Windows 11, use these steps:
-
Open Settings.
-
Click on System.
-
Click the Storage tab.
-
Click the Storage Sense setting.
-
Check the “Keep Windows running smoothly” option.
-
Turn on the “Automatic User content cleanup” toggle switch.

-
Under the ” Configure cleanup schedules ” section, use the “Run Storage Sense” setting and select the “During low free disk space” option.
-
Use the “Delete files in my recycle bin” setting to choose the files to delete from the Recycle Bin. (Then the 1-day option clears the most files.)
-
Use the “Delete files in my Downloads folder” setting to clean up the files from the Downloads folder. (You want to make a copy of any important file before selecting this option.)
-
Under the “Locally available cloud content” section, use the OneDrive setting and select when synced files should become online-only to free up space.
-
Click the “Run Storage Sense now” button.
Once you complete the steps, Windows 11 will free up space making more room to store other files. Also, since you are enabling the feature, Storage Sense will run automatically during low available drive space.
17. Change default web browser on Windows 11
If you prefer another web browser (such as Google Chrome or Mozilla Firefox) other than Microsoft Edge to browse the web, you can change the system settings to any browser with the new default so that links will open automatically with the application of your choice.
To change the default browser on Windows 11, use these steps:
-
Open Settings.
-
Click on Apps.
-
Click the Default apps page from the left side.
-
Select the web browser (Google Chrome or Mozilla Firefox) to make the new default on Windows 11.

-
Click the Set default button.

-
(Optional) Click the “.pdf” protocol and select the Switch anyway option to make your preferred browser the new default.
-
Click the OK button.
Once you complete the steps, the application will become the new default browser. However, it won’t be the default for everything. Microsoft Edge and Bing will still be the default for web results when using Windows Search and clicking links from the Widgets dashboard.
18. Enable Dynamic Refresh Rate (DRR)
Dynamic Refresh Rate is a feature that helps your laptop or computer save battery power. It basically adjusts how quickly the screen refreshes. This might make the picture look slightly different, but it saves energy.
To use this feature, you need a special type of screen known as “Variable Refresh Rate” (VRR) that can refresh at least 120 times per second (120Hz). You also need the right kind of graphics driver installed on your computer.
To enable Dynamic Refresh Rate on Windows 11, use these steps:
-
Open Settings.
-
Click on System.
-
Select the Display tab on the right side.
-
Click the Advanced display setting under the “Related settings” section.

-
Choose the monitor from the “Select a display to view or change settings” section if you have a multi-monitor setup.
-
Turn on the “Dynamic refresh rate” toggle switch to enable the DRR feature.

Once you complete the steps, the device will apply the refresh rate. If the computer has the “Dynamic” option, the system will automatically lower the refresh rate to save power, reducing the quality of your overall experience.
19. Enable auto brightness feature
Although you can adjust the screen brightness manually, Windows 11 can automatically control the brightness and contrast to improve content visibility in different environments while saving battery life.
To disable content adaptive brightness control, use these steps:
-
Open Settings.
-
Click on System.
-
Click the Display tab.
-
Click the Brightness setting under the “Brightness & color” section.
-
Turn off the “Change brightness automatically when lighting changes” toggle switch on devices that have an ambient sensor.
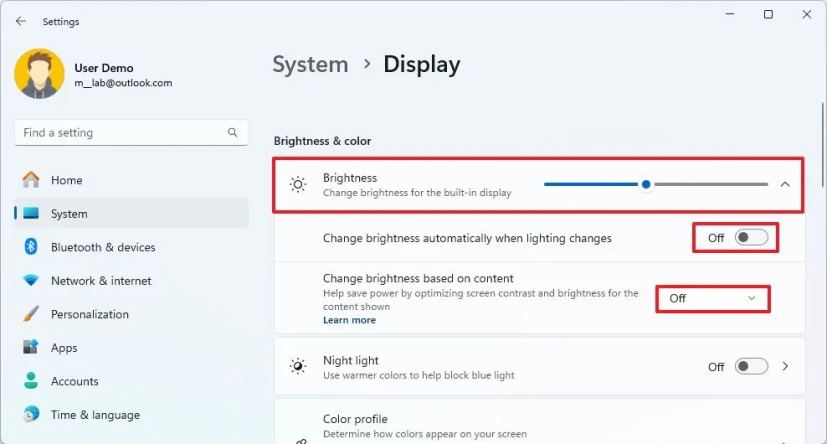
-
Choose the “Off” option in the “Change brightness based on content” setting to disable the “Content Adaptive Brightness Control” (CABC) feature.
After you complete the steps, Windows 11 will use the ambient sensor to adjust the brightness according to the light in the room. If you enabled the “Content Adaptive Brightness Control” (CABC) feature, the system would change the brightness and contrast settings based on the content being displayed on the screen to improve battery performance.
It’s important to note that the Content Adaptive Brightness Control feature can reduce image quality. If color accuracy is important, it’s best to disable it.
If the screen keeps changing the brightness levels automatically, you may need to change some additional energy settings on Windows 11, especially if you have a Copilot+ PC.
20. Change theme to personalize the desktop
A theme is the easiest way to refresh the appearance of the desktop. On Windows 11, themes are packages containing different wallpapers, accent colors, mouse cursor customizations, and sounds.
Windows 11, by default, includes six themes, including Windows (light), Windows (dark), Glow, Sunrise, Capture mentions, and Flow. However, you can also download plenty more from the Microsoft Store.
To change themes on Windows 11, use these steps:
-
Open Settings.
-
Click on Personalization.
-
Click the Themes tab.

-
Choose one of the available default themes to apply it.

-
(Optional) Click the Browse themes button.
-
Select a theme from the Microsoft Store.
-
Click the Get button.

-
Click the Open button.
-
Choose the new theme to apply it under the “Current theme” section.
Once you complete the steps, the theme will apply to set a background image on the desktop, custom accent color, and system color mode.
21. Change the mouse cursor and pointer colors
On Windows 11, you can change the appearance of your mouse pointer. Instead of the regular white color, you can choose different colors and sizes. You might be surprised to find these settings in the “Accessibility” section, not where you’d usually expect them, which is the “Personalization” section.
To change the mouse pointer color on Windows 11, use these steps:
-
Open Settings.
-
Click on Accessibility.
-
Click the “Mouse pointer and touch” tab.
-
Select the Custom option under the “Mouse pointer” section.
 Quick note: You can also choose from three other styles, including White, Black, and Inverted.
 -
Select one of the recommended colors.
-
(Optional) Click the “Choose another color” option to create a custom color for the mouse pointer.
Once you complete the steps, the new color will apply to the mouse pointer.
Change mouse size on Windows 11
To change the mouse pointer size on Windows 11, use these steps:
-
Open Settings.
-
Click on Accessibility.
-
Click the “Mouse pointer and touch” tab.
-
Use the Size slider to change the mouse pointer size under the “Mouse pointer” section.

After you complete the steps, the new size will apply to the mouse pointer.
22. Optimize gaming performance on Windows 11
If you play games on your computer computer, Microsoft recommends disabling the Memory Integrity and Virtual Machine Platform features to improve gaming performance.
Disable Memory Integrity
To disable Memory Integrity on Windows 11, use these steps:
-
Open Start.
-
Search for Windows Security and click the top result to open the app.
-
Click on Device Security.
-
Click the “Core isolation details” option under the “Core isolation” section.

-
Turn off the “Memory integrity” toggle switch to optimize gaming.

-
Restart the computer.
Once you complete the steps, the security feature will be disabled on the computer to improve gaming performance.
Disable virtualization
To disable virtualization on Windows 11, use these steps:
-
Open Settings.
-
Click on Apps.
-
Click the Optional features tab.
-
Click the “More Windows features” setting under the “Related settings” section.

-
Clear the “Virtual Machine Platform” option to disable the feature and optimize gaming.

-
Click the OK button.
-
Click the Restart now button.
After you complete the steps, the virtualization will be disabled to improve gaming performance on Windows 11.
Once you are done playing, it’s recommended to re-enable the features. You can use the same instructions outlined above, but on step 5 (first set of steps), turn on the toggle switch to re-enable Memory Integrity, and do not restart yet. Then, on step 4 (second set of steps), check the option to re-enable virtualization and restart the computer.
23. Enable System Restore to recover Windows 11
System Restore is a handy feature on Windows 11 that you should also consider using. When the system detects a significant change, such as installing an update, it takes a snapshot of the current system state (including a backup of the Registry) as a restore point. If your computer stops working correctly, you can use this snapshot to restore it to its previous state without losing any of your files.
The only problem is that this feature is turned off by default, so you need to turn it on yourself before you can use it.
To enable and create a restore point on Windows 11, use these steps:
-
Open Start.
-
Search for Create a restore point and click the top result to open the app.
-
Select the system drive (C) and click the Configure button under the “Protection Settings” section.

-
Select the “Turn on system protection” option.

-
Click the Apply button.
-
Click the OK button.
-
Click the Create button.

-
Confirm a name for the Windows 11 restore point.
-
Click the Create button.
-
Click the Close button.
Once you complete the steps, the system will create a restore point that includes system files, installed applications, system settings, and a backup of the Registry. You can use this to restore the system to a working state.
Although this feature can detect and create restore points when specific system changes happen, it’s also possible to create restore points daily if System Restore cannot detect a change that will cause problems on the computer.
Mauro Huculak is a Windows How-To Expert and founder of Pureinfotech in 2010. With over 23 years as a technology writer and IT Specialist, Mauro specializes in Windows, software, and cross-platform systems such as Linux, Android, and macOS.
Certifications: Microsoft Certified Solutions Associate (MCSA), Cisco Certified Network Professional (CCNP), VMware Certified Professional (VCP), and CompTIA A+ and Network+.
Mauro is a recognized Microsoft MVP and has also been a long-time contributor to Windows Central.
You can follow him on YouTube, Threads, BlueSky, X (Twitter), LinkedIn and About.me. Email him at [email protected].