
- To create an entire Registry backup on Windows 11, open System Protection, select the “C” drive, and click “Create.”
- To manually create a backup of specific Registry keys, open the Registry Editor, select “Computer,” click “File,“ and select “Export.”
UPDATED 3/8/2024: If you are not careful when editing the Registry on Windows 11, many problems could occur, so it is critical to create a backup of the entire Registry.
The Registry is an essential component of Windows 11. It’s a hierarchical database that stores the operating system’s low-level settings and applications designed to use this database. You should never make changes to the system database. However, sometimes, modifying the database to fix problems or tweak settings you couldn’t do otherwise might be necessary.
If you plan to make system changes (that being to remove the Gallery page File Explorer, restore the legacy context menu, disable Microsoft Defender Antivirus, run programs during startup, etc.), Windows 11 includes at least two ways to create a backup and restore the Registry using System Restore and Registry Editor.
In this guide, I will explain how to create a backup of the Windows Registry and how to restore it.
- Backup registry using System Restore on Windows 11
- Restore Registry backup using System Restore on Windows 11
- Backup Registry using Registry Editor on Windows 11
- Restore Registry backup using Registry Editor on Windows 11
Backup registry using System Restore on Windows 11
To create a backup of the Registry on Windows 11, use these steps:
-
Open Start on Windows 11.
-
Search for Create a restore point and click the top result to open the app.
-
Choose the system drive (C) and click the Configure button under the “Protection Settings” section.

-
Select the “Turn on system protection” option.

-
Click the Apply button.
-
Click the OK button.
-
Click the Create button.

-
Confirm a name for the Windows 11 Registry backup.
-
Click the Create button.
-
Click the Close button.
Once you complete the steps, the system will create a restore point that includes system files, installed applications, system settings, and, more importantly, a backup of the entire Registry database. Then, you can use the same tool to restore your computer to a working condition.
Restore registry backup using System Restore on Windows 11
System Restore offers multiple ways to recover the Registry on Windows 11. If you can access the desktop, you can restore the database to its previous state using the System Restore app. If you don’t have access to the desktop, you can use the recovery tools to boot in Safe Mode or Windows Recovery Environment (WinRE).
You can use these steps to start the computer in Safe Mode and then continue with the steps below. If you can’t start the device, use these instructions to access the Advanced startup environment. Then go to Troubleshoot > Advanced Options > System Restore, and continue with step 4 below.
To restore the Registry from a previous backup, use these steps:
-
Open Start.
-
Search for Create a restore point and click the top result to open the app.
-
Click the System Restore button.

-
Click the Next button.
-
Select the restore point to restore the Registry on Windows 11.

-
Click the Next button.
-
Click the Finish button.
After you complete the steps, the computer may need a reboot to finish restoring the backup.
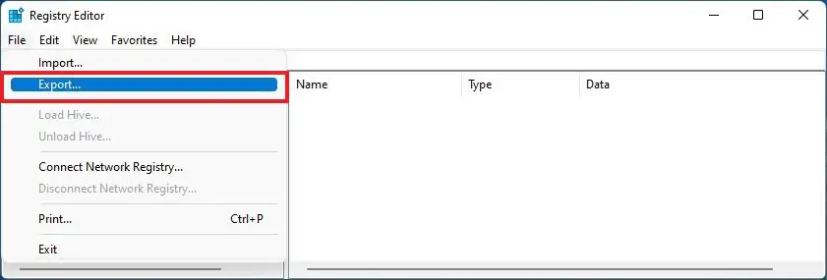
Backup Registry using Registry Editor on Windows 11
To create a backup by exporting the Registry database on Windows 11, use these steps:
-
Open Start.
-
Search for regedit and click the top result to open the app.
-
Click on Computer on the left side.
-
Click the File menu and select the Export option.
-
Confirm a name for the Registry backup.

-
Click the Save button.
Once you complete the steps, you will have a “.reg” file containing the Registry backup.
Restore Registry backup using Registry Editor on Windows 11
To restore the Registry database on Windows 11 to fix problems, use these steps:
-
Open Start.
-
Search for regedit and click the top result to open the app.
-
Click on Computer on the left side.
-
Click the File menu and select the Import option.

-
Select the registry backup file.
-
Click the Open button.

-
Restart the computer.
After you complete the steps, the backup will be restored, replacing the current database on Windows 11.
Update March 8, 2024: This guide has been updated to ensure accuracy and reflect changes to the process.
Mauro Huculak is a Windows How-To Expert and founder of Pureinfotech in 2010. With over 23 years as a technology writer and IT Specialist, Mauro specializes in Windows, software, and cross-platform systems such as Linux, Android, and macOS.
Certifications: Microsoft Certified Solutions Associate (MCSA), Cisco Certified Network Professional (CCNP), VMware Certified Professional (VCP), and CompTIA A+ and Network+.
Mauro is a recognized Microsoft MVP and has also been a long-time contributor to Windows Central.
You can follow him on YouTube, Threads, BlueSky, X (Twitter), LinkedIn and About.me. Email him at [email protected].