
On Windows 11, even though you can create a Microsoft account during the initial setup, it’s possible to create additional accounts to share the computer with other people after the setup has been completed.
You can use multiple account types on Windows 11, but the recommended type is a Microsoft account since it’s the easiest method to configure, provides a higher level of security, and gives you easy access to virtually any service from Microsoft, including OneDrive, Microsoft Store, Outlook, Xbox network, and Office (if the account has a Microsoft 365 subscription).
In addition, a Microsoft account gives you some other important benefits, such as file backup to the cloud with the ability to sync your files, credentials, and settings across devices.
This guide will teach you the different methods to create a profile with a Microsoft account on Windows 11.
- Create Microsoft account from Settings on Windows 11
- Create Microsoft account from Control Panel on Windows 11
- Create Microsoft account from Family settings on Windows 11
Create Microsoft account from Settings on Windows 11
The easiest way to create a standard user account with a Microsoft account for Windows 11 is to use the “Other Users” settings.
To create and set up a Microsoft account through Settings on Windows 11, use these steps:
-
Open Settings on Windows 11.
-
Click on Accounts.
-
Click the Other Users tab.
-
Under the “Other users” section, click the Add account button.

-
Confirm the Microsoft account of the person to add to Windows 11.
 Quick tip: If the person doesn’t have a Microsoft account, they can create one online, or you can choose the “I don’t have this person’s sign-in information” option and follow the on-screen directions to create a new account.
 -
Click the Next button.
-
Click the Finish button.
-
Open Start.
-
Click on the profile menu and choose the Sign-out option.
-
Select the new account from the Sign-in screen.
-
Click the Sign in option.

-
Sign in with the Microsoft account credentials.

-
Click the “Yes, set up” button to configure the account using Windows Hello.
Quick tip: If the setup fails, click the “Close” button, and the PIN setup should appear. -
Click the Next button (if applicable).
-
Confirm the PIN to access the Microsoft account on Windows 11.

-
Click the OK button.
-
Configure the file backup settings to OneDrive. If you click the Next button, the operating system will upload the user’s profile folders (Desktops, Pictures, and Documents) to OneDrive. If you choose the “Only save files to this PC” option, the files will only be available on the computer.

-
Click the Decline option to skip the Microsoft 365 promotion (if applicable).
-
Click the Decline option to skip the OneDrive promotion (if applicable).
-
Choose the user’s privacy settings.
-
Click the Next button.

-
Click the Accept button.
Once you complete the steps, the system will create a new profile, but without setting it up until the user signs in for the first time.
Create Microsoft account from Control Panel on Windows 11
Alternatively, it’s possible to create a Microsoft account from the legacy User Accounts (netplwiz) settings from the Control Panel.
To create a Microsoft account from netplwiz on Windows 11, use these steps:
-
Open Start.
-
Search for netplwiz and click the top result to open the Control Panel User Accounts settings.
-
Click the Add button.

-
Confirm the Microsoft account of the person to add to Windows 11.

-
Click the Next button.
-
Click the Finish button.
-
Click the OK button.
-
Open Start.
-
Click on the profile menu and choose the Sign-out option.
-
Select the new account from the Sign-in screen.
-
Click the Sign in option.
-
Sign in with the Microsoft account credentials.
-
Click the “Yes, set up” button to configure the account using Windows Hello.
Quick tip: If the setup fails, click the “Close” button, and the PIN setup should appear. -
Click the Next button (if applicable).
-
Confirm the PIN to access the Microsoft account on Windows 11.
-
Click the OK button.
-
Configure the file backup settings to OneDrive. If you click the Next button, the operating system will upload the user’s profile folders (Desktops, Pictures, and Documents) to OneDrive. If you choose the “Only save files to this PC” option, the files will only be available on the computer.
-
Click the Decline option to skip the Microsoft 365 promotion (if applicable).
-
Click the Decline option to skip the OneDrive promotion (if applicable).
-
Choose the user’s privacy settings.
-
Click the Next button.
-
Click the Accept button.
After you complete the steps, Windows 11 will create the new profile using the Microsoft account.
Create Microsoft account from Family settings on Windows 11
On Windows 11, you can also use “Family” settings to create new accounts. Usually, you would use these settings for younger people who need supervision. Once you configure an account through these settings, you can use the Microsoft Family Safety features to limit screen time, control the apps they can access, configure different parental controls, and more.
To create a family member with a Microsoft account on Windows 11, use these steps:
-
Open Settings.
-
Click on Accounts.
-
Click the Family tab.
-
Under the “Your family” section, click the Add someone button.

-
Confirm the Microsoft account of the person to add to Windows 11.

-
Click the Next button.
-
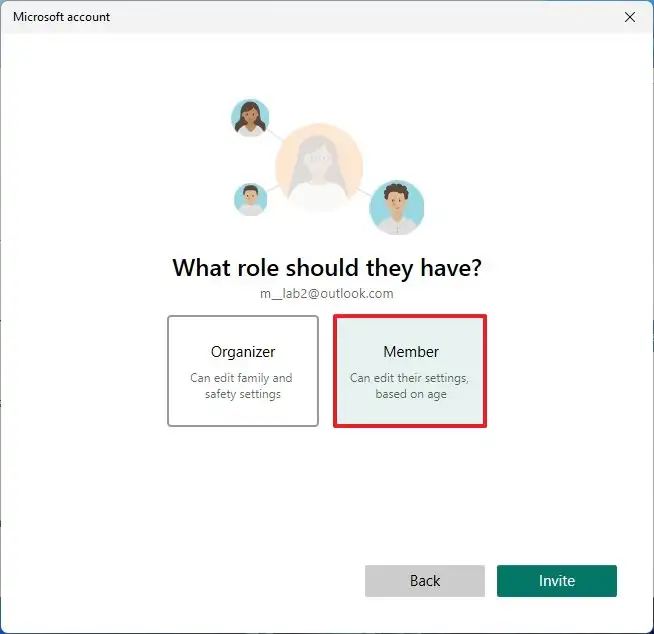
Choose the Member option to create an account for a young person. Or click the Organizer option to create an account for someone who will be able to manage the family settings.
-
Click the Invite button.
-
Open Start.
-
Click on the profile menu and choose the Sign-out option.
-
Select the new account from the Sign-in screen.
-
Click the Sign in option.
-
Sign in with the Microsoft account credentials.
-
Click the “Yes, set up” button to configure the account using Windows Hello.
Quick tip: If the setup fails, click the “Close” button, and the PIN setup should appear. -
Click the Next button (if applicable).
-
Confirm the PIN to access the Microsoft account on Windows 11.
-
Click the OK button.
-
Configure the file backup settings to OneDrive. If you click the Next button, the operating system will upload the user’s profile folders (Desktops, Pictures, and Documents) to OneDrive. If you choose the “Only save files to this PC” option, the files will only be available on the computer.
-
Click the Decline option to skip the Microsoft 365 promotion (if applicable).
-
Click the Decline option to skip the OneDrive promotion (if applicable).
-
Choose the user’s privacy settings.
-
Click the Next button.
-
Click the Accept button.
Once you complete the steps, the Microsoft account will be created for the family member on Windows 11.
As part of the process, the person with the new account has to accept the invitation from their Microsoft account and then click the “Join now” button on the family safety setup page.
Mauro Huculak is a Windows How-To Expert and founder of Pureinfotech in 2010. With over 23 years as a technology writer and IT Specialist, Mauro specializes in Windows, software, and cross-platform systems such as Linux, Android, and macOS.
Certifications: Microsoft Certified Solutions Associate (MCSA), Cisco Certified Network Professional (CCNP), VMware Certified Professional (VCP), and CompTIA A+ and Network+.
Mauro is a recognized Microsoft MVP and has also been a long-time contributor to Windows Central.
You can follow him on YouTube, Threads, BlueSky, X (Twitter), LinkedIn and About.me. Email him at [email protected].