
- To create a partition on Windows 11 from unpartitioned space, open Settings > Storage > Advanced storage settings > Disks & volumes, select the drive, click “Create volume,” choose a label, letter, file system, and size for the new partition, and click “Format.”
- You can also open Disk Management, right-click the unallocated space, and select “New Simple Volume.” Then, follow the wizard to create a partition on Windows 11.
- Alternatively, you can also create a partition from the Setup experience and through Command Prompt and PowerShell.
On Windows 11, you can create a new partition on a hard drive using different tools. In this guide, you will learn the steps for using the Settings app, Disk Management, Command Prompt, PowerShell, and the installation setup. A partition (also referred to as a volume) describes the logical section on the drive that is formatted and configured with a file system (such as NTFS or FAT32) and drive letter to store files. Usually, you can have multiple partitions on the hard drive that will appear on File Explorer as different drives.
You can create as many partitions as you need, but there are limitations depending on the partition style. For example, if the device uses the Master Boot Record (MBR) partition style, you can only have up to four “primary” partitions. Only one of them can be set as “active,” usually, this is the partition where the operating system is installed.
Also, partition number four will be converted automatically into an “extended” partition. An extended partition can’t store data but allows you to have additional “logical” partitions. This workaround enables the system to have more than four partitions. Technically, inside an extended partition, you don’t have a limit on the number of partitions that you can create.
If the hard drive is initialized as GUID Partition Table (GPT), you can create as many primary partitions as needed since the limitation is 128 partitions. (With these instructions, you can also convert a drive from MBR to GPT.)
This guide will teach you the different ways to create a new partition on a hard drive on Windows 11. If you have to delete a partition, use these instructions.
- Create a partition on Windows 11 from Settings app
- Create a partition on Windows 11 from Disk Management
- Create a partition on Windows 11 from Command Prompt
- Create a partition on Windows 11 from PowerShell
- Create a partition on Windows 11 from Setup
Create a partition on Windows 11 from Settings app
To create a partition from unpartitioned space on Windows 11, use these steps:
-
Open Settings on Windows 11.
-
Click on Storage.
-
Click on Advanced storage settings under the “Storage Management” section.
-
Click the “Disks & volumes” setting.

-
Select the SSD or HDD storage to create a new partition.
-
Select the “Unallocated” space and click the Create volume button.
 Quick note: If the drive already has a partition, select and open the properties page and click the “Delete” button in the “Format” section. However, this process will delete the data currently on the drive. As a result, I recommend that the partition files be backed up before proceeding.
 -
Confirm a label for the drive in the “Label” setting.
-
Select the drive letter to make it available on File Explorer in the “Drive Letter” setting.
-
Select the NTFS option in the “File System” setting.
-
Confirm the size of the partition in the “Size” setting.
-
Click the Advanced setting.
-
Check the “Perform a quick format” option.
-
Click the Format option.
Once you complete the steps, the partition will be created, formatted, and ready to store files.
If you want to create another partition on a drive that already has a partition taking the entire storage space, you first need to shrink the partition to create unallocated space to set up another partition.
Create a partition on Windows 11 from Disk Management
To create a hard drive partition from the Disk Management tool, use these steps:
-
Open Start.
-
Search for Create and format hard disk partitions and click the top result to open the Disk Management app.
-
Right-click the drive with the “Unallocated” and select the “New Simple Volume” option.
Quick note: If the drive already has a partition, right-click it and select the “Delete Volume” option. However, this process will delete the data currently on the drive. As a result, I recommend that the partition files be backed up before proceeding.
-
Click the Next button.
-
Confirm the size of the partition in the “Size” setting.

-
Click the Next button.
-
Select the “Assign the following driver” option and choose the letter for the new partition.

-
Click the Next button.
-
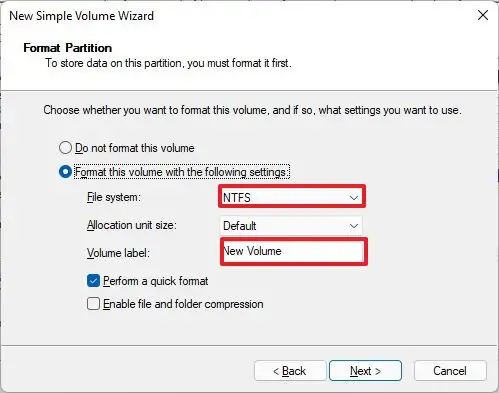
Select the “Format this volume with the following settings” option.
-
Select the NTFS option in the “File System” setting.
-
Confirm the drive’s name in the “Volume label” setting.
-
Check the “Perform a quick format” option.
-
Click the Next button.
-
Click the Finish button.
After you complete the steps, Disk Management will create and format the partition on the SSD or HDD storage on Windows 11.
Create a partition on Windows 11 from Command Prompt
To create a partition from Command Prompt, use these steps:
-
Open Start.
-
Search for Command Prompt, right-click the top result, and click on Run as an administrator.
-
Type the following command to launch the diskpart tool and press Enter:
diskpart
-
Type the following command to view the disks on your computer and press Enter:
list disk
-
Type the following command to select the drive to create a partition and press Enter:
select disk 0
In the command, change “0” for the number of the disk to create a partition.
-
Type the following command to create a primary partition and press Enter:
create partition primary
Quick tip: You can specify the amount of space to assign for the new partition using the size=x (where x is the amount of space in megabytes) to the command I showed you above. The command would look something like this: create partition primary size=1000
-
(Optional) Type the following command to list the volumes on your computer (RAW means that the volume doesn’t have a file system) and press Enter:
list volume
-
Type the following command to format the partition with the NTFS file system and press Enter:
format fs=ntfs quick
-
Type the following commands to assign a drive letter and press Enter:
assign letter=f
Quick tip: If you use theassigncommand, the drive will get a letter automatically, but if you use theassign letter=xcommand, you need to specify a letter that is not currently in use. In the command, also remember to change “2” for the number of the volume you want to assign a letter.
Once you complete the steps, Command Prompt will create and format the partition on the hard drive.
Create a partition on Windows 11 from PowerShell
To create a partition with PowerShell commands, use these steps:
-
Open Start.
-
Search for PowerShell, right-click the result, and select the Run as administrator option.
-
Type the following command to identify the hard drive to partition and format and press Enter:
Get-Disk
-
(Optional) Type the following command to erase the entire drive and press Enter:
Get-Disk 7 | Clear-Disk -RemoveData
In the command, change “7” to the disk number of the drive to use. If you specify the number incorrectly, you could wipe out the wrong drive, causing data loss. This step is optional in case you want to create a partition on a drive with an existing partition.
-
Type “Y” to confirm that you want to wipe the specified drive, and press Enter.
-
Type the following command to create a partition using the NTFS file system, assign a name for the partition, and press Enter:
New-Partition -DiskNumber 7 -UseMaximumSize | Format-Volume -FileSystem NTFS -NewFileSystemLabel myUSBflash
In the command, change “7” with the disk number of the storage and change “myUSBflash” with the name you want to use for the new partition.
-
Type the following command to assign a drive letter to the storage and press Enter:
Get-Partition -DiskNumber 7 | Set-Partition -NewDriveLetter F

In the command, make sure to change “1” with the disk number of the drive you’re partitioning and change “F” with the letter to assign to the storage.
After you complete the steps, the partition should appear as a new drive and be accessible through File Explorer.
Create a partition on Windows 11 from Setup
To create a partition during the Windows 11 installation, use these steps:
-
Start your PC with a Windows 11 USB install media.
Important: To boot your computer using a USB flash drive, you may need to modify the UEFI firmware settings. This typically involves pressing one of the function keys (F1, F2, F3, F10, or F12), the “ESC,” or the “Delete” key. For precise instructions, refer to your manufacturer’s support website. It’s crucial to note that this process will erase all data on the hard drive. Therefore, it’s highly recommended to create a backup of your files before proceeding. -
Press any key to begin.
-
Click the Next button.
-
Click the Install now button.

-
Type the product key to activate Windows 11, or click the Skip button if this is a reinstallation.

-
Check the “I accept the license terms” option.
-
Click the Next button.
-
Choose the edition of Windows 11 to install if you skipped the product key.

-
Click the Next button.
-
Select the “Custom: Install Windows only (advanced)” option.

-
Select each partition on the drive and click the Delete button.
-
Select the “Drive 0 Unallocated Space” item.
-
Click the New button.

-
Choose the amount of space (in megabytes) for the partition that will hold Windows 11 and apps.

-
Click the Apply button.
-
Click the OK button. (Alongside the custom partition, Windows 11 will also create the additional partitions automatically required to install and run the system.)
-
(Optional) Select the “Drive 0 Unallocated Space” item.
-
Click the New button to create additional partitions with the remaining space (as necessary).
-
Select the “Drive 0 Partition 4 (Primary)” item from the list.
-
Click the Next button.

Once you complete the steps, the setup process will initiate a fresh installation of Windows 11 on the newly created partition. After the installation is complete, you will be required to go through the out-of-box experience (OOBE) to create an account and finalize the setup process.
Although the steps to use the “Disks & volumes” settings are exclusively for Windows 11, you can still refer to these instructions if you’re using Windows 10, 8.1, 7, and older if you use the Disk Mamanagent tool, Command Prompt, and PowerShell.
Update July 31, 2024: This guide has been updated to ensure accuracy and reflect changes to the process.
Mauro Huculak is a Windows How-To Expert and founder of Pureinfotech in 2010. With over 22 years as a technology writer and IT Specialist, Mauro specializes in Windows, software, and cross-platform systems such as Linux, Android, and macOS.
Certifications: Microsoft Certified Solutions Associate (MCSA), Cisco Certified Network Professional (CCNP), VMware Certified Professional (VCP), and CompTIA A+ and Network+.
Mauro is a recognized Microsoft MVP and has also been a long-time contributor to Windows Central.
You can follow him on YouTube, Threads, BlueSky, X (Twitter), LinkedIn and About.me. Email him at [email protected].