
- To fix account problems on Windows 11, create a new local account and check if the issue persists.
- If the problem is gone, transfer your files to the new profile and link it to your Microsoft account.
- Finally, delete the corrupted account to complete the transition.
On Windows 11, you can switch to a new account to resolve specific issues with your current user profile, including problems caused by system file corruption or misconfigured settings. If you’re experiencing problems with the Start menu, Taskbar, Microsoft Store, Settings app, or other built-in features that won’t load or function properly, this typically indicates something is damaged in the user profile.
These problems can occur after a system upgrade, malware infection, improper shutdown, or the installation of a poorly designed application. Rather than spending hours trying to troubleshoot every component, creating a new account often provides a faster and more effective solution.
The process of switching accounts to resolve the issues involves creating a new local administrator account and then confirming that the issue is not present in the new profile. If the problem has been resolved, you can then transfer your files, apps, and settings to the new account. Finally, you must unlink the Microsoft account or delete the old account, and then link the local account to your Microsoft account.
If the problem is still available in the new account, then the issue isn’t with the profile, but rather with the setup. In this case, stop with this process and continue troubleshooting the problem.
In this guide, I’ll explain the process to fix profile issues by switching to another account on Windows 11.
- Create a new local account on Windows 11
- Copy files and data to the new account on Windows 11
- Delete the account with problems on Windows 11
- Link a local account to a Microsoft account on Windows 11
Create a new local account on Windows 11
To create a local account on Windows 11, follow these steps:
-
Open Settings on Windows 11.
-
Click on Accounts.
-
Click the Other users tab.
-
Click the Add account button under the “Other users” section.

-
Click the “I don’t have this person’s sign-in information” option.

-
Click the “Add a user without a Microsoft account” option.

-
Create a Windows 11 local account by confirming a name and password.

-
Configure the security questions to recover your account if you lose your password.
-
Click the Next button.
-
(Optional) Select the newly created account and click the “Change account type” button.

-
Use the “Account type” drop-down menu and select the Administrator option.

-
Click the OK button.
After completing the steps, sign in to the new account and confirm that the problem has been resolved. If you no longer experience the same issue, it could be an issue with the current account.
Copy files and data to the new account on Windows 11
If the problem is related to the user account, you may consider switching to the new account by transferring your files, settings, and apps, and then linking the local account to your Microsoft account.
The process of transferring your files only involves copying the data from one folder to another. Usually, the apps installed on your computer are already available to all users. However, it’s something you should check, as it may not be the case for every application.
Finally, you will need to manually reapply your settings in the new account, as there is no way to export and import your entire system configuration to another account.
To transfer your files to the new account, follow these steps:
-
Sign in to the new account
-
Open File Explorer (Windows key + E).
-
Open the
C:\Usersfolder from the “This PC” page. -
Open your old profile folder (source).
Quick note: The system may prompt you for permission to access the folder, but since you’re using an administrator account, clicking the Continue button should grant you access to the profile folder. -
Snap the folder to the right side of the screen (Windows key + Right Arrow).
-
Open a second instance of File Explorer (Windows key + E).
-
Open the
C:\Usersfolder from the “This PC” page. -
Open your new profile folder (destination).
-
Snap the folder to the left side of the screen (Windows key + Left Arrow).

-
Open each of the folders (Desktop, Documents, Downloads, Music, Pictures, and Videos) in the source folder.
-
Select all of the files and click the Copy option.

-
Open each of the folders (Desktop, Documents, Downloads, Music, Pictures, and Videos) in the destination folder.
-
Click the Paste button.
Once you have completed transferring the files, configured your applications, and re-applied the settings in the new account, you can proceed to delete the old account.
Delete the account with problems on Windows 11
You can’t use the same Microsoft account on more than one account on the same computer. If you’re transferring to a new account, you can either unlink your Microsoft account or delete the profile that’s causing problems to avoid conflicts.
To delete the account causing issues on Windows 11, follow these steps:
-
Open Settings.
-
Click on Accounts.
-
Click the Other Users page.
-
Select the account and click the Remove button.
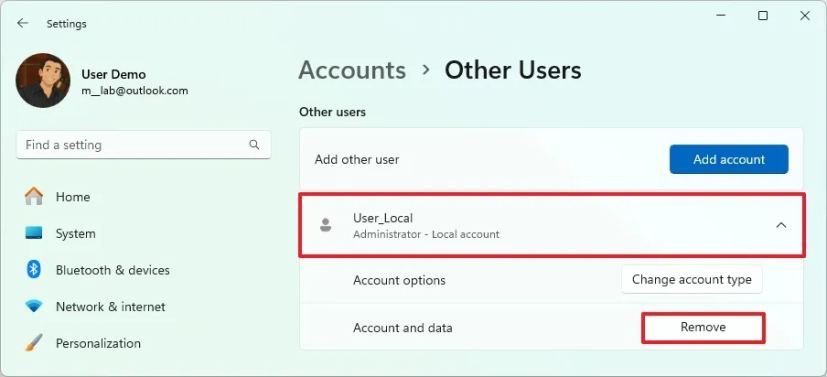
-
Click the “Delete account and data” button.

After you complete the steps, the account and files will be removed from the current setup, and you can proceed to link your Microsoft account to the new profile.
Link a local account to a Microsoft account on Windows 11
To link a local account with a Microsoft account, follow these steps:
-
Open Settings.
-
Click on Accounts.
-
Click the Your Info page on the right side.
-
Click the “Sign in with a Microsoft account instead” option for the Local account setting under the “Account settings” section.

-
Confirm your Microsoft account email address.
-
Click the Next button.
-
Confirm the account password.
-
Click the Sign in button.
-
Confirm the local account password.
 Quick tip: If the account doesn’t have a password, leave the option blank and click the Next button.
 -
(Option 1) Click the “Skip for now” option to skip the Windows Hello setup.
-
(Option 2) Click the Next button to create a PIN.
-
Create the new PIN to sign in to Windows 11.

-
Click the OK button.
-
Click the Verify button (if applicable).

-
Select the option to verify the account.
-
Confirm the email address to verify the account.

-
Click the Send code button.
-
Confirm the code sent to your recovery email address.
-
Click the Verify button.
Once you complete the steps, the local account will now be switched to a Microsoft account, and you will be able to access all the cloud features available for Windows 11.
Mauro Huculak is a Windows How-To Expert and founder of Pureinfotech in 2010. With over 22 years as a technology writer and IT Specialist, Mauro specializes in Windows, software, and cross-platform systems such as Linux, Android, and macOS.
Certifications: Microsoft Certified Solutions Associate (MCSA), Cisco Certified Network Professional (CCNP), VMware Certified Professional (VCP), and CompTIA A+ and Network+.
Mauro is a recognized Microsoft MVP and has also been a long-time contributor to Windows Central.
You can follow him on YouTube, Threads, BlueSky, X (Twitter), LinkedIn and About.me. Email him at [email protected].