
If you have a new laptop from HP, Asus, Acer, Dell, or another brand or a desktop computer with an external monitor with extremely warm yellowish colors, the problem could be that the display hasn’t been properly calibrated.
In the case of an external display, you can always use the built-in controls to adjust the red, green, and blue colors until you arrive at a cooler color level, but laptops don’t usually have display controls. However, you can use the Windows 11 calibration tool to reduce the amount of red and green colors to fix the warm colors on the screen.
In this guide, you will learn the steps to address the issue of significant warm colors on your Windows 11 computer’s display.
Calibrate display to fix warm colors on Windows 11
The Display Color Calibration tool has been available for a long time, and it’s a simple guided tool that allows for correcting the gamma, brightness, contrast, and primary colors (red, green, and blue) settings to improve the viewing experience.
Before using the calibration tool, open Settings > System > Display and confirm that the Night light feature is disabled since this could be the reason for the warm colors on the screen.
To fix extremely warm colors on your laptop’s display or external monitor on Windows 11, use these steps:
-
Open Start on Windows 11.
-
Search for Calibrate Display Color and click the top result to open the app.
-
Click the Next button.
-
Click the Next button again.
-
Use the slider to change the gamma setting until the dots are barely visible.

-
Click the Next button.
-
Click the Next button again.
-
Click the Next button one more time.
-
Use the display controls to increase or lower the brightness until you distinguish the elements of the photo.

-
Click the Next button.
-
Click the Next button again.
-
Click the Next button one more time.
-
Use the display controls to increase or lower the contrast without losing the wrinkles in the photo (if applicable).

-
Click the Next button.
-
Click the Next button again.
-
Click the Next button one more time.

-
Use the sliders for red, green, and blue to fix the warm color by adjusting until you get a cooler color scheme.
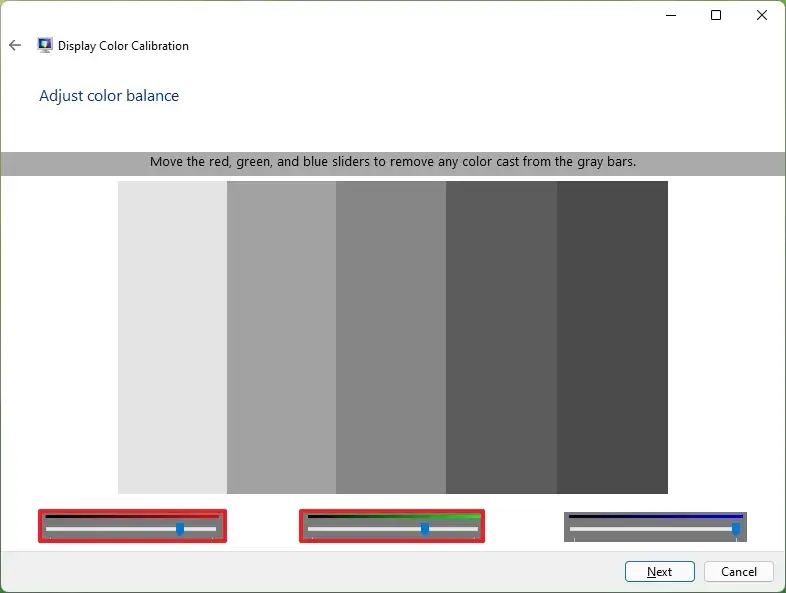 Quick tip: If you want to fix a warm yellowish color on the laptop screen, try lowering the red and green colors one level at a time until you find the right balance.
 -
Click the Next button.
-
Clear the “Start ClearType Tuner” option to calibrate how text is rendered on the screen.

-
Click the Finish button.
Once you complete the steps, the screen will show cooler colors instead of warm colors. If calibrating the screen didn’t fix the problem, you should check your manufacturer’s support website for other ways to calibrate the display. If you continue with the same problem, contact technical support since it might be a problem with the laptop display or external monitor.
This guide focuses on Windows 11, but the instructions will also work on Windows 10.
In the case that you have a display with HDR support, you can enable HDR for apps using ICC profiles on Windows 11. Also, on HDR displays, you can enable the Auto HDR feature to convert compatible games from standard dynamic range (SDR) to high dynamic range (HDR) automatically to unlock the brighter and bolder colors available on compatible displays
Mauro Huculak is a Windows How-To Expert and founder of Pureinfotech in 2010. With over 23 years as a technology writer and IT Specialist, Mauro specializes in Windows, software, and cross-platform systems such as Linux, Android, and macOS.
Certifications: Microsoft Certified Solutions Associate (MCSA), Cisco Certified Network Professional (CCNP), VMware Certified Professional (VCP), and CompTIA A+ and Network+.
Mauro is a recognized Microsoft MVP and has also been a long-time contributor to Windows Central.
You can follow him on YouTube, Threads, BlueSky, X (Twitter), LinkedIn and About.me. Email him at [email protected].