
- To change the wireless connection priority order on Windows 11 (or 10), open Settings > Network & internet > Wi-Fi, click on “Show available networks,” select the network, check “Connect automatically,” and complete the connection.
- You can also use the “netsh” command to change the Wi-Fi profile priority order with Command Prompt (or PowerShell).
On Windows 11 (and 10), you can change the priority order of Wi-Fi network connections to ensure the laptop always connects to your designed wireless network, and in this guide, I’ll explain the steps to complete this configuration.
If you connect your laptop (or desktop computer) to different wireless networks during the first connection, Windows will create and save a wireless profile. The profile usually contains the network name, technically known as the SSID (Service Set Identifier), the password (security key), and other configurations to make the connection possible. Then, the system will use this profile to connect automatically based on the priority order.
If you want to ensure your device always connects to your preferred network when in range to prevent accidental connections to less reliable networks, you can change the priority of each profile through the Settings app or Command Prompt.
In this guide, I will outline the different ways to change the wireless connection priority order on Windows 11 as well as on Windows 10.
- Change wireless network priority on Windows 11
- Change wireless network priority on Windows 10
- Change wireless network priority from Command Prompt
Change wireless network priority on Windows 11
To change the priority order for a Wi-Fi profile on Windows 11, use these steps:
-
Open Settings on Windows 11.
-
Click on Network & internet.
-
Click the Wi-Fi page.
-
Click the “Show available networks” setting.
-
Select the wireless network you want to make a priority.
-
Check the Connect automatically option to set the connection a top priority.

-
Click the Connect button.
-
Confirm the wireless network credentials.
-
Click the Next button.
Once you complete the steps, the wireless connection will be placed at the top of the list until you set up another connection with the same option.
Since setting the option to connect automatically will change the wireless priority, I would only recommend using the “Connect automatically” option on those networks you connect more frequently in different places. If you want to set the option on two or more networks that are usually in the range, you can set the priority order to which one the system should try to connect first using Command Prompt.
Change wireless network priority on Windows 10
To change the Wi-Fi connection priority on Windows 10, use these steps:
-
Open Settings on Windows 10.
-
Click on Network & internet.
-
Click on Wi-Fi.
-
Click the “Show available networks” option.

-
Select the wireless network you want to make a priority.
-
Check the Connect automatically option to set the connection a top priority.

-
Click the Connect button.
-
Confirm the wireless network credentials.
-
Click the Next button.
After you complete the steps, the Wi-Fi profile will be bumped to the top of the list, giving it the highest priority order.
Change wireless network priority from Command Prompt
To change the priority order of a Wi-Fi connection on Windows 11 or 10 with Command Prompt (or PowerShell), use these steps:
-
Open Start.
-
Search for Command Prompt (PowerShell or Terminal), right-click the top result, and choose the Run as administrator option.
-
Type the following command to view the saved wireless profiles and press Enter:
netsh wlan show profiles
-
Confirm the wireless interface and profile names.
-
Type the following command to change the Wi-Fi profile priority and press Enter:
netsh wlan set profileorder name="WIFI-PROFILE" interface="INTERFACE-NAME" priority=1
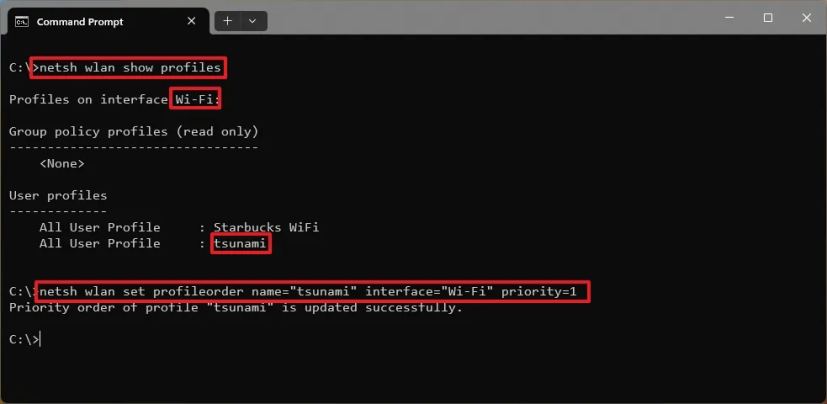
In the command, update “WIFI-PROFILE” and “INTERFACE-NAME” with your computer information, and then change “1” for the priority number you want to set. The number “1” sets the wireless network as the first priority, and “2” would set a lower priority since, in this case, I have two networks saved on the computer.
Once you complete the steps, the wireless profiles will have a new priority order.
The Command Prompt (or PowerShell) instructions should also work with older versions of the operating system, including Windows 8.1 and 7.
Mauro Huculak is a Windows How-To Expert and founder of Pureinfotech in 2010. With over 23 years as a technology writer and IT Specialist, Mauro specializes in Windows, software, and cross-platform systems such as Linux, Android, and macOS.
Certifications: Microsoft Certified Solutions Associate (MCSA), Cisco Certified Network Professional (CCNP), VMware Certified Professional (VCP), and CompTIA A+ and Network+.
Mauro is a recognized Microsoft MVP and has also been a long-time contributor to Windows Central.
You can follow him on YouTube, Threads, BlueSky, X (Twitter), LinkedIn and About.me. Email him at [email protected].