
If you’re still using Windows 10 on a computer that isn’t compatible with Windows 11, it’s possible to install the newer version of the operating system using an answer file that performs the clean installation process, bypassing the hardware requirements.
Furthermore, this process bypasses the Internet and Microsoft account requirements, and you can perform an even more debloated installation.
I have published several guides on installing Windows 11 on unsupported hardware, bypassing the Microsoft account steps to create a local account, and showing you different methods to debloat the operating system. However, the one thing these topics have in common is that they require extra steps and time.
If you don’t want to go through the extra steps, you can use a tool to create an answer file that you can integrate into the USB bootable media to automate the entire process, even without bloatware.


An answer file is an XML file containing the answers to the prompts you would usually have to complete during the setup and Out-of-the-box Experience (OOBE), allowing you to perform a fully automated installation of Windows 11.
Technically, you can build an answer file using the Notepad app, but using third-party tools is always easier. In this case, I’ll be using the “Generate autounattend.xml files for Windows 10/11” tool from the “Schneegans” website, which is also available from GitHub. This tool includes all the necessary settings to create an “unattend.xml” or “autounattend.xml” file to clean install Windows 11 on unsupported hardware using a local account and reduce the amount of bloatware.
In this guide, I’ll outline the steps to perform the cleanest installation of Windows 11.
Clean install Windows 11 on unsupported hardware without bloatware
If you want to set up a new installation of Windows 11 on unsupported hardware, you first have to create an unattended file with the settings to debloat the operating system and bypass the hardware requirements, including internet and a Microsoft account.
Finally, you have to integrate the answer file into the bootable USB flash drive, and then, you can use the media to perform an automated installation of the operating system.
As part of the answer file creation process, the settings that are required to bypass the hardware requirements, cloud account, and debloat the operating system are labeled as “important.” For all other customizations, you can choose the settings you deem appropriate.
Create an answer file to automate installation
To create an autounattend.xml to install Windows 11 on unsupported hardware without bloatware or a Microsoft account, follow these steps:
-
-
Choose the “Install Windows using these language settings” option under the “Region and language settings” setting.
-
Select your language in the “Windows display language” setting.
-
Choose the Intel/AMD 64-bit option under the “Processor architectures” setting.
-
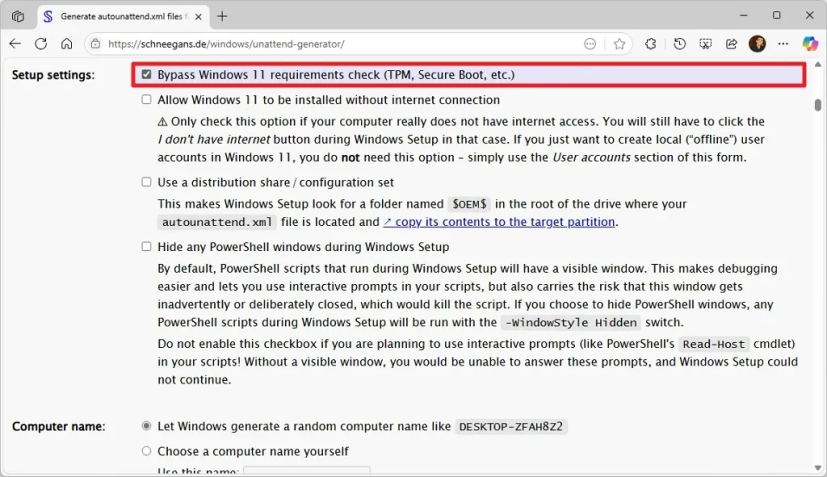
(Important) Check the “Bypass Windows 11 requirements check (TPM, Secure Boot, etc.)” option under the “Settings” section.
-
(Important) Check the “Hide any PowerShell windows during Windows Setup” option.
-
(Optional) Select the “Choose a computer name yourself” option and specify a custom name for the computer.
Quick note: You should only use this option if you plan to use the answer file to install the operating system on your computer. If you have to set up multiple computers, you should let the operating system choose a random name. -
Select the “Do not use Compact OS” under the “Compact OS” setting.
-
Choose the “Let Windows determine your time zone based on language and region settings” option under the “Time zone” setting.
-
Select the “Let Windows Setup wipe, partition and format your hard drive (more specifically, disk 0) using these settings” option.
-
Choose the GPT option in the “Choose partition layout” setting.
-
Select the “Install on recovery partition” option using the default settings in the “Choose how to install Windows RE” section.
-
Choose the “Do not run a script” option.
-
Select the “Use a generic product key” option in the “Windows edition” section.
-
Select the edition on Windows 11 to install, such as “Pro” or “Home,” in the “Install this edition of Windows” setting.
-
(Important) Choose the “Let Windows Setup create the following local (“offline”) accounts” option under the “User accounts” section.

-
Confirm the name and password for the local account to bypass the Microsoft account requirement.
Quick tip: Clear the “User” account. -
Choose the Administrators option.
-
Select the “Logon to the first administrator account created above” option in the “First logon” setting.
Quick note: This is only for the installation process. After the setup is complete, you will have to sign in to your account normally. -
Choose the “Passwords do not expire” option under the “Password expiration” setting.
-
Choose the “Use default policy” option under the “Account Lockout policy” section.
-
Select the “Use File Explorer default setting” option under the “File Explorer tweaks” section.
-
(Optional) Check the “Always show file extensions” option to show extensions like “.exe,” “.txt,” “.docx,” etc..
-
(Optional) Check the “Use classic context (right-click) menu in Windows 11” option to bring back the legacy context menu to File Explorer.
-
(Optional) Check the “Open File Explorer to This PC instead of Quick access” option to change the default startup page.
-
(Optional) Check the “Show End task command in the taskbar” option to enable the option to terminate unresponsive apps from the Taskbar.
-
(Optional) Select the “Hide” option to remove the search box from the Taskbar under the “Start menu and taskbar” setting.
-
(Important) Choose the “Remove all icons” option to remove the default icons (such as Copilot, File Explorer, Microsoft Store, and others) that the system pins by default on every installation in the Taskbar.
 Quick tip: I’m choosing to enable and disable some options since we’re trying to debloat Windows 11 as much as possible.
 -
(Important) Check the “Disable widgets” option to remove the widgets from the Taskbar.
-
Check the “Left-align the taskbar in Windows 11” option to roll back to the classic experience for accessing apps and the Start menu.
-
(Important) Check the “Hide the Task view button from the taskbar” option if you don’t use this feature.
-
(Optional) Check the “Do not show Bing results when searching in the Start menu or the search box” option if you don’t want to see web results when searching from the Taskbar.
-
(Important) Check the “Remove all pins” option to debloat the Start menu by removing all the default pins from built-in and promoted apps.
-
Confirm the features you want to turn on or off as needed in the “System tweaks” section.
Quick note: Whatever the options you choose in this section, I do not recommend disabling the Microsoft Defender Antivirus or Windows Update. -
Select the “Use default settings chosen by Windows” option under the “Visual effects” section unless you want to use a different configuration.
-
Select the “Show default desktop icons” option under the “Desktop icons” section.
-
Skip the “Virtual machine support” settings unless you install the operating system as a virtual machine in VirtualBox or VMware Workstation.
-
(Optional) Choose the “Configure Wi-Fi using these settings” option and confirm the wireless network settings under the “WLAN / Wi-Fi setup” section.
-
Select the “Disable all” option to improve your privacy by limiting the upload of diagnostic data under the “Express settings” section.
-
Select the “Use default lock key states and behaviors” option under the “Lock key settings” section.
-
Select the “Use default Sticky keys settings” option under the “Sticky keys” section.
-
(Optional) Select the color and desktop wallpaper default settings under the “Personalization settings” section.
Quick note: Although you can always change these settings later, it can come in handy if you don’t plan to activate Windows 11. -
(Important) Click the “Select all” button to select all the apps you don’t want the system to include in the installation.
 Quick note: This is the main option to debloat Windows 11. If you want to keep one or more applications, select the apps to remove manually.
 -
Skip the “Run custom scripts” settings.
-
Select the “Do not configure WDAC policy” option under the “Windows Defender Application Control” section.
-
Skip the “XML markup for more components” settings.
-
Skip the “Download settings” configuration.
-
Click the “Download.xml file” button and save the file on your computer.
After you complete the steps, you will have to integrate the unattended answer file into the USB bootable media.
Create bootable USB with answer file
To create a bootable Windows 11 USB with the Media Creation Tool, follow these steps:
-
Click the Download Now button under the “Create Windows 11 installation media” section.
-
Double-click the mediacreationtool.exe file to launch the tool.
-
Click the Accept button.
-
Click the Next button.
 Quick note: Clear the “Use the recommended options for this PC” option to select the correct language, architecture, and edition if you want to create a Windows 11 24H2 USB for another computer.
 -
Select the “USB flash drive” option.

-
Click the Next button.
-
Select the USB flash drive from the list.

-
Click the Next button.
-
Click the Finish button.
-
Open File Explorer.
-
Open the autounattend.xml file location.
-
Select the file and click the Copy button from the command bar.
-
Open the root of the Windows 11 installation media with File Explorer.
-
Click the Paste button from the command bar.

Once you complete the steps, you can start the device with the USB drive to install the operating system automatically.
Also, you must ensure the computer can boot from a USB flash drive, which means you may need to change the UEFI settings or start the device in the boot menu. Since the firmware settings are different on every computer, remember to check your manufacturer’s support website for more specific details.
Unsupported Windows 11 Install
To automate the installation of Windows 11 without bloatware and with a local account on unsupported hardware, follow these steps:
-
Connect the Windows 11 USB bootable media
-
Power the computer.
-
Observe the automated clean installation process.

Once you complete the steps, the answer file will be read by the setup to install the operating system based on your previous configuration.
If the unattend file has a problem, the setup will stop, and you will have to answer the prompt to continue with the setup.
After the installation, it’s recommended that you download the latest system and driver updates from the “Windows Update” settings.
Mauro Huculak is a Windows How-To Expert and founder of Pureinfotech in 2010. With over 22 years as a technology writer and IT Specialist, Mauro specializes in Windows, software, and cross-platform systems such as Linux, Android, and macOS.
Certifications: Microsoft Certified Solutions Associate (MCSA), Cisco Certified Network Professional (CCNP), VMware Certified Professional (VCP), and CompTIA A+ and Network+.
Mauro is a recognized Microsoft MVP and has also been a long-time contributor to Windows Central.
You can follow him on YouTube, Threads, BlueSky, X (Twitter), LinkedIn and About.me. Email him at [email protected].