
- To install WSL on Windows 10, open Command Prompt (or PowerShell) as admin and run
wsl --installto install all the WSL2 components and the Ubuntu Linux distro. - If you want to install a specific distro, run the
wsl --install -d DISTRO-NAMEcommand, and to update the WSL kernel, run thewsl --updatecommand. - You can also install WSL and Linux distributions from the Microsoft Store.
UPDATED 1/2/2026: Windows Subsystem for Linux (WSL) is a feature that allows you to use Linux natively on top of Windows 10 (using a lightweight virtual machine) without having to set up another virtualization environment with Hyper-V, VMware Workstation, or Oracle VirtualBox, or use a dual-boot setup. In other words, WSL gives you access to the powerful command-line tools and utilities of Linux while still using your familiar Windows desktop.
This Linux environment for Windows users has two versions, usually referred to as WSL1 and WSL2. The original version (or WSL1) was designed as an actual integration with the operating system that relies on a translation layer to interact with Windows system calls. The problem was that it offered a slow performance, especially for file system operations and resource-intensive tasks.
On the other hand, WSL2 uses a lightweight virtual machine to run a full Linux kernel with the Microsoft Hyper-V hypervisor. It offers significantly faster performance and app compatibility, meaning that it can be used for more complex development workflows, running demanding applications, and using Docker containers.
This feature is primarily for command-line applications, but you can also install and run GUI (Graphical User Interface) apps leveraging tools like X11 or Wayland.
Finally, even though you may still be able to access WSL1, it’s recommended that you set up and use WSL2. Microsoft has simplified the installation process of the WSL on Windows 10 to only one command that downloads and installs all the required components, including the virtual machine platform and Ubuntu Linux by default.
In this guide, I will teach you the steps to install the Windows Subsystem for Linux (version 2) on Windows 10.
- Install WSL on Windows 10 from Command Prompt or PowerShell
- Install WSL on Windows 10 from the Microsoft Store
- Install WSL on Windows 10 (older versions)
Install WSL on Windows 10 from Command Prompt or PowerShell
To install Windows Subsystem for Linux on Windows 10, use these steps:
-
Open Start on Windows 10.
-
Search for Command Prompt (or PowerShell), right-click the top result, and select the Run as administrator option.
-
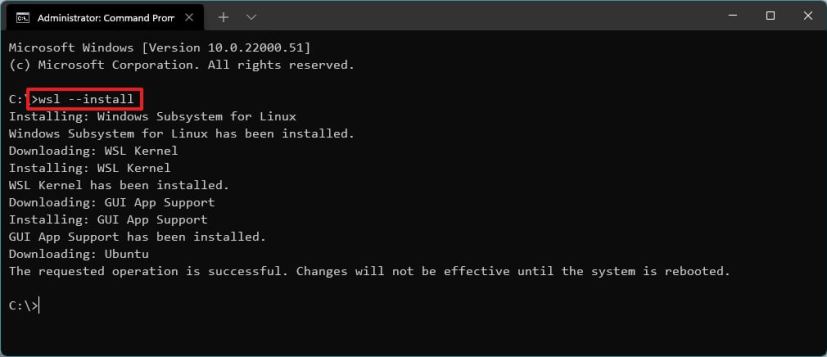
Type the following command to install the WSL on Windows 10 and press Enter:
wsl --install
-
Restart your computer to finish the WSL installation on Windows 11.
-
Continue with the Linux distro setup as necessary.
Once you complete the steps, Windows Subsystem for Linux will install on your computer with the latest version of the Ubuntu Linux distribution since it’s the default behavior.
If you receive the error code 14107, it could indicate that the “Virtual Machine Platform” feature isn’t enabled on your computer. In this case, open Settings > Optional features > More Windows features, check the “Virtual Machine Platform,” and click the “OK” button to add the components. You can now run the WSL install command one more time.
Install WSL with specific distro
To install WSL with a specific distro on Windows 10, use these steps:
-
Open Start.
-
Search for Command Prompt, right-click the top result, and select the Run as administrator option.
-
Type the following command to view a list of available WSL distros to install on Windows 10 and press Enter:
wsl --list --online
Quick note: At the time of this writing, you can install Ubuntu, Debian, Kali Linux, openSUSE, and SUSE Linux Enterprise Server. -
Type the following command to install the WSL with a specific distro on Windows 10 and press Enter:
wsl --install -d DISTRO-NAME

Remember to replace “DISTRO-NAME” in the command with the distro’s name to install, such as Debian.
-
Restart your computer.
-
Continue with the Linux distro setup as necessary.
After you complete the steps, the Windows Subsystem for Linux 2 components will be installed with the Linux distro you specified.
Update WSL kernel
To update the WSL kernel to the latest version, use these steps:
-
Open Start.
-
Search for Command Prompt, right-click the top result, and select the Run as administrator option.
-
Type the following command to update the WSL kernel and press Enter:
wsl --update

Once you complete the steps, if an update is available, it will download and install on the device.
If the update command doesn’t work, open Settings > Update & Security > Windows Update > Advanced options, and turn on the “Receive updates for other Microsoft products when you update Windows” toggle switch.
Install WSL on Windows 10 from the Microsoft Store
You can also install the Windows Subsystem for Linux and distros from the Microsoft Store. However, this process requires enabling the “Virtual Machine Platform” and “Windows Subsystem for Linux” features before installing the platform and the Linux distributions.
1. Enable WSL virtualization components
To install the required system components to run Linux on Windows 10, use these steps:
-
Open Start.
-
Search for Turn Windows Features on or off and click the top result to open the app.
-
Check the “Virtual Machine Platform” option.

-
Check the “Windows Subsystem for Linux” option.
-
Click the OK button.
-
Click the Restart button.
After completing the steps, you can proceed with the steps to download the WSL from the Microsoft Store.
2. Install Windows Subsystem for Linux app
To install WSL on Windows 11 from the Microsoft Store, use these steps:
-
Click the Install button.
-
Click the “Open Microsoft Store” button (if applicable).
-
Click the Install button again.

3. Install Linux distro
To install a Linux distribution from the Microsoft Store, use these steps:
-
Open the Microsoft Store app.
-
Search for Linux distros, such as Debian.
-
Click the Get button.

-
Click the Open button.
Once you complete the steps, the Linux layer will install on Windows 10, including the support for Linux GUI apps and the Linux distribution.
Install WSL2 on Windows 10 (older versions)
Alternatively, you can still install WSL on Windows 10 version 1909 and older versions using the legacy processes. The process requires enabling WSL1, the Virtual Machine Platform, converting existing distros (if applicable), and configuring the Windows Subsystem for Linux 2 as the new default for future distro installations.
If you have an ARM64 system, the Linux integration is supported on version 2004 and higher.
Enable Windows Subsystem for Linux
If you are not already using Linux on Windows 10, you must enable the Windows Subsystem for Linux (version 1) with these steps:
-
Open Start on Windows 10.
-
Search for Turn Windows features on or off and click the top result to open the app.
-
Check the “Windows Subsystem for Linux” option.

-
Click the OK button.
-
Click the Restart button.
Once you complete the steps, you must enable the Virtual Machine Platform feature.
Enable Virtual Machine Platform
To enable the Virtual Machine Platform on Windows 10, use these steps:
-
Open Start.
-
Search for PowerShell, right-click the top result, and select the Run as administrator option.
-
Type the following command to enable the Virtual Machine Platform feature and press Enter:
Enable-WindowsOptionalFeature -Online -FeatureName VirtualMachinePlatform

-
Restart your computer.
After you complete the steps, you can set the Windows Subsystem for Linux version 2 as the new default architecture and convert existing distros.
Enable Windows Subsystem for Linux 2
To start using WSL2 or covert WSL distros to WSL2, use these steps:
-
Download this WSL 2 kernel update (required).
-
Double-click the wsl_update_x64.msi file and apply the update.
-
Open Start.
-
Search for PowerShell, right-click the top result, and select the Run as administrator option.
-
Type the following command to set Windows Subsystem for Linux 2 as your default architecture for new distros that you install, and press Enter:
wsl --set-default-version 2

-
(Optional) Type the following command to convert the distro from WSL to WSL 2 and press Enter:
wsl --set-version Ubuntu 2

In the command, change “Ubuntu” for the distro’s name you want to convert. If you do not know the distro’s name, use the
wsl -l -vcommand.
Once you complete the steps, your device will start using the new version of Windows Subsystem for Linux as the default architecture.
Confirm distro platform
To confirm distros are using the Windows Subsystem for Linux 2, use these steps:
-
Open Start.
-
Search for PowerShell, right-click the top result, and select the Run as administrator option.
-
Type the following command to verify the version of the distro and press Enter:
wsl --list --verbose
-
Confirm the distro version is 2.

After you complete the steps, you will know if the process was successful or if you need to troubleshoot any of the steps.
Update January 2, 2026: This guide has been updated to ensure accuracy and reflect changes to the process.
Mauro Huculak is a Windows How-To Expert and founder of Pureinfotech in 2010. With over 23 years as a technology writer and IT Specialist, Mauro specializes in Windows, software, and cross-platform systems such as Linux, Android, and macOS.
Certifications: Microsoft Certified Solutions Associate (MCSA), Cisco Certified Network Professional (CCNP), VMware Certified Professional (VCP), and CompTIA A+ and Network+.
Mauro is a recognized Microsoft MVP and has also been a long-time contributor to Windows Central.
You can follow him on YouTube, Threads, BlueSky, X (Twitter), LinkedIn and About.me. Email him at [email protected].