
- To view other network PCs on Windows 10, open File Explorer > Network. You may also need to open Settings > Network & internet > Ethernet (or Wi-Fi), choose active connection, and set the profile to “Private.” Then on File Explorer, turn on the network discovery option.
On Windows 10, finding other computers in the local network can come in handy in many scenarios. For example, when you need to access a shared folder or printer or when you need to access a particular application hosted on a remote computer.
Whatever the reason, you can always use File Explorer to find and access network devices quickly.
This guide will teach you the easy steps to quickly find other computers connected to a local network on Windows 10.
Find computers in network from File Explorer
To find computers in the network on Windows 10, use these steps:
-
Open File Explorer on Windows 10.
-
Click on Network from the left pane.
-
See computers available in the local network.

-
Double-click the device to access its shared resources, such as shared folders or printers.
Once you complete the steps, you will be able to access the device. However, you can only access the shared resources as long as the remote device has the same account and password. If it doesn’t, you’ll need to authenticate using an administrator account username and password available on the remote computer to access it.
Enable network discovery on Windows 10
If you can’t see any computer in the network, it’s probably because network discovery is disabled.
To enable network discovery on Windows 10, use these steps:
-
Open Settings.
-
Click on Network & Internet.
-
Click on Ethernet (or Wi-Fi).

-
Select the active network connection.
-
Under the “Network profile” section, select the Private option.

-
Open File Explorer.
-
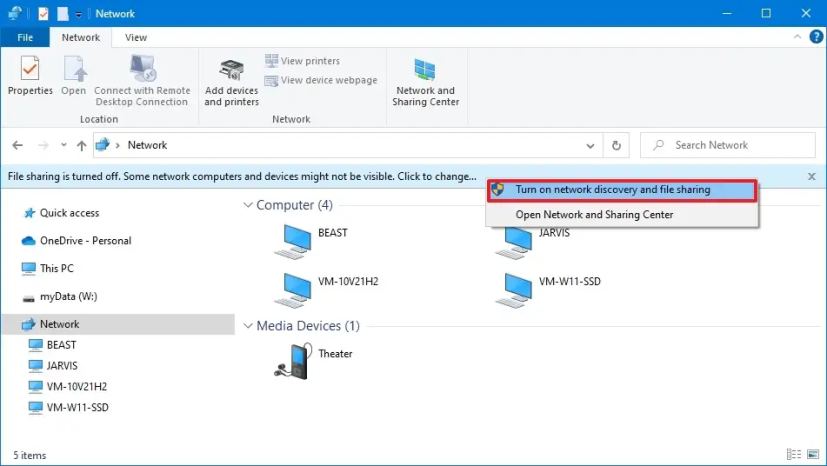
Click on Network from the left pane.
-
Click the message at the bottom of the ribbon and select the Turn on network discovery and file sharing option.
-
Click the “No, make the network that I am connected to a private network” option.
After you complete the steps, you should be able to see the devices in the network.
Enable network discovery from Control Panel
To enable network discovery from the Control Panel on Windows 10, use these steps:
-
Open Control Panel.
-
Click on Network and Internet.
-
Click on Network and Sharing Center.
-
Click the Change advanced sharing settings option from the left pane.

-
Expand the Private network profile.
-
Under the “Network discovery” section, select the Turn on network discovery option.

-
Under the “File and printer sharing” section, select the “Turn on file and printer sharing” option.
-
Click the Save changes button.
After completing the steps, you should be able to find other computers in the local network.
Mauro Huculak is a Windows How-To Expert and founder of Pureinfotech in 2010. With over 23 years as a technology writer and IT Specialist, Mauro specializes in Windows, software, and cross-platform systems such as Linux, Android, and macOS.
Certifications: Microsoft Certified Solutions Associate (MCSA), Cisco Certified Network Professional (CCNP), VMware Certified Professional (VCP), and CompTIA A+ and Network+.
Mauro is a recognized Microsoft MVP and has also been a long-time contributor to Windows Central.
You can follow him on YouTube, Threads, BlueSky, X (Twitter), LinkedIn and About.me. Email him at [email protected].