
- To configure data usage limits on Windows 11, open Settings > Network & internet > Advanced network settings > Data usage, choose the network adapter, click on “Enter limit,” and set up the data limit settings.
- To configure data usage on Windows 10, open Settings > Network & internet > Status, click the “Data usage” button for the network adapter, click on “Enter limit,” and set up the data limit settings.
On Windows 11 (and 10), you can monitor and configure data usage limits for those cases when you’re connected to the internet using a data cap plan, which usually happens when subscribed to a cellular connection.
The idea of this feature is to help you track your data usage so that you stay under your plan limit. Once you configure the “Data usage” feature, Windows will warn you as you get close to reaching the limit to avoid going over the cap and prevent extra charges.
It’s important to note that companies offering internet services may count the data usage slightly differently. As a result, it’s best to configure the feature on Windows 11 or 10 below the threshold allowance.
In this guide, I will explain the steps to configure the data usage limit for wireless as well as network connections on Windows.
Set network data usage limit on Windows 11
To configure the data usage limit feature when using a limited internet connection on Windows 11, use these steps:
-
Open Settings on Windows 11.
-
Click on Network & internet.
-
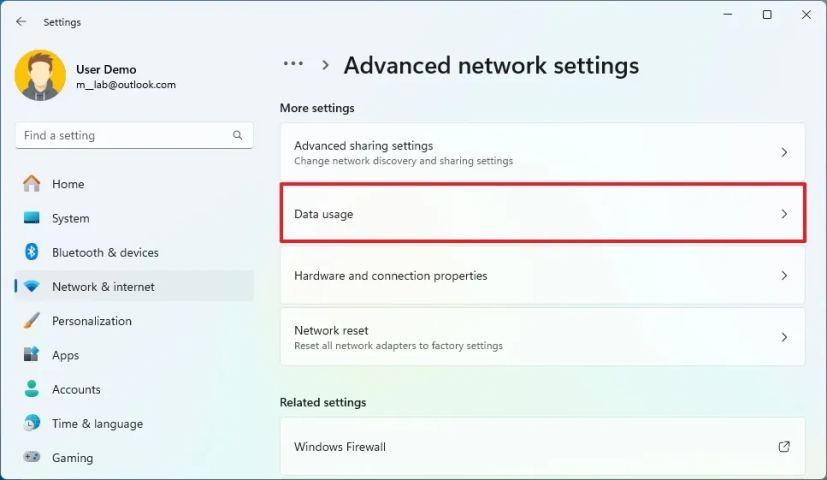
Click the “Advanced network settings” page.
-
Click the Data usage setting under the “More settings” section.
-
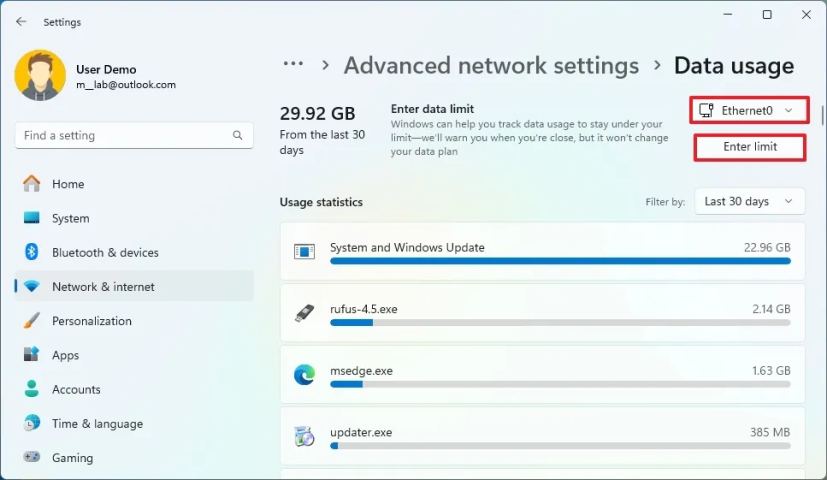
Choose the Ethernet or Wi-Fi network adapter from the top right.
-
Click the Enter limit button.
-
Choose the cycle type (daily, weekly, monthly, etc.) from the “Limit type” setting.

-
Select the reset setting depending on the selected option in the previous step.
-
Specify the amount of data and the unit (megabyte (MB) or gigabyte (GB)).
-
Click the Save button.
Once you complete the steps, the system will start monitoring the network adapter, and you will receive a warning as you get close to the limit.
Check current data usage on Windows 11
To review your current data usage on Windows 11, use these steps:
-
Open Settings on Windows 11.
-
Click on Network & internet.
-
Click the “Advanced network settings” page.
-
Click the Data usage setting under the “More settings” section.
-
Review the current data by application under the “Usage statistics” section.

-
(Optional) Choose the time range to view the stats with the “Filter by” setting on the top-right.
After you complete the steps, you will have a better understanding of your data usage and the apps using the most data.
Set network data usage limit on Windows 11
To configure the data usage limit feature on Windows 10, use these steps:
-
Open Settings on Windows 10.
-
Click on Network & Internet.
-
Click on Status.
-
Click the Data usage button for the Ethernet or Wi-Fi adapter you want to monitor.

-
Click the “Enter limit” button.

-
Under “Limit type,” select the type of limit you want to use:
- Monthly — Monitors data usage on a monthly basis and statics reset every month as well on the day of your choosing.
- One time — Monitors your data usage during the course of one period.
- Unlimited — Constantly monitors data usage without limitations, and statistics are reset every month on the day of your choosing.
-
Select the “Monthly reset date” or “Days until data expires” number, depending on your previous selection.
-
Specify the amount of data and the unit (megabyte (MB) or gigabyte (GB)).

-
Click the Save button.
Once you complete the steps, your data usage in the network adapter will be monitored according to the schedule you configured, and as you approach the limit, you’ll receive a toast notification.
Check current data usage on Windows 10
To review your current data usage on Windows 11, use these steps:
-
Open Settings on Windows 10.
-
Click on Network & Internet.
-
Click on Status.
-
Click the Data usage button for the Ethernet or Wi-Fi adapter you want to monitor.
-
Review the current data by application under the “Data limit” section.

After you complete the steps, you will have an overview of your data usage and the apps and services using the most data.
Mauro Huculak is a Windows How-To Expert and founder of Pureinfotech in 2010. With over 23 years as a technology writer and IT Specialist, Mauro specializes in Windows, software, and cross-platform systems such as Linux, Android, and macOS.
Certifications: Microsoft Certified Solutions Associate (MCSA), Cisco Certified Network Professional (CCNP), VMware Certified Professional (VCP), and CompTIA A+ and Network+.
Mauro is a recognized Microsoft MVP and has also been a long-time contributor to Windows Central.
You can follow him on YouTube, Threads, BlueSky, X (Twitter), LinkedIn and About.me. Email him at [email protected].