
- To uninstall WSL on Windows 11, open Settings > Apps > Installed apps and remove the Linux distros and “Windows Subsystem for Linux” components.
- Finally, open Settings > System > Optional features > More Windows Features and remove the WSL and virtual machine components.
- This guide has been updated to ensure accuracy and reflect changes to the process. – May 11, 2026.
On Windows 11, it’s possible to uninstall the Windows Subsystem for Linux (WSL), but it requires multiple (in-order) steps. Although Microsoft has streamlined the installation with a single command or using the Microsoft Store, removing the platform is not as simple as clicking an “Uninstall” button.
If you want to uninstall WSL from your computer completely, you must remove the Linux distros, uninstall additional components, and disable the platform components.
Although the ability to run Linux on Windows 11 is a useful feature for developers and users who need access to both platforms, there might come a time when you no longer need it or need to reset it to fix problems. Whatever the reason, you can permanently remove WSL by uninstalling all the components in order.

In this guide, I will walk you through uninstalling the Windows Subsystem for Linux on Windows 11.
- Completely uninstall WSL from Windows 11
- Pureinfotech’s take
- FAQs about uninstalling WSL on Windows 11
Completely uninstall WSL from Windows 11
To uninstall the Windows Subsystem for Linux from Windows 11, you first want to remove the distros, platform components, and the remaining operating system features.
1. Remove Linux distros
To uninstall a distro of Linux from WSL on Windows 11, follow these steps:
-
Open Settings on Windows 11.
-
Click on Apps.
-
Click the Installed apps page.
-
Select the Linux distribution.
-
Click the menu (three-dotted) button on the right and the Uninstall option.

-
Click the Uninstall option again.
Once you complete the steps, repeat the instructions to remove any remaining distro as necessary.
2. Remove Windows Subsystem for Linux components
To uninstall the WSL Linux kernel and GUI components on Windows 11, follow these steps:
-
Open Start.
-
Search for PowerShell, right-click the top result, and then click the Run as administrator option.
-
Type the following command to view all the installed apps and press Enter:
Get-AppxPackage MicrosoftCorporationII.WindowsSubsystemForLinux | Remove-AppxPackage
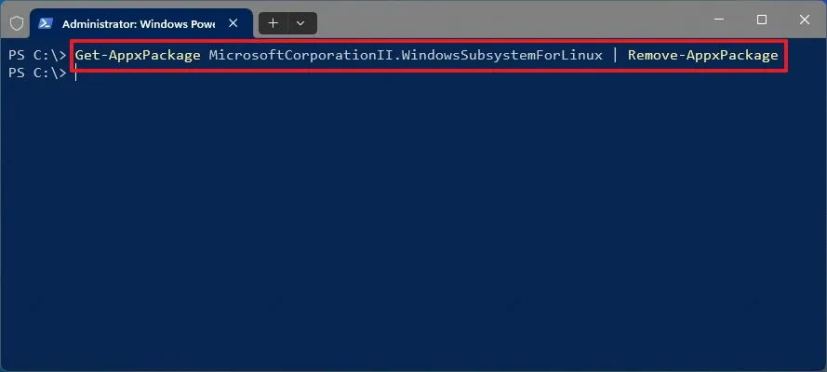
After you complete the steps, you can uninstall the platform from Windows 11.
Previously, Windows 11 provided an option in Settings > Apps > Installed apps to remove the “Windows Subsystem for Linux” component, which was later relocated to Settings > System > System Components. However, at this location, I have noticed that the component no longer includes an uninstall option. As a result, the alternative is to remove the WSL component with PowerShell.
3. Remove WSL from Windows 11
To uninstall the Windows Subsystem for Linux components from Windows 11, follow these steps:
-
Open Settings.
-
Click on System.
-
Click the Optional features page.
-
Click the “More Windows features” option under the “Related settings” section.

-
Clear the “Virtual Machine Platform” option.
-
Clear the “Windows Subsystem for Linux” option.

-
Click the OK button to uninstall the features.
-
Click the Restart now button.
Once you complete the steps, the Windows Subsystem for Linux will be completely removed from your Windows 11 installation.
The WSL is now an open-source platform, allowing you to download the Windows Subsystem for Linux from GitHub, rebuild it from source, add new features, and implement fixes.
Pureinfotech’s take
WSL remains one of those Windows 11 features that’s easy to install but noticeably more complex to fully remove. In practice, most users don’t need to go that far. Simply removing Linux distros is usually enough.
In my experience, the full uninstall process feels fragmented across Settings and PowerShell, reflecting how Windows still separates modern features across multiple system layers. It works, but it’s not exactly streamlined.
I would only recommend a complete uninstallation if you’re troubleshooting or resetting your development setup. Otherwise, disabling or uninstalling distros is the more practical approach for everyday users.
FAQs about uninstalling WSL on Windows 11
Here’s a list of frequently asked questions (FAQs) and answers about completely uninstalling WSL on Windows 11.
What is WSL on Windows 11?
Windows Subsystem for Linux (WSL) is a Windows 11 feature that lets you run Linux distributions natively without needing a full virtual machine. It integrates Linux command-line tools and utilities directly into the operating system, making it popular for developers who need cross-platform workflows, testing environments, and access to Linux-based software tools.
How do you completely uninstall WSL on Windows 11?
You can completely uninstall WSL on Windows 11 by removing installed Linux distributions, uninstalling the WSL Appx package using PowerShell, and disabling related optional features such as Windows Subsystem for Linux and Virtual Machine Platform.
Why can’t I uninstall Windows Subsystem for Linux from Settings?
You may not be able to uninstall WSL from Settings because Microsoft has moved or restricted the uninstall option for the system component.
Do I need to remove Linux distros before uninstalling WSL?
Yes, you should remove all installed Linux distributions before uninstalling WSL. Leaving them installed can leave behind files and storage usage even after the platform is removed.
What components must be removed to fully uninstall WSL on Windows 11?
To fully uninstall WSL on Windows 11, you must remove Linux distributions, uninstall the Windows Subsystem for Linux Appx package, and disable optional features such as Windows Subsystem for Linux and Virtual Machine Platform. Removing all these components ensures the system no longer contains active WSL or virtualization dependencies.
Is disabling WSL the same as uninstalling it?
Disabling WSL is not the same as uninstalling it. Disabling only turns off the feature through “Optional features,” while uninstalling removes the WSL application package and any installed Linux distributions.
Mauro Huculak is a Windows How-To Expert and founder of Pureinfotech in 2010. With over 23 years as a technology writer and IT Specialist, Mauro specializes in Windows, software, and cross-platform systems such as Linux, Android, and macOS.
Certifications: Microsoft Certified Solutions Associate (MCSA), Cisco Certified Network Professional (CCNP), VMware Certified Professional (VCP), and CompTIA A+ and Network+.
Mauro is a recognized Microsoft MVP and has also been a long-time contributor to Windows Central.
You can follow him on YouTube, Threads, BlueSky, X (Twitter), LinkedIn and About.me. Email him at [email protected].