
- To check the update history on Windows 11, open Settings > Windows Update > Update History.
- Alternatively, you can use PowerShell to complete the same task.
On Windows 11, the “Update history” settings let you see a list of the most recent updates installed on your laptop or desktop computer. This comes in handy for checking whether a particular update applied successfully or failed.
The Windows 11 update history page can also be helpful for learning more details about fixes, improvements, and known issues for a recently installed quality or driver update. On this page, you can also determine and uninstall a problematic KB. The operating system also lists the antivirus definitions that can help you understand if the Microsoft Defender Antivirus is receiving updates correctly.
In this guide, you’ll learn the steps to view the update history of Windows 11 using the Settings app and PowerShell.
Check Windows 11 update history from Settings
To view the update history on Windows 11, use these steps:
-
Open Settings on Windows 11.
-
Click on Windows Update.
-
Click the Update history setting under the “More options” section.

-
Check the recent history of installed updates, including quality updates, drivers, definitions (Microsoft Defender Antivirus), feature updates, and optional Windows 11 updates.

Once you complete the steps, you will know which updates were installed successfully and which failed to apply. If you want more information about a specific update, click the “Learn more” option to open the Microsoft support website for that specific update. There, you can find out more details about the changes, improvements, and known issues (if any).
When an update fails to install on your computer, an error code message will appear next to the update name. You can use this message to search online to determine the reason and the steps to fix the problem.
You can also use these instructions to uninstall updates from Windows 11 whenever a new release is causing issues.
Check Windows 11 update history from PowerShell
To see the history list of Windows 11 updates installed on the computer with PowerShell, use these steps:
-
Open Start.
-
Search for PowerShell, right-click the top result, and select the Run as administrator option.
-
Type the following command to install the PowerShell module to update Windows 11 and press Enter:
Install-Module -Name PSWindowsUpdate -Force
Quick tip: If you get an error trying to run the command, it might be because of the default restricted settings available with PowerShell. If this is the case, you may need to run theSet-ExecutionPolicy bypasscommand, follow the steps in this guide, and then run theSet-ExecutionPolicy undefinedcommand to restore the default security script setting. -
Type “A” and press Enter to complete the installation.
-
Type the following command to import the module and press Enter:
Import-Module PSWindowsUpdate
-
(Option 1) Type the following command to view all the recent updates and press Enter:
Get-WUHistory
-
(Option 2) Type the following command to view a list of the 20 most recent updates and press Enter:
Get-WUHistory -Last 20
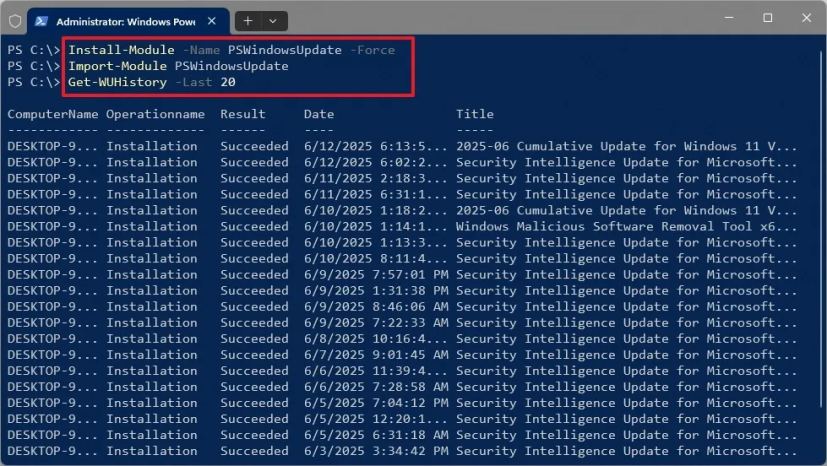
Once you complete the steps, the command will list the history of the updates installed on your computer. You can always change 20 to the number of updates you want to see in the list in the command.
The PSWindowsUpdate module also allows you to install updates and uninstall patches, causing problems after a Patch Tuesday rollout.
You can also use the Get-HotFix command, such as Get-HotFix | Sort-Object InstalledOn -Descending or Get-HotFix -Id KB5063060, but the command only shows WMI‑registered hotfixes, not cumulative updates like those the computer receives every month.
In the past, you could also run the wmic qfe list command using Command Prompt, but the wmic tool has been removed from the operating system starting with version 24H2.
Update June 12, 2025: This guide has been updated to ensure accuracy and reflect changes to the process.
Mauro Huculak is a Windows How-To Expert and founder of Pureinfotech in 2010. With over 22 years as a technology writer and IT Specialist, Mauro specializes in Windows, software, and cross-platform systems such as Linux, Android, and macOS.
Certifications: Microsoft Certified Solutions Associate (MCSA), Cisco Certified Network Professional (CCNP), VMware Certified Professional (VCP), and CompTIA A+ and Network+.
Mauro is a recognized Microsoft MVP and has also been a long-time contributor to Windows Central.
You can follow him on YouTube, Threads, BlueSky, X (Twitter), LinkedIn and About.me. Email him at [email protected].