
Although Windows 11 (and 10) allows you to install Linux distributions like Ubuntu, Mint, Kali, and Fedora through the Windows Subsystem for Linux (WSL) or a virtual machine, there are scenarios where a full Linux installation is necessary to utilize the hardware’s full capabilities for optimal performance.
If you don’t have a separate device for installing Linux, you can configure your existing system to run both Linux and Windows in a dual-boot setup. This guide focuses on dual-booting Windows 11 and Ubuntu, one of the most popular Linux distributions. However, these steps can be adapted for nearly any Linux distro or Windows 10 setup.
If your system uses BitLocker, you can still configure a dual-boot setup. However, you’ll need to temporarily disable BitLocker encryption before proceeding. Once Linux is installed, you can re-enable BitLocker.

In this guide, I will explain the process of setting up a dual-boot system with Windows and Linux, specifically using Windows 11 (or 10) and Ubuntu. Additionally, you can use similar steps to configure dual-boot with two different Windows versions. You can also use these more specific instructions to dual-boot Linux Mint and Windows 11.
Dual-boot set up using Windows 11 and Linux
Setting up a dual-boot system involves three main steps. First, create a bootable USB drive with the Linux distribution of your choice. Next, shrink the current Windows installation to allocate space for the second operating system. Finally, install the Linux distribution alongside Windows 11 (or 10) on the same computer.
- Step 1: Create Linux USB bootable media
- Step 2: Shrink Windows 11 partition
- Step 3: Dual-boot Windows 11 and Linux
Step 1: Create Linux USB bootable media
You’ll need to download the Linux ISO file for the latest version of your preferred distribution (in this example, Ubuntu) to create a bootable USB drive. Below are the links to download some popular Linux distributions:
On Windows, the easiest way to create a bootable USB drive that works with both BIOS and UEFI systems is by using the Rufus tool. Rufus is user-friendly and widely recommended for this purpose.
To create a bootable Linux USB drive, follow these steps:
-
-
Click the Download option for the latest version.
-
Save the file onto your computer.
-
Double-click the Rufus-x.x.exe file to launch the tool.
-
On “Device,” use the drop-down menu and select the USB flash drive.
-
Click the Select button.

-
Choose the Linux ISO file (in this case, Ubuntu).
-
Click the Open button.
-
Choose the MBR option in the “Partition scheme” setting.
-
Choose the BIOS or UEFI option in the “Target system” setting.
-
On “File System,” select FAT32.
-
(Optional) Confirm a name for the drive in the “Volume label” setting.
-
Choose the FAT32 option in the “File system” setting.
-
Continue with the default settings as they are.
-
Click the Start button.
-
Choose the “Write in ISO image mode” option (if applicable).

-
Click the OK button.
-
Click the Yes button (if applicable).
-
Click the OK button.
After completing the steps, you can proceed with the steps below to create a dual-boot system with Ubuntu and Windows 11.
Alternatively, you can use the Ventoy utility to make any installation media bootable by dragging and dropping the ISO file into a USB drive.
Step 2: Shrink Windows 11 partition
Although the Ubuntu installer provides an option to install alongside Windows 11 (or 10), this feature may not always function as expected. To ensure a smoother installation process, it’s recommended to manually shrink the Windows partition beforehand to create space for Ubuntu.
Alternatively, you can use a secondary internal drive for the Ubuntu installation. This approach keeps each operating system on a separate physical drive, avoiding the need to modify the existing Windows partition and reducing the risk of accidental data loss.
If your device does not currently have an operating system installed, follow these instructions to perform a clean installation of Windows 11 (or use these steps for Windows 10). Once Windows is installed, proceed with the instructions below to set up a dual-boot configuration.
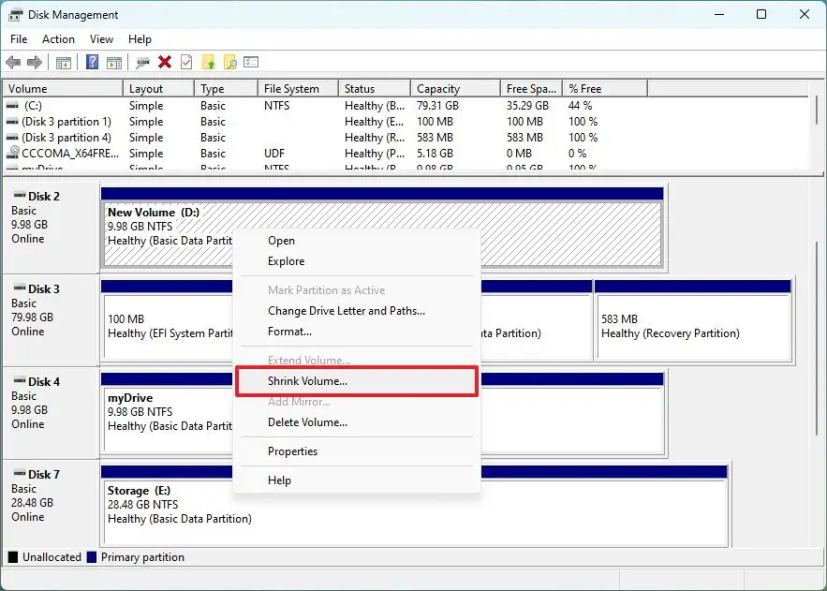
To shrink a partition on Windows 11 or 10 using Disk Management, follow these steps:
-
Open Start.
-
Search for Create and format hard disk partitions and click the top result to open the Disk Management console.
-
Right-click the drive you want to change its partition size and select the Shrink Volume option.
-
Confirm the amount of space to shrink the partition (in megabytes).
 Quick note: Ubuntu (and most distros) requires at least 25GB of available space.
 -
Click the Shrink button.
Once you complete the steps, you’ll end up with a small partition and some unallocated space to install Ubuntu. You can also use other methods to change the size of the partition on Windows 11.
Step 3: Dual-boot Windows 11 and Linux
After shrinking the Windows 11 (or 10) system partition and creating a bootable Linux drive, you can proceed with the dual-boot installation
To dual-boot Windows 11 and Linux, follow these steps:
-
Restart your computer with a Linux USB bootable media.
Quick Tip: If your computer is not starting into the Ubuntu (Fedora, Kali, or Mint) setup, you may need to access the system BIOS to change the boot settings to start from USB. Typically, you can change these settings by pressing one of the functions (for example, F2, F8, F12), Delete, or ESC key. However, check your computer manufacturer’s support website for more details. -
Select the “Try or Install Ubuntu” option and press Enter to continue.

-
Choose your language.

-
Click the Continue button.
-
Continue selecting your accessibility preferences.
 Quick note: You can configure visual, hearing, typing, and input settings.
 -
Click the Next button.
-
Choose your keyboard layout.

-
Click the Next button.
-
Select your network connection. For example, “Use wired connection.”

-
Click the Next button.
-
Select the Install Ubuntu option.

-
Click the Next button.
-
Choose the Interactive installation.

-
Click the Next button.
-
Choose the Default selection option.
 Quick tip: The “Default selection” option sets up a leaner installation of the operating system with only the essential utilities. You can then use the App Center app to add more apps. The “Extended selection” adds more tools that are typically useful for offline situations.
 -
Check the “Install third-party software for graphics and Wi-Fi hardware” option.

-
Check the “Download and install support for additional media formats” option.
-
Click the Next button.
-
Choose the “Install Ubuntu alongside Windows Boot Manager” option.

-
Click the Next button.
-
Create a local Linux account.
 Quick note: In this section, do not try to use the “root” username and choose the name for your computer.
 -
Click the Next button.
-
Change your timezone (if applicable).

-
Click the Next button.
-
Click the Install button.

-
Click the Restart now button.
Once you complete the steps, Linux will install on your device alongside Windows 11 (or 10).
If you’re unable to start the device after updating to the latest build of Windows 11, it’s likely because Microsoft has fixed a vulnerability with the Secure Boot Advanced Targeting (SBAT) setting that also happened to affect dual-boot systems. This error will produce the “Verifying shim SBAT data failed: Security Policy Violation. Something has gone seriously wrong: SBAT self-check failed: Security Policy Violation” message.
If you haven’t restarted the computer to complete the installation of KB5041585, you can run the reg add HKEY_LOCAL_MACHINE\SYSTEM\CurrentControlSet\Control\SecureBoot\SBAT /v OptOut /d 1 /t REG_DWORD command through Command Prompt (admin).
After the August 2024 update has been applied to the computer, you will have to disable Secure Boot in the UEFI/BIOS, boot into Ubuntu, and remove the SBAT policy by running the sudo mokutil --set-sbat-policy delete command. Then restart the computer into Linux to update the changes, reboot the computer one more time, and re-enable Secure Boot.
If you plan to test this setup with VMware Workstation Pro, consider that Ubuntu 24.04 is not officially supported, and you may encounter issues. For instance, I encountered graphics and networking problems while writing this guide. If this is the case, you may be able to mitigate graphics issues by disabling 3D graphics and auto-adjusting interface features. If the problem is the network, you must install the drivers manually.
When the time comes, you can use these instructions to safely uninstall Linux from the dual-boot system.
Update January 2, 2026: This guide has been updated to ensure accuracy and reflect changes to the process.
Mauro Huculak is a Windows How-To Expert and founder of Pureinfotech in 2010. With over 23 years as a technology writer and IT Specialist, Mauro specializes in Windows, software, and cross-platform systems such as Linux, Android, and macOS.
Certifications: Microsoft Certified Solutions Associate (MCSA), Cisco Certified Network Professional (CCNP), VMware Certified Professional (VCP), and CompTIA A+ and Network+.
Mauro is a recognized Microsoft MVP and has also been a long-time contributor to Windows Central.
You can follow him on YouTube, Threads, BlueSky, X (Twitter), LinkedIn and About.me. Email him at [email protected].