
- To enable BitLocker on Windows 11, open Settings > Storage > Advanced storage settings > Disks & volumes, open the “Properties” page for the drive to encrypt, and click on “Turn on BitLocker.”
- In the Control Panel, click “Turn on BitLocker” for the system drive, then follow the instructions, selecting the “Encrypt used disk space only” and “New encryption mode” options.
- BitLocker is only available on Windows 11 Pro. If you have Windows 11 Home, you have to use the “device encryption” feature (if available).
On Windows 11, you can enable BitLocker in at least three ways to encrypt data on the main installation drive, external storage, or even a USB flash drive using “BitLocker To Go.” In this guide, I will show you how.
BitLocker is a security feature that encrypts a drive to protect your data from unauthorized access to your documents, pictures, and any other data on the computer. The feature is available on Windows 11 Pro, Enterprise, and Education. While it’s not part of the Home edition, Windows 11 still provides device encryption for specific devices, such as Surface Pro, Laptop, and others that meet the minimum requirements.
When encryption is enabled on the drive, all data is scrambled using the Advanced Encryption Standard (AES) algorithm. No one can access it without the correct password, even if you share the file with other people.

Windows 11 offers two types of encryption: “BitLocker” to encrypt and protect the operating system and fixed data drives, and “BitLocker To Go” to encrypt removable drives that can be accessed from different devices.
BitLocker requires a Trusted Platform Module (TPM) chip for the best experience. Since you can’t install Windows 11 on a device without TPM, it’s no longer necessary to check or configure the security feature.
If you are running an older version, such as Windows 10, you can enable BitLocker with TPM-based or software-based encryption, but it requires additional authentication steps.
In this guide, I will teach you how to manage BitLocker on a Windows 11 drive, fixed and data drives, and USB removable storage.
- Enable BitLocker encryption on Windows 11
- Enable BitLocker on fixed data drive on Windows 11
- Enable BitLocker To Go on USB flash drive on Windows 11
Enable BitLocker encryption on Windows 11
To turn on BitLocker on a Windows 11 drive, use these steps:
-
Open Settings on Windows 11.
-
Click on Storage.
-
Click on Advanced storage settings under the “Storage management” section.
-
Click the Disks & volumes page.

-
Select the drive with the volume to encrypt.
-
Choose the volume to enable BitLocker encryption and click the Properties button.

-
Click the “Turn on BitLocker” option.

-
Click the “Turn on BitLocker” option under the “Operating system drive” section in the Control Panel.

-
Select the “Save to a file” option to prevent uploading the recovery key to Microsoft.
 Quick note: You can choose any of the available options. The “Print the recovery key” can also help you to save a hard copy of the key, but I wouldn’t choose the “Microsoft account” option if you want to preserve your privacy.
 -
Save the file with the recovery encryption key on a different drive, such as a USB drive.
-
Click the Next button.
-
Select the “Encrypt used disk space only” option.

-
Click the Next button.
-
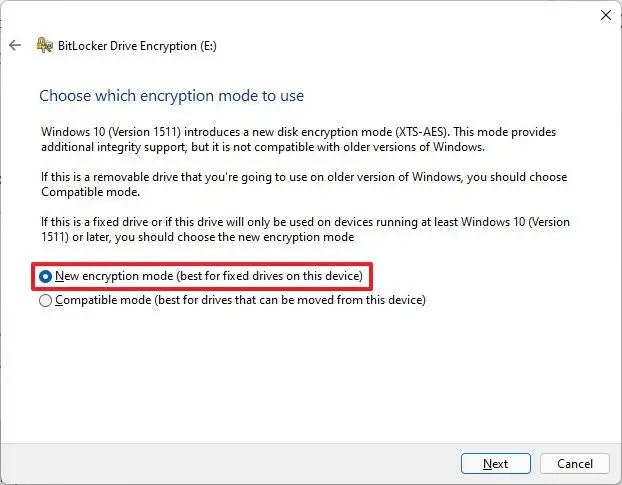
Select the “New encryption mode” option.
 Quick note: If you intend to encrypt a drive you will use on an older version of Windows, you should choose the “Compatible mode” option.
 -
Click the Next button.
-
(Optional) Check the “Run BitLocker system check” option.

-
Click the Restart now button.
Once you complete the steps, the computer will restart to enable BitLocker. However, depending on the data available on the drive, BitLocker will continue to encrypt the used space in the background.
If you used the Microsoft account option to save the BitLocker recovery key, you can later find the keys in the device BitLocker recovery keys section of your account.
You can disable BitLocker on Windows 11 if you no longer need the feature or are performing a task that can cause problems, such as setting up a dual-boot system with Linux.
Enable BitLocker on fixed data drive on Windows 11
To turn BitLocker on a secondary drive, use these steps:
-
Open Settings.
-
Click on Storage.
-
Click on Advanced storage settings under the “Storage management” section.
-
Click the Disks & volumes page.
-
Select the drive with the volume to encrypt.
-
Choose the volume to enable BitLocker encryption and click the Properties button.
-
Click the “Turn on BitLocker” option.
-
Click the “Turn on BitLocker” option under the “Fixed data drives” section in the Control Panel.

-
Check the “Use a password to unlock the drive” option.

-
Create and confirm the password to unlock the BitLocker drive.
-
Click the Next button.
-
Select the “Save to a file” option to prevent uploading the recovery key to Microsoft.

-
Click the Next button.
-
Select the “Encrypt used disk space only” option.

-
Click the Next button.
-
Select the “New encryption mode” option.
-
Click the Next button.
-
Click the Start encrypting button.

-
Click the Close button.
After you complete the steps, BitLocker will encrypt the entire volume on the secondary drive.
Enable BitLocker To Go on USB flash drive on Windows 11
To set up BitLocker To Go on a USB flash drive on Windows 11, use these steps:
-
Open Settings.
-
Click on Storage.
-
Click on Advanced storage settings under the “Storage management” section.
-
Click the Disks & volumes page.
-
Select the drive with the volume to encrypt.
-
Choose the volume to enable BitLocker encryption and click the Properties button.
-
Click the “Turn on BitLocker” option.
-
Click the “Turn on BitLocker” option under the “Removable data drives BitLocker To Go” section in the Control Panel.

-
Check the “Use a password to unlock the drive” option.

-
Create and confirm the password to unlock the BitLocker drive.
-
Click the Next button.
-
Select the option to save the recovery key. For example, “Save to your Microsoft account.”

-
Click the Next button.
-
Select the “Encrypt used disk space only” option.

-
Click the Next button.
-
Select the Compatible mode option.

-
Click the Next button.
-
Click the Start encrypting button.
-
Click the Close button.
Once you complete the steps, the data inside the USB portable drive will be encrypted with BitLocker To Go.
BitLocker is one of the many security features available on Windows 11. I have also created another comprehensive guide with the best security features you should consider configuring and using on Windows 11.
Are you using this encryption feature on your computer? Let me know in the comments.
Mauro Huculak is a Windows How-To Expert and founder of Pureinfotech in 2010. With over 23 years as a technology writer and IT Specialist, Mauro specializes in Windows, software, and cross-platform systems such as Linux, Android, and macOS.
Certifications: Microsoft Certified Solutions Associate (MCSA), Cisco Certified Network Professional (CCNP), VMware Certified Professional (VCP), and CompTIA A+ and Network+.
Mauro is a recognized Microsoft MVP and has also been a long-time contributor to Windows Central.
You can follow him on YouTube, Threads, BlueSky, X (Twitter), LinkedIn and About.me. Email him at [email protected].