
- To run an app as an administrator on Windows 11 (or Windows 10), locate the app you want to start, right-click it, and select the “Run as administrator” option.
- You can also perform this action from Task Manager and use Command Prompt (or PowerShell) with the “sudo” and “runas” commands.
On Windows 11 (or Windows 10), running an app as administrator grants it elevated privileges, allowing it to make changes to system settings and files that the regular user mode might not have access to.
This is usually necessary for tasks involving system-level modifications, such as installing software, accessing protected system files, or troubleshooting complex issues.
You have several options for running an app with administrative privileges. Each method offers a convenient way to elevate an application’s permissions temporarily or permanently, depending on your specific needs.
In this guide, I’ll outline the different ways to launch an application with administrator privileges on Windows 11 as well as on Windows 10.
Run an app as admin on Windows
On Windows 11 (and 10), you have at least eight ways to run a program with elevated privileges.
Method 1: Start menu
To run an app as administrator from the Start menu on Windows, use these steps:
-
Open Start.
-
Right-click the the app.
-
(Windows 11) Choose the “Run as administrator” option.

-
(Windows 10) Choose the More menu and select the “Run as administrator” option.

Method 2: Search
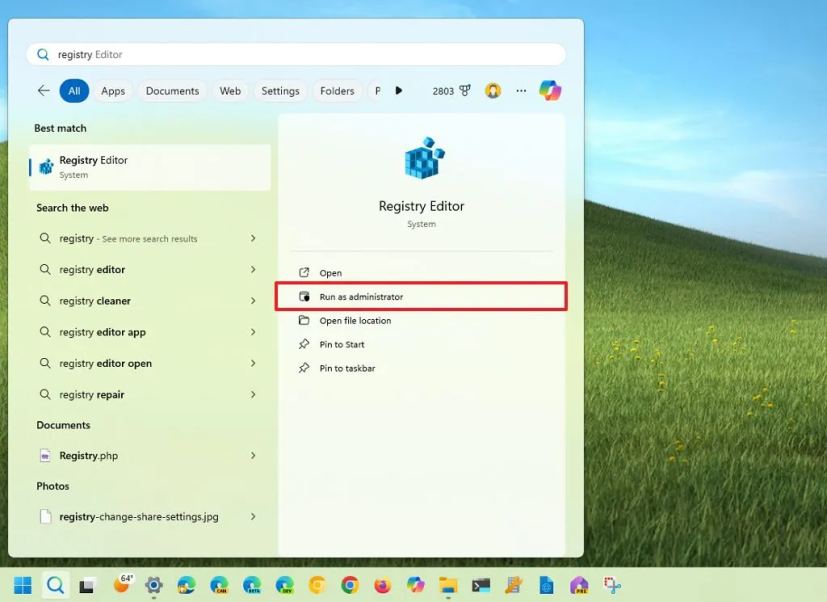
To launch a program with elevated privileges from Windows Search on Windows 11 (or 10), use these steps:
-
Open Search.
-
Search for an app.
-
(Option 1) Click the “Run as administrator” option from the menu on the right.
-
(Option 2) Invoke the “Ctrl + Shift + Enter” keyboard shortcut while the app is selected.
Method 3: Context menu
To start an app as an administrator from the Taskbar or desktop, use these steps:
-
Right-click the app in the Taskbar.
-
Right-click the app’s name from the Jump List.
-
Choose the “Run as administrator” option.

On the desktop, you can also right-click an app and choose the “Run as administrator” option.
Method 4: App properties
To always launch a program as an administrator on Windows 11 (or 10), use these steps:
-
Right-click the app and select the Properties option.
-
Click the Shortcut tab.
-
Click the Advanced button.

-
Check the “Run as administrator” option.

-
Click the OK button.
-
Click the Apply button.
-
Click the OK button.
It’s important to note that some applications may not support this option. If this is the case, the “Run as administrator” option will appear grayed out. The reason will depend on the app. For example, some apps, like some system programs and Universal Windows Platform (UWP) apps, do not support running in privilege mode. Also, some system files or services do not support this option.
Method 5: Task Manager
To run an application as administrator from the Task Manager, use these steps:
-
Open Start.
-
Search for Task Manager and click the top result to open the app.
Quick tip: You can also right-click the Taskbar and select the “Task Manager” option. Use the “Ctrl + Shift + Esc” keyboard shortcut, the “Ctrl + Alt + Delete” shortcut, and click the “Task Manager” option. -
(Windows 11) Click the “Run new task” button.
-
Confirm the app’s executable name.
-
Check the “Create this task with administrator privileges” option.

-
Click the OK button.
-
(Windows 10) Click the File menu and select the “Run new task” option.

-
Check the “Create this task with administrator privileges” option.

-
Click the OK button.
Method 6: Run
To launch a program as admin from the Run command, use these steps:
-
Open Start.
-
Search for Run and click the top result to open the app.
Quick tip: You can also invoke the “Windows key + R” keyboard shortcut. -
Confirm the app’s executable name. For example, explorer.exe.

-
Invoke and hold the “Ctrl + Shift” keyboard shortcut and click the OK button.
Method 7: Command Prompt or PowerShell
To run an application as administrator from Command Prompt or PowerShell on Windows 11 (or on Windows 10), use these steps:
-
Open Start.
-
Search for Command Prompt (or PowerShell) and click the top result to open the command console.
-
(Windows 11 and 10) Type the following command to run an app as admin on Windows 11 (or 10) and press Enter:
runas /user:"COMPUTER-NAME\ADMINISTRATOR-USER" "C:\PATH\APP.EXE"
In the command, replace “COMPUTER-NAME” with the actual name of the computer, “ADMINISTRATOR-USER” with the account with administrative rights, and confirm the path and executable for the application. For example,
runas /user:"vmpreview\[email protected]" "C:\Program Files\Classic Sticky Notes\StikyNot.exe".
-
Confirm your account credentials and press Enter.
-
(Windows 11) Type the following command to launch an app as an administrator with Sudo and press Enter:
sudo APP.EXE
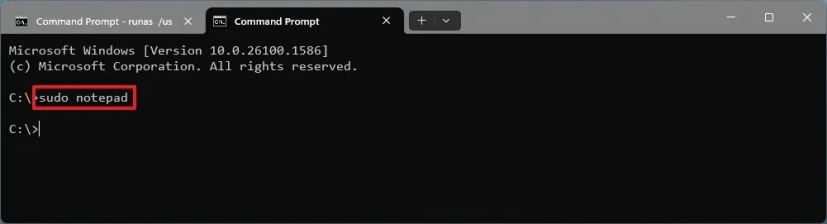 Quick note: Use these instructions to enable Sudo on Windows 11. Also, if this is not a system app, you will have to provide the app’s executable location path. For example,
sudo C:\Program Files\Classic Sticky Notes\StikyNot.exe.
If you’re already using Command Prompt as an administrator, you can simply type the name of the app (such as Notepad) or specify the executable name and path to launch it.
Alternatively, you can also create a shortcut Windows 11 (or 10) with the runas or sudo command in steps 3 and 5 to always launch the app with admin rights.
Method 8: File Explorer
To launch apps with administrative privileges for File Explorer, use these steps.
-
Open File Explorer.
-
Open the folder with the app’s executable file.
-
(Windows 11 and 10) Right-right the executable and choose the “Run as administrator” option.

-
(Windows 10) Select the executable in the folder location.
-
Click the Application Tools tab.
-
Click the “Run as administrator” button.

Once you complete the steps, the app will try to start as administrator, but you will have to confirm the User Account Control (UAC) prompt to allow the action.
Although there are many methods to elevate an application, there’s no best way to perform this action since this is about finding the option depending on where you are in the operating system.
Security risks running apps elevated
While running apps as an administrator can be necessary for specific tasks, it also introduces potential security risks. For example, malicious software can leverage elevated privileges to gain deeper access to your system and potentially encrypt (usually known as ransomware) or delete your files. Also, making mistakes while running apps as an administrator can have severe consequences, such as deleting important system files or turning off critical services.
Best practices for running apps elevated
As part of the best practice to mitigate risks on Windows 11 (or 10), avoid running apps as an administrator unless absolutely required. Be cautious of apps from unknown sources or those that request excessive permissions. Always keep your computer updated with the latest security patches, use strong passwords, don’t click on suspicious links or attachments, and switch to a standard user account for your daily activities and switch to an administrator account only when necessary.
Mauro Huculak is a Windows How-To Expert and founder of Pureinfotech in 2010. With over 22 years as a technology writer and IT Specialist, Mauro specializes in Windows, software, and cross-platform systems such as Linux, Android, and macOS.
Certifications: Microsoft Certified Solutions Associate (MCSA), Cisco Certified Network Professional (CCNP), VMware Certified Professional (VCP), and CompTIA A+ and Network+.
Mauro is a recognized Microsoft MVP and has also been a long-time contributor to Windows Central.
You can follow him on YouTube, Threads, BlueSky, X (Twitter), LinkedIn and About.me. Email him at [email protected].