
- To use Tiny11 ISO to install Windows 11, start the PC with the Tiny11 Windows 11 USB, choose language settings and click “Next,” accept terms and click “Next,” select the hard drive, click “Next,” and continue with a simplified Out-of-the-box Experience.
- The Tiny11 ISO upgrades devices to the Windows 11 25H2 features and only requires 2GB of RAM and 8GB of storage.
Tiny11 is an unofficial custom ISO image of Windows 11 that removes unnecessary clutter, such as default apps, services, and features, enabling installation on low-end, unsupported hardware.
The custom image is based on Windows 11 25H2, and while it strips out many of the default elements, everything works as expected, including Windows Update, activation, and the included apps. It also maintains many security features, such as Microsoft Defender Antivirus and Firewall, Core isolation, Data encryption, and more.
As this guide will show, the clean installation experience is not much different from the official setup. The only difference is that it removes some annoyances, including the requirement for TPM 2.0 and Secure Boot, memory, storage, a Microsoft account, and other needless steps. However, the computer will need a processor that supports SSE 4.2 and a graphics card capable of DirectX 10. Tiny11 is an ideal solution for those who want to run the operating system on less powerful, unsupported hardware, as it only requires 2GB of RAM and 8GB of storage. According to the creator (NTDEV on X), you can use the Tiny11 image to perform a clean installation or upgrade from Windows 10 to Windows 11.
If you want to install Windows 11 (at your own risk) using the Tiny11 image, you will first need to download the Tiny11 ISO file. Then you will need to use Rufus to create a bootable USB flash drive. If you create a virtual machine, you can mount the Tiny11 ISO file directly to the VM.
Also, it’s now possible to download and run the Tiny11 Builder script to create a custom ISO file from any version of Windows 11. (Usually, this is the recommended option.)
You must also ensure the computer can start from a USB, so you must change the BIOS or UEFI settings. However, since most computers have different settings, you may want to check your manufacturer’s support website for more specific details.
Install Windows 11 from Tiny11 ISO with USB
To install Windows 11 with the Tiny11 ISO image, use these steps:
-
Start the PC with the Tiny11 Windows 11 USB.
Quick note: You must download the Tiny11 ISO file, which requires free registration, and then use Rufus or Ventoy to create a bootable installation media that you can use to start the setup on your computer. -
Click the Next button.

-
Click the Next button again.

-
Check the “I accept the license terms” option.
-
Click the Next button.
-
Select each partition on the hard drive where you want to install Windows 11 and click the Delete button.
Important: Typically, the “Drive 0” is the drive that contains all the installation files. When you delete a partition, it also deletes all data on the drive. Also, it is not necessary to delete the partitions from a secondary hard drive. -
Select the hard drive (Drive 0 Unallocated Space) to install Windows 11.

-
Click the Next button.
-
Select your region setting after the installation on the first page of the out-of-the-box experience (OOBE).

-
Click the Yes button.
-
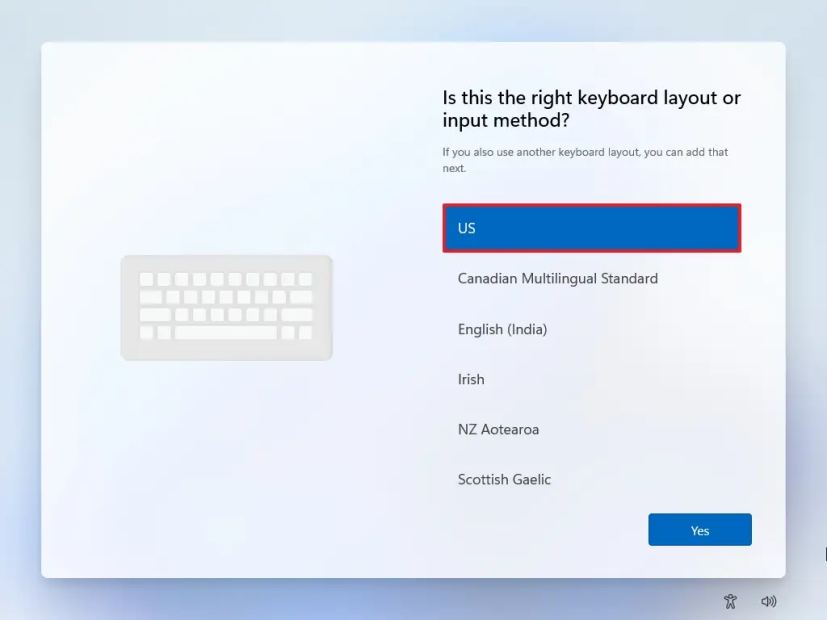
Select your keyboard layout setting.
-
Click the Yes button.
-
Click the Skip button if you do not need to configure a second layout.
-
The computer will automatically connect to the network using an Ethernet connection. If you have a wireless connection, you must set up the connection manually (a security key may be required).
-
Confirm a name for the Tiny11 Windows 11 local account.
-
Click the Next button.
-
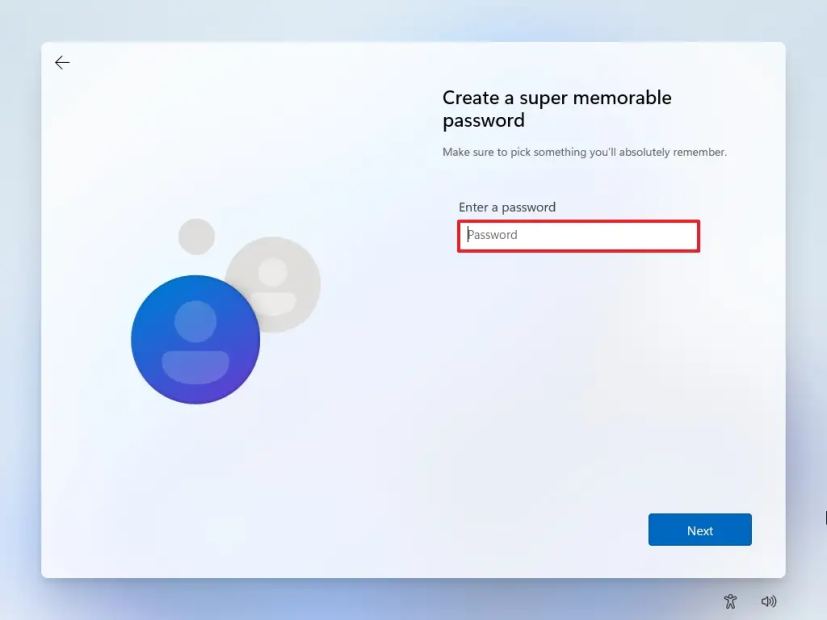
Create the account password.
-
Click the Next button.
-
Confirm the account password.
-
Click the Next button.
-
Set the three security questions to recover your account.

-
Click the Next button.
Once you complete the steps, Windows 11 will continue the installation using the Tiny11 setup on the computer.
Although the Tiny11 provides an alternative method to install Windows 11, there are some caveats to consider. For example, Microsoft does not support this setup method. You may expose your computer to security risks because of vulnerabilities this modified image can introduce, and no one knows whether anything extra has been added that could be considered a privacy concern.
FAQs about using the Tiny11 ISO to install Windows 11
Here’s a list of frequently asked questions (FAQs) and answers about the Tiny11 ISO to set up an installation of Windows 11.
What is Tiny11, and how is it different from the official Windows 11 ISO?
Tiny11 is an unofficial, lightweight version of Windows 11 that removes many default apps, services, and system requirements. It is designed to run on low-end or unsupported hardware with as little as 2GB of RAM and 8GB of storage while still supporting features like Windows Update, activation, and Microsoft Defender.
What are the minimum system requirements for Tiny11 Windows 11?
Tiny11 requires significantly fewer resources than standard Windows 11. It can run with only 2GB of RAM and 8GB of storage. However, the processor must support SSE 4.2, and the graphics card must support DirectX 10, even though TPM 2.0 and Secure Boot are not required.
Tiny11 vs official Windows 11: what’s the difference?
Tiny11 is a modified Windows 11 installation that removes many built-in apps, services, and hardware restrictions. Unlike the official version from Microsoft, it bypasses TPM 2.0, Secure Boot, and Microsoft account requirements. However, it is unofficial and not supported by Microsoft, which may introduce security or reliability risks.
How do you install Windows 11 using the Tiny11 ISO?
To install Windows 11 using Tiny11, create a bootable USB drive from the Tiny11 ISO with a tool like Rufus or Ventoy. Boot the computer from the USB drive, choose language settings, accept the license terms, select the installation drive, and complete the simplified Windows setup process.
Can you upgrade from Windows 10 to Windows 11 using Tiny11?
Yes, Tiny11 can be used to upgrade a Windows 10 installation or perform a clean install. According to its creator, the image supports upgrading devices to Windows 11 features while reducing system requirements, making it suitable for older or unsupported hardware.
Is it safe to install Windows 11 using Tiny11?
Installing Tiny11 carries potential risks because it is an unofficial modified Windows 11 image. Microsoft does not support this installation method, and there is no guarantee that the image has not been altered in ways that could affect privacy, security, or long-term system stability.
How do you create a Tiny11 ISO using the Tiny11 Builder script?
You can create a custom Tiny11 ISO by running the Tiny11 Builder script on an official Windows 11 image. The script removes unnecessary components and generates a lightweight ISO. This method is often recommended because it lets users build the image from a trusted Windows source.
Can Tiny11 receive Windows 11 updates after installation?
Yes, Tiny11 generally supports Windows Update because it is still based on the standard Windows 11 system components. Security updates and cumulative updates usually install normally. However, some feature updates or optional components may fail if the removed system elements are required for those updates.
Can you install Tiny11 on a virtual machine?
Yes, Tiny11 works well in virtual machines because of its low hardware requirements. You can mount the Tiny11 ISO directly in virtualization software such as VMware Workstation, VirtualBox, or Hyper-V and complete the setup as a standard Windows installation.
Does Tiny11 include the Microsoft Store and built-in apps?
Tiny11 removes many preinstalled apps to reduce system size and resource usage. In many cases, users can reinstall missing apps later through package installers or by manually restoring the components.
Mauro Huculak is a Windows How-To Expert and founder of Pureinfotech in 2010. With over 23 years as a technology writer and IT Specialist, Mauro specializes in Windows, software, and cross-platform systems such as Linux, Android, and macOS.
Certifications: Microsoft Certified Solutions Associate (MCSA), Cisco Certified Network Professional (CCNP), VMware Certified Professional (VCP), and CompTIA A+ and Network+.
Mauro is a recognized Microsoft MVP and has also been a long-time contributor to Windows Central.
You can follow him on YouTube, Threads, BlueSky, X (Twitter), LinkedIn and About.me. Email him at [email protected].