
- To uninstall Windows 11 23H2, open Settings > Windows Update > Update history, click “Uninstall updates,” and click “Uninstall” for the “Feature Update to Windows 23H2 via Enablement Packages (KB5027397)” update. You may also need to remove the update “KB5031455” to remove the new features.
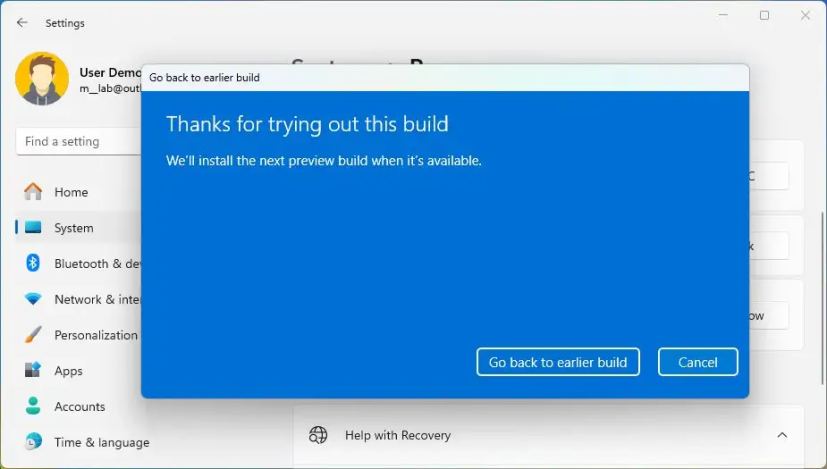
- To remove version 23H2 from an in-place upgrade, open Settings > System > Recovery, click “Go back,” choose an uninstall reason, click “Next,” “No, thanks,” “Next,” “Next,” and “Go back to earlier build.”
UPDATE 11/1/2023: After upgrading to Windows 11 23H2, it’s possible to uninstall it to revert to version 22H2 (or another version, including Windows 10) without losing your files in case the new feature update is causing problems as a result of a bug or compatibility issues or you want to stay on the same version for a little longer.
The only caveat is that the method to uninstall version 23H2 will depend on the version of the operating system that was installed on the computer and the method you used to upgrade. For example, if you upgraded from Windows 11 22H2 to version 23H2, you will only have to remove enablement packages from the “Windows Update” settings. On the other hand, if you installed Windows 11 23H2 using the Installation Assistant tool or any other upgrade method, or you upgraded a device previously running Windows 10, then you will need to use the “Recovery” settings.
If you perform a clean installation of version 23H2, then you won’t be able to uninstall the update unless you once again perform a fresh installation with the older version you want to use.
Also, it’s important to note that the option to rollback from the Recovery settings is only available during the first ten days after the upgrade is completed. After this period, Windows 11 will delete the files from the previous installation to free up space to accommodate more of your files.
After uninstalling Windows 11 2023 Update, you may need to reinstall some apps and lose the settings you may have configured while using the newer release.
In this guide, I will teach you the steps to roll back to a previous version after upgrading to Windows 11 23H2.
Uninstall Windows 11 23H2 from Windows Update
If you upgraded to version 23H2 from Windows 11 22H2, you can use the Windows Update settings to remove the update.
To uninstall the Windows 11 23H2 update to rollback to version 22H2, use these steps:
-
Open Settings on Windows 11 23H2.
-
Click on Windows Update.
-
Click the Update history tab.

-
Under the “Related settings” section, click the Uninstall updates setting.

-
Click the Uninstall option for the “Feature Update to Windows 23H2 via Enablement Packages (KB5027397)” update.

-
Click the Uninstall button.
-
Restart the computer.
After you complete the steps, the system will remove version 23H2, rolling back to Windows 11 22H2. However, this process will only uninstall the update and revert the version, but it won’t remove the features. If you want to remove the new features, you will have to uninstall the update KB5031455 from the “Uninstall updates” page.
Once you complete the steps, you can prevent the system from re-applying the update using the “Pause updates” feature in the “Windows Update” settings. Alternatively, you may be able to block the updates using the “Show or hide updates troubleshooter.”
Uninstall Windows 11 23H2 from Recovery settings
In the case that you upgrade to version 23H2 from version 22H2 or 21H2 using the “Installation Assistant” tool or any other in-place upgrade method or you upgraded from Windows 10, you can use the “Recovery” settings to uninstall Windows 11 23H2 and rollback to the previous version of the operating system.
To uninstall Windows 11 23H2 from version 22H2, 21H2, or Windows 10, use these steps:
-
Open Settings.
-
Click on System.
-
Click the Recovery page on the right side.
-
Under the “Recovery options” section, click the Go back button.

-
Select the reason for uninstalling Windows 11 23H2.

-
Click the Next button.
-
Click the “No, thanks” button.
-
Click the Next button.

-
Click the Next button again.

-
Click the “Go back to earlier build” button to uninstall version 23H2.
Once you complete the steps, the Windows 11 23H2 update will be removed from the computer, reverting the system to version 22H2, 21H2, or Windows 10, keeping your files and most of your settings and apps.
If the recovery option shows the “this option is no longer available on this PC” message, it’s possible to continue with the downgrade. However, you will need to perform a clean installation of Windows 11 and restore the files from a previous backup.
Update November 1, 2023: This guide has been updated to ensure accuracy and reflect new changes.
Mauro Huculak is a Windows How-To Expert and founder of Pureinfotech in 2010. With over 22 years as a technology writer and IT Specialist, Mauro specializes in Windows, software, and cross-platform systems such as Linux, Android, and macOS.
Certifications: Microsoft Certified Solutions Associate (MCSA), Cisco Certified Network Professional (CCNP), VMware Certified Professional (VCP), and CompTIA A+ and Network+.
Mauro is a recognized Microsoft MVP and has also been a long-time contributor to Windows Central.
You can follow him on YouTube, Threads, BlueSky, X (Twitter), LinkedIn and About.me. Email him at [email protected].